Daemons & Dependencies
Introduction
In the tutorial and the documentation You’ve learned how to code your first plugin using relatively simple actions triggered by the user via an action command or by a task scheduled by the core (crons). The plugin is then capable of periodically retrieving information (for example, via an HTTP request) or performing all kinds of operations, as long as they can be coded in PHP.
There may be times when you need more than that; here are a few examples, though this list is not exhaustive:
- use system resources, such as a USB flash drive or other hardware (Bluetooth, etc.)
- Maintain a connection to a remote system (on a local network or over the Internet, but not Jeedom)
- keeping processes active in the background, which is not the case with PHP code, which only “lives” while the HTTP request is being executed
- perform real-time processing
To do this, a “daemon” is usually used. Don’t panic—everything is already built into the Jeedom core to help us set up this daemon, and we’ll go over the details here.
File Structure of a Daemon
The code and/or executable file for your daemon must, of course, be located in your plugin’s directory structure and must therefore be included and delivered with the archive when installing a plugin.
There are no strict rules regarding the exact location of your daemon; however, it is customary to place it in the subdirectory ./resources/ of the plugin.
In the plugin template, you’ll find the basics for implementing a Python daemon, and that’s the example we’ll be using in this documentation; however, you’re free to develop your daemon in the language of your choice, provided it can be run on the Platforms supported by Jeedom. Most Jeedom plugin daemons are written in Python or Node.js, but there are also some written in .NET Core and certainly other technologies as well.
You’ll also find some useful methods for a Node.js daemon, which may be covered in more detail in a future version of this documentation. For now, I encourage you to check out the developer community to coordinate with other developers on all matters related to Node.js, particularly regarding which version to use.
Template directory structure:
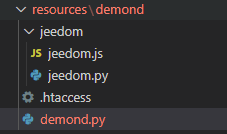
the Python daemon
In the plugin template, the daemon directory has been named demond, and the daemon itself is called demond.py.
These names are arbitrary; feel free to change them.
The convention is to use the plugin ID followed by the letter “d.” For example, for the plugin blea the directory ./resources/blead/ which contains, among other things, the file blead.py, as this file serves as the starting point for the daemon.
TIP
Feel free to use the official plugins with daemons—such as blea, openzwave, or sms—as a reference to understand the details.
The Jeedom package for a Python daemon
Jeedom provides, along with the plugin template, a Python package containing the basic classes and methods needed to manage the daemon and handle communication between the daemon and your plugin’s PHP code.
These classes are located in the directory ./resources/demond/jeedom/jeedom.py (shown in the screenshot above).
To get started, you don’t need to know the implementation details of these classes and methods, so here is just a summary of what they do.
class jeedom_utils()
This class is a collection of useful static methods such as convert_log_level to convert the log level received from Jeedom into a log level of the Python class logging or find_tty_usb to return a list of devices on the system.
We won’t go into detail about all of them here; the names of each method are fairly self-explanatory, and you’ll discover them as you dive into the code.
class jeedom_serial()
This class encapsulates reading from and writing to a device. Once again, we won’t go into detail about the class—the methods speak for themselves. Just know that it’s there if you need it.
Warning
If your daemon doesn’t need to perform this type of action, be sure not to use or import this class, because the Python package
serialis not installed by default, and in that case your daemon will not start (an issue seen several times in the community). We’ll come back to this in the section on dependency management.
class jeedom_socket() & jeedom_socket_handler()
You will not use the class jeedom_socket_handler() directly; it is only used for jeedom_socket().
The purpose of jeedom_socket() is to ensure downlink communication (from your PHP code to the daemon).
When your plugin needs to send a command to your daemon, it can do so via this socket; you’ll see an example later in this documentation.
So the class opens a TCP socket and listens. When a message is received, it is placed in a queue that will later be read by your daemon; we’ll come back to that.
Again, you don’t have to use this mechanism; you’re free to set up something else (an HTTP server, for example), but this is what Jeedom provides by default—it’s lightweight and works very well.
class jeedom_com()
This handles the upstream communication from the daemon to your PHP code.
You will mainly use send_change_immediate() at the beginning, which allows you to send a JSON payload to Jeedom via an HTTP request. It’s very simple and effective; we’ll look at an example later.
Python Demon Skeleton
Now that we’re familiar with the environment, we can turn our attention to the part that interests us most: the daemon and what we’ll need to code.
So let’s take a closer look at the skeleton of a daemon as proposed by Jeedom. Open the file demond.py and we’ll start with the last few lines, which are actually the beginning of the program:
_log_level = "error"
_socket_port = 55009 # à modifier
_socket_host = 'localhost'
_device = 'auto'
_pidfile = '/tmp/demond.pid'
_apikey = ''
_callback = ''

for arg in sys.argv:
    if arg.startswith("--loglevel="):
        temp, _log_level = arg.split("=")
    elif arg.startswith("--socketport="):
        temp, _socket_port = arg.split("=")
    elif arg.startswith("--sockethost="):
        temp, _socket_host = arg.split("=")
    elif arg.startswith("--pidfile="):
        temp, _pidfile = arg.split("=")
    elif arg.startswith("--apikey="):
        temp, _apikey = arg.split("=")
    elif arg.startswith("--device="):
        temp, _device = arg.split("=")

_socket_port = int(_socket_port)

jeedom_utils.set_log_level(_log_level)

logging.info('Start demond')
logging.info('Log level : '+str(_log_level))
logging.info('Socket port : '+str(_socket_port))
logging.info('Socket host : '+str(_socket_host))
logging.info('PID file : '+str(_pidfile))
logging.info('Apikey : '+str(_apikey))
logging.info('Device : '+str(_device))

signal.signal(signal.SIGINT, handler)
signal.signal(signal.SIGTERM, handler)

try:
    jeedom_utils.write_pid(str(_pidfile))
    jeedom_com = jeedom_com(apikey = _apikey,url = _callback,cycle=_cycle)
    if not jeedom_com.test():
        logging.error('Network communication issues. Please fixe your Jeedom network configuration.')
        shutdown()
    jeedom_socket = jeedom_socket(port=_socket_port,address=_socket_host)
    listen()
except Exception as e:
    logging.error('Fatal error : '+str(e))
    shutdown()
Some variable initializations:
_log_level = "error" # le log level par défaut, au format texte tel qu'il est envoyé par Jeedom
_socket_port = 55009 # le port que votre démon utilisera par défaut pour ouvrir le socket d'écoute de Jeedom, à modifier.
_socket_host = 'localhost' # l'interface sur laquelle ouvrir le socket, à priori ne pas changer.
_device = 'auto' # ne sert à rien si vous n'utilisez pas un device matériel
_pidfile = '/tmp/demond.pid' # emplacement par défaut du pidfile, ce fichier est utiliser par Jeedom pour savoir si votre démon est démarrer ou pas; nom du démon à modifier comme expliqué ci-dessus;
_apikey = '' # apikey pour authentifier la communication entre Jeedom et votre démon
_callback = '' ## l'url de callback pour envoyer les notifications à Jeedom (et à votre code php)
Warning
You need to be very careful when choosing the port you’ll use for your socket; this is an area for improvement in Jeedom, as there’s no mechanism in place to prevent collisions: so if another plugin uses the same port as you, it will obviously cause a problem. For now, the only way to make this choice is to check which ports are already in use among existing plugins and coordinate with the community (there are already open threads on this topic). Additionally, it’s important to allow users to configure this setting within your plugin’s configuration so that the port number can be changed if such a conflict were to occur.
Next, we retrieve the arguments received via the command line; this command line will be generated by your PHP code—we’ll come back to that later.
It’s up to you to remove anything that isn’t needed (such as the device argument) or to add others, such as a user/pswd, if your daemon needs to connect to a remote system.
for arg in sys.argv:
    if arg.startswith("--loglevel="):
        temp, _log_level = arg.split("=")
    elif arg.startswith("--socketport="):
        temp, _socket_port = arg.split("=")
    elif arg.startswith("--sockethost="):
        temp, _socket_host = arg.split("=")
    elif arg.startswith("--pidfile="):
        temp, _pidfile = arg.split("=")
    elif arg.startswith("--apikey="):
        temp, _apikey = arg.split("=")
    elif arg.startswith("--device="):
        temp, _device = arg.split("=")
Next, there are a few lines of log output and these two lines—standard in Python—that simply record the method to be called if these two interrupt signals are received, which will stop the daemon:
signal.signal(signal.SIGINT, handler)
signal.signal(signal.SIGTERM, handler)
and the method handler which is defined a little further up in the daemon:
def handler(signum=None, frame=None):
    logging.debug("Signal %i caught, exiting..." % int(signum))
    shutdown()
which simply adds a log entry and calls the method shutdown() defined just below:
def shutdown():
    logging.debug("Shutdown")
    logging.debug("Removing PID file " + str(_pidfile))
    try:
        os.remove(_pidfile)
    except:
        pass
    try:
        jeedom_socket.close()
    except:
        pass
    try:
        jeedom_serial.close()
    except:
        pass
    logging.debug("Exit 0")
    sys.stdout.flush()
    os._exit(0)
This is where you should write the code to be executed if the daemon shuts down—for example, logging out of the remote system and gracefully closing any open connections.
Warning
You’ll need to adapt this method and remove any code that isn’t necessary for your situation, particularly the try/except block on
jeedom_serial.close()if you are not using this class.
Going back to the daemon startup, here is the rest of the code with comments:
try:
    jeedom_utils.write_pid(str(_pidfile)) # écrit le pidfile que le core de jeedom va surveiller pour déterminer si le démon est démarré
    jeedom_com = jeedom_com(apikey = _apikey,url = _callback,cycle=_cycle) # création de l'objet jeedom_com
    if not jeedom_com.test(): #premier test pour vérifier que l'url de callback est correcte
        logging.error('Network communication issues. Please fixe your Jeedom network configuration.')
        shutdown()
    jeedom_socket = jeedom_socket(port=_socket_port,address=_socket_host) # on déclare le socket pour recevoir les ordres de jeedom
    listen() # et on écoute
except Exception as e:
    logging.error('Fatal error : '+str(e))
    shutdown()
The Method listen() defined at the beginning of the file:
def listen():
    jeedom_socket.open()
    try:
        while 1:
            time.sleep(0.5)
            read_socket()
    except KeyboardInterrupt:
        shutdown()
Nothing to change here; you can see that the socket is open, followed by an infinite loop that reads from the socket every half-second.
The Method read_socket()
def read_socket():
    global JEEDOM_SOCKET_MESSAGE
    if not JEEDOM_SOCKET_MESSAGE.empty():
        logging.debug("Message received in socket JEEDOM_SOCKET_MESSAGE")
        message = json.loads(jeedom_utils.stripped(JEEDOM_SOCKET_MESSAGE.get()))
        if message['apikey'] != _apikey:
            logging.error("Invalid apikey from socket : " + str(message))
            return
        try:
            print 'read'
        except Exception, e:
            logging.error('Send command to demon error : '+str(e))
The variable JEEDOM_SOCKET_MESSAGE is a queue() Python powered by the class jeedom_socket() as discussed earlier.
If the queue is not empty, load the JSON and verify that the API key received with the message matches the one received when the daemon started (_apikey) Then we can read the message and perform our actions in the try/except block:
        try:
            print 'read'
        except Exception, e:
            logging.error('Send command to demon error : '+str(e))
So instead of the print 'read' It’s up to you to read the relevant parts of the message that your plugin has sent and to trigger actions or call your plugin’s own classes or methods.
From here on, you have a daemon that can be run even if it doesn’t do anything yet (that’s your job).
Modifying the plugin’s PHP code
Having a daemon and understanding its structure is all well and good, but a few key elements are missing that would allow your plugin (PHP code) to control that daemon and ensure that the core is also aware of its existence.
plugin_info/info.json
In your plugin’s info.json file, you need to add the property hasOwnDeamon and assign the value true, example:
{
    "id" : "pluginID",
    "name" : "pluginName",
    ...
    "hasDependency" : true,
    "hasOwnDeamon" : true,
    "maxDependancyInstallTime" : 10,
    ...
}
We’ll look at how to use hasDependency and maxDependancyInstallTime.
Daemon Management in Your eqLogic Class
In your plugin’s eqLogic class, there are a few methods you need to implement to ensure proper management of the daemon.
daemon_info() function
The feature deamon_info() will be called by the core when the next frame is displayed on your plugin’s configuration page; it must exist:

Typically, it will look like this; the returned array and the keys used in that array are obviously important. You can copy and paste the code below as is and modify the code at the end of the function to verify the configuration required for your plugin.
    public static function deamon_info() {
        $return = array();
        $return['log'] = __CLASS__;
        $return['state'] = 'nok';
        $pid_file = jeedom::getTmpFolder(__CLASS__) . '/deamon.pid';
        if (file_exists($pid_file)) {
            if (@posix_getsid(trim(file_get_contents($pid_file)))) {
                $return['state'] = 'ok';
            } else {
                shell_exec(system::getCmdSudo() . 'rm -rf ' . $pid_file . ' 2>&1 > /dev/null');
            }
        }
        $return['launchable'] = 'ok';
        $user = config::byKey('user', __CLASS__); // exemple si votre démon à besoin de la config user,
        $pswd = config::byKey('password', __CLASS__); // password,
        $clientId = config::byKey('clientId', __CLASS__); // et clientId
        if ($user == '') {
            $return['launchable'] = 'nok';
            $return['launchable_message'] = __('Le nom d\'utilisateur n\'est pas configuré', __FILE__);
        } elseif ($pswd == '') {
            $return['launchable'] = 'nok';
            $return['launchable_message'] = __('Le mot de passe n\'est pas configuré', __FILE__);
        } elseif ($clientId == '') {
            $return['launchable'] = 'nok';
            $return['launchable_message'] = __('La clé d\'application n\'est pas configurée', __FILE__);
        }
        return $return;
    }
Warning
There is no typo in the example; the method is indeed named
deamon_info()and notdaemon_info, the error is in the core.
The Key state obviously corresponds to the status displayed on the screen; as shown above, we are checking for the presence of our “pid_file” to determine whether the daemon is running or not.
The Key launchable corresponds to the “Configuration” column in the pane, so you can verify that the configuration is complete and correct before starting the daemon. launchable_message allows a message to be displayed to the user in the event of a “NOK”
daemon_start() function
The feature deamon_start() is, as the name suggests, the method that the core will call to start your daemon.
You can copy and paste the code below as is and modify the indicated lines.
    public static function deamon_start() {
        self::deamon_stop();
        $deamon_info = self::deamon_info();
        if ($deamon_info['launchable'] != 'ok') {
            throw new Exception(__('Veuillez vérifier la configuration', __FILE__));
        }

        $path = realpath(dirname(__FILE__) . '/../../resources/demond'); // répertoire du démon à modifier
        $cmd = system::getCmdPython3(__CLASS__) . " {$path}/demond.py"; // nom du démon à modifier
        $cmd .= ' --loglevel ' . log::convertLogLevel(log::getLogLevel(__CLASS__));
        $cmd .= ' --socketport ' . config::byKey('socketport', __CLASS__, '55009'); // port par défaut à modifier
        $cmd .= ' --callback ' . network::getNetworkAccess('internal', 'http:127.0.0.1:port:comp') . '/plugins/template/core/php/jeeTemplate.php'; // chemin de la callback url à modifier (voir ci-dessous)
        $cmd .= ' --user "' . trim(str_replace('"', '\"', config::byKey('user', __CLASS__))) . '"'; // on rajoute les paramètres utiles à votre démon, ici user
        $cmd .= ' --pswd "' . trim(str_replace('"', '\"', config::byKey('password', __CLASS__))) . '"'; // et password
        $cmd .= ' --apikey ' . jeedom::getApiKey(__CLASS__); // l'apikey pour authentifier les échanges suivants
        $cmd .= ' --pid ' . jeedom::getTmpFolder(__CLASS__) . '/deamon.pid'; // et on précise le chemin vers le pid file (ne pas modifier)
        log::add(__CLASS__, 'info', 'Lancement démon');
        $result = exec($cmd . ' >> ' . log::getPathToLog('template_daemon') . ' 2>&1 &'); // 'template_daemon' est le nom du log pour votre démon, vous devez nommer votre log en commençant par le pluginid pour que le fichier apparaisse dans la page de config
        $i = 0;
        while ($i < 20) {
            $deamon_info = self::deamon_info();
            if ($deamon_info['state'] == 'ok') {
                break;
            }
            sleep(1);
            $i++;
        }
        if ($i >= 20) {
            log::add(__CLASS__, 'error', __('Impossible de lancer le démon, vérifiez le log', __FILE__), 'unableStartDeamon');
            return false;
        }
        message::removeAll(__CLASS__, 'unableStartDeamon');
        return true;
    }
Change only the lines that have a comment; the rest should remain unchanged.
Note that we start by stopping the daemon; this is to handle the restart.
Next, we check whether the daemon can actually be started using the method deamon_info() and we generate the command line in the variable $cmd to start our daemon, here using Python 3. Note the use of the function system::getCmdPython3(__CLASS__) which will set the path to Python 3 so that this works with Debian 12 if your dependencies are installed via the core.
daemon_stop() function
This method will be used to stop the daemon: we retrieve the daemon’s PID, which has been written to the “pid_file,” and send the kill signal to the process.
    public static function deamon_stop() {
        $pid_file = jeedom::getTmpFolder(__CLASS__) . '/deamon.pid'; // ne pas modifier
        if (file_exists($pid_file)) {
            $pid = intval(trim(file_get_contents($pid_file)));
            system::kill($pid);
        }
        system::kill('templated.py'); // nom du démon à modifier
        sleep(1);
    }
At this point, you have declared the daemon in info.json and implemented the three methods required for the Jeedom core to start and stop your daemon, as well as display its status. The prerequisites are now in place.
Communication between the daemon and the PHP code
We still need to handle communication to and from the daemon. In the Python code, we’ve already seen how this is handled: as a reminder, the method listen() and read_socket() that listens on a socket and the method send_change_immediate() to send a JSON payload to the PHP code.
So you need to handle the equivalent on the PHP side.
Send a message to the daemon
This feature is not included in the core and is not standard for all Jeedom plugins; it is also not required. This is the function that I (@Mips) use in each of my plugins that have a daemon; I’m posting it here, and you can do whatever you want with it ;-)
It therefore receives an array of values as a parameter and is responsible for sending it to the daemon’s socket, which can then read this array in the method read_socket() that we saw earlier.
    public static function sendToDaemon($params) {
        $deamon_info = self::deamon_info();
        if ($deamon_info['state'] != 'ok') {
            throw new Exception("Le démon n'est pas démarré");
        }
        $params['apikey'] = jeedom::getApiKey(__CLASS__);
        $payLoad = json_encode($params);
        $socket = socket_create(AF_INET, SOCK_STREAM, 0);
        socket_connect($socket, '127.0.0.1', config::byKey('socketport', __CLASS__, '55009')); //port par défaut de votre plugin à modifier
        socket_write($socket, $payLoad, strlen($payLoad));
        socket_close($socket);
    }
What’s in the table $params and how you use that data in your daemon is up to you; it depends on what your plugin does.
As a reminder, this array will be retrieved in the method read_socket(); excerpt from the Python code:
        if message['apikey'] != _apikey:
            logging.error("Invalid apikey from socket : " + str(message))
            return
        try:
            print 'read'
        except Exception, e:
            logging.error('Send command to demon error : '+str(e))
You can clearly see the “apikey” key added by the PHP code, which will be read by the Python code in the “message” array.
Receiving a message from the daemon
To do this, we need to add a file to our plugin in the folder ./core/php/. By convention, we’ll name this file jee[pluginId].php. /plugins/[pluginId]/core/php/jee[pluginId].php will therefore be the path to use as the callback URL in the method deamon_start()
Here is the basic content you can copy and paste into this file:
<?php

try {
    require_once dirname(__FILE__) . "/../../../../core/php/core.inc.php";

    if (!jeedom::apiAccess(init('apikey'), 'template')) { //remplacez template par l'id de votre plugin
        echo __('Vous n\'êtes pas autorisé à effectuer cette action', __FILE__);
        die();
    }
    if (init('test') != '') {
        echo 'OK';
        die();
    }
    $result = json_decode(file_get_contents("php://input"), true);
    if (!is_array($result)) {
        die();
    }

    if (isset($result['key1'])) {
        // do something
    } elseif (isset($result['key2'])) {
        // do something else
    } else {
        log::add('template', 'error', 'unknown message received from daemon'); //remplacez template par l'id de votre plugin
    }
} catch (Exception $e) {
    log::add('template', 'error', displayException($e)); //remplacez template par l'id de votre plugin
}
The code begins by verifying that the API key is correct:
    if (!jeedom::apiAccess(init('apikey'), 'template')) { //remplacez template par l'id de votre plugin
        echo __('Vous n\'êtes pas autorisé à effectuer cette action', __FILE__);
        die();
    }
The first test serves as a test method when the daemon starts (see call jeedom_com.test() in the daemon’s code):
    if (init('test') != '') {
        echo 'OK';
        die();
    }
and finally, we load the payload and decode it into the array $result:
    $result = json_decode(file_get_contents("php://input"), true);
    if (!is_array($result)) {
        die();
    }
Next, it’s up to you to read the table and perform the appropriate actions in your plugin. For example:
    if (isset($result['key1'])) {
        // do something
    } elseif (isset($result['key2'])) {
        // do something else
    } else {
        log::add('template', 'error', 'unknown message received from daemon'); //remplacez template par l'id de votre plugin
    }
The Python code to send the message will look like this:
jeedom_com.send_change_immediate({'key1' : 'value1', 'key2' : 'value2' })
There you go—you now have a fully functional daemon, and you can communicate back and forth between your daemon and your PHP code. The hardest part is still ahead: coding the daemon’s logic.
Outbuildings
When writing a daemon, we will very often need external libraries in addition to our own classes.
On Debian, you’ll typically use the apt tool to install the necessary packages, and for Python 3, you’ll use pip3.
And to manage this, once again, everything is built into Jeedom’s core to help us through two distinct methods:
- The procedural approach. This was the only method available with versions of Jeedom prior to 4.2
- The JSON configuration file method. This method was introduced in version 4.2 of the Jeedom core.
Both methods can be implemented in the same plugin.
- If both methods are implemented in a plugin:
- Cores prior to version 4.2 will use the procedure-based method.
- Core 4.2 and later versions will use the JSON configuration file method.
- If only the procedural method is implemented in a plugin:
- All cores will use this method.
- If only the JSON configuration file method is implemented in a plugin.
- The plugin will not be compatible with core versions earlier than 4.2
Both methods have their pros and cons. It’s up to you to choose based on your situation.
Declaration in plugin_info/info.json
In both cases, you need to adjust your file info.json.
Just like in the example for declaring the daemon, you need to add the property hasDependency and assign the value true:
{
    "id" : "pluginID",
    "name" : "pluginName",
    ...
    "hasDependency" : true,
    "hasOwnDeamon" : true,
    "maxDependancyInstallTime" : 30,
    ...
}
The Property maxDependancyInstallTime is the time in minutes after which the core will consider the installation to have failed.
In this case, the daemon’s auto mode will be disabled, and a message will be posted to the notification center.
If this property is not set, the default timeout will be 30 minutes.
TIP
The installation script will not be interrupted, so it may eventually complete successfully. This simply refers to the time after which the core stops waiting and no longer displays the progress.
The JSON configuration file method
Creating the plugin_info/packages.json file
The syntax of this file is described here. See also the blog’s inaugural post.
This file may contain any of the following sections:
pre-install: the path to a script to be run before installation
Example:
{
  "pre-install" : {
    "script" : "plugins/[pluginID]/resources/pre-install.sh"
  }
post-installation
This can be either the path to a script to be run after installation, or the action to restart Apache. Example:
{
  "post-install" : {
    "restart_apache" : true,
    "script" : "plugins/[pluginID]/resources/post-install.sh"
  }
apt: Debian dependencies
Example
{
  "apt" : {
    "libav-tools" : {"alternative" : ["ffmpeg"]},
    "ffmpeg" : {"alternative" : ["libav-tools"]},
    "python-pil" : {},
    "php-gd" : {}
  }
}
For each package, you can specify version To set a version, alternative if available,
optional if it’s optional, reinstall to force the package to be reinstalled, remark to add a free-form comment.
pip3: Python 3 dependencies
Example:
{
  "apt" : {
    "python3-pyudev" : {},
    "python3-requests" : {},
    "python3-dev" : {}
  },
  "pip3" : {
    "wheel" : {},
    "pyserial" : {},
    "tornado" : {},
    "zigpy" : {"reinstall" : true},
    "zha-quirks" : {"reinstall" : true},
    "zigpy-znp" : {"reinstall" : true},
    "zigpy-xbee" : {"reinstall" : true},
    "zigpy-deconz" : {"reinstall" : true},
    "zigpy-zigate" : {"reinstall" : true},
    "zigpy-cc" : {"reinstall" : true},
    "bellows" : {"reinstall" : true}
  }
}
Hint
Starting with Jeedom version 4.4.9, the core can manage the installation of Python 3 dependencies on Debian 12. The dependencies will be installed in a venv (virtual environment) You must adapt your plugin accordingly and stop hard-coding the path to
python3but usesystem::getCmdPython3(__CLASS__)instead. Example:$cmd = system::getCmdPython3(__CLASS__) . " {$path}/demond.py";
npm: dependencies for Node.js
For Node.js, the dependencies are in a separate file packages.json in its own format,
placed in the directory /resources For example, this is the file that will be specified in the Jeedom file:
{
  "apt" : {
    "nodejs" : {}
  },
  "npm" : {
    "plugins/dyson/resources/dysond"  : {}
  }
}
composer: to install another PHP dependency
No examples on hand; the syntax is similar to that of other packages, using the keyword composer.
Dependencies on another plugin
If a plugin requires the installation of another plugin, this can also be done using the following syntax: The plugin must be free or have already been purchased:
{
    "plugin":{
        "mqtt2": {}
    }
}
The procedural method
There are two prerequisites that we’ll go over right now.
Installation of outbuildings
In your eqLogic class, you must add this function if it does not already exist. You can copy and paste this one as is without making any changes.
    public static function dependancy_install() {
        log::remove(__CLASS__ . '_update');
        return array('script' => dirname(__FILE__) . '/../../resources/install_#stype#.sh ' . jeedom::getTmpFolder(__CLASS__) . '/dependance', 'log' => log::getPathToLog(__CLASS__ . '_update'));
    }
This function first deletes the log from the previous installation, if one exists, and then returns the script command to be executed and the log location to the core.
Note that the returned script file is named install_#stype#.sh. In fact, #stype# will be dynamically replaced by the core using the appropriate package manager depending on the system on which Jeedom is installed. Therefore #stype# will be replaced by apt on a Debian system.
This makes it possible to provide dependency installation scripts for multiple systems and thus support platforms other than Debian/apt, which is the bare minimum and the only one we’ll be managing here.
The first argument: jeedom::getTmpFolder(__CLASS__) . '/dependance' is the file used to track the installation progress (the percentage that appears on the screen during installation).
That’s it for the PHP part; now we need to create the script in ./resources/install_apt.sh and, of course, the contents of the script will depend on your plugin and the packages you want to install.
Here’s a fairly simple example script from one of my plugins, but you can create much more comprehensive and advanced ones:
Warning
Starting with Debian 12, you must install Python packages in a virtual environment, so this sample script will no longer work as is; you’ll need to adapt it accordingly.
I also invite you to check out this documentation, which offers an alternative: https://github.com/Mips2648/dependance.lib/blob/master/pyenv.md
PROGRESS_FILE=/tmp/jeedom/template/dependance #remplacez template par l'ID de votre plugin

if [ ! -z $1 ]; then
    PROGRESS_FILE=$1
fi
touch ${PROGRESS_FILE}
echo 0 > ${PROGRESS_FILE}
echo "*************************************"
echo "*   Launch install of dependencies  *"
echo "*************************************"
echo $(date)
echo 5 > ${PROGRESS_FILE}
apt-get clean
echo 10 > ${PROGRESS_FILE}
apt-get update
echo 20 > ${PROGRESS_FILE}

echo "*****************************"
echo "Install modules using apt-get"
echo "*****************************"
apt-get install -y python3 python3-requests python3-pip python3-voluptuous python3-bs4
echo 60 > ${PROGRESS_FILE}

echo "*************************************"
echo "Install the required python libraries"
echo "*************************************"
python3 -m pip install "aiohttp"
echo 80 > ${PROGRESS_FILE}

echo 100 > ${PROGRESS_FILE}
echo $(date)
echo "***************************"
echo "*      Install ended      *"
echo "***************************"
rm ${PROGRESS_FILE}
Let’s break it down a bit:
First, let’s set the default location for the progress file in case we didn’t complete the previous step correctly… And we use the first argument received as the location because we did the previous step correctly ;-).
PROGRESS_FILE=/tmp/jeedom/template/dependance #remplacez template par l'ID de votre plugin

if [ ! -z $1 ]; then
    PROGRESS_FILE=$1
fi
Lines of the type echo 60 > ${PROGRESS_FILE} are obviously used to reverse the progress bar: to reassure the user, we keep adding to it until it reaches 100 (users usually get stressed when it goes over 100, so we avoid that).
A few tips:
- Don’t do
apt-get upgrade! You don’t know what’s on the machine, and it’s not your job to update everything. - Do not use
aptbutapt-get.aptis designed for interactive use, and this will trigger a warning. - Add the flag
-ywhen necessary to confirm prompts; otherwise, the script will stop with a message likeDo you want to continue [y/n]and the user will be locked out. - Prefer the following syntax
python3 -m pip install ...rather thanpip3 install ...to install the Python packages, because the second one will cause problems ifpip3(orpipif you’re using Python v2) isn’t linked to the same version as Python 3: for example, if Python 3 points to version 3.7 and pip3 points to 3.9 or, worse yet, 2.7; You don’t know what changes have been made to the system, and you’re not immune to this kind of problem on the user’s machine; there are dozens of reported cases on the community forum.
Warning
It is very important to install all the necessary packages and to pay special attention to those that are very often already installed… but not always. There are frequently problems with packages
python3-requests,python3-pipand/orserial. These are not pre-installed on a base Debian system but are very often already installed by another plugin… unless your plugin is the first one, in which case your daemon will not start. This happens more often than you might think.
Check Status
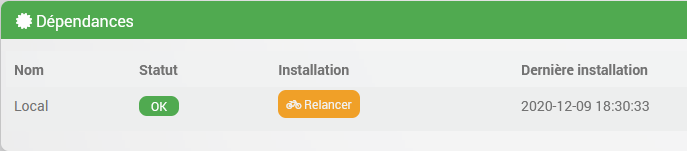
So this is our PHP function dependancy_install() which will be called by the core and will allow us to run our script ./resources/install_apt.sh when the user clicks the “Rerun” button, or automatically by the core when it detects that dependencies are either not installed or not up to date.
But how does the core know the status, and how does it display it in the box above? Thanks to the function dependancy_info() that we need to add to our eqLogic class.
Here is an example that you can use as a basis:
    public static function dependancy_info() {
        $return = array();
        $return['log'] = log::getPathToLog(__CLASS__ . '_update');
        $return['progress_file'] = jeedom::getTmpFolder(__CLASS__) . '/dependance';
        if (file_exists(jeedom::getTmpFolder(__CLASS__) . '/dependance')) {
            $return['state'] = 'in_progress';
        } else {
            if (exec(system::getCmdSudo() . system::get('cmd_check') . '-Ec "python3\-requests|python3\-voluptuous|python3\-bs4"') < 3) { // adaptez la liste des paquets et le total
                $return['state'] = 'nok';
            } elseif (exec(system::getCmdSudo() . 'pip3 list | grep -Ewc "aiohttp"') < 1) { // adaptez la liste des paquets et le total
                $return['state'] = 'nok';
            } else {
                $return['state'] = 'ok';
            }
        }
        return $return;
    }
In this example, we check for the presence of apt packets: system::getCmdSudo() . system::get('cmd_check') . '-Ec "python3\-requests|python3\-voluptuous|python3\-bs4"'. Here, we want python3-requests, python3-voluptuous and python3-bs4 and therefore the command must return 3, hence the comparison: < 3.
The same goes for Python packages: pip3 list | grep -Ewc "aiohttp"'. The presence of aiohttp is validated; there’s only one package, so let’s compare: < 1;
Warning
Starting with Debian 12, you must install Python packages in a virtual environment, so this command will no longer work as is; you’ll need to adapt it accordingly.
So it’s very simple: the list of packages and the total are the only items you need to modify if you’re only running this type of check; otherwise, it will be easy to add any other relevant tests for your specific situation.