Instalación de Openjabnab
Aquí hay un tutorial sobre cómo instalar openjabnab localmente (en un rpi o zumbido)
Nota
Este tutorial está inspirado en gran medida por este
Instalación de dependencias
Una vez que el sistema instalado en SSH haya terminado :
apt-get update
apt-get dist-upgrade
apt-get install ssh
apt-get install apache2 php5 php5-mysql libapache2-mod-php5
a2enmod rewrite
apt-get install make
apt-get install build-essential
apt-get install libqt4-dev --fix-missing
apt-get install qt4-dev-tools
apt-get install bind9
apt-get install git
Configuración de red
Luego debe recuperar la dirección IP del sistema :
ifconfig
El resultado es :
eth0      Link encap:Ethernet  HWaddr d0:63:b4:00:54:98
          inet addr:192.168.0.162  Bcast:192.168.0.255  Mask:255.255.255.0
          inet6 addr: fe80::d263:b4ff:fe00:5498/64 Scope:Link
          UP BROADCAST RUNNING MULTICAST  MTU:1500  Metric:1
          RX packets:10721 errors:0 dropped:0 overruns:0 frame:0
          TX packets:6477 errors:0 dropped:0 overruns:0 carrier:0
          collisions:0 txqueuelen:1000
          RX bytes:2032942 (1.9 MiB)  TX bytes:1230703 (1.1 MiB)
Aquí la dirección IP es 192.168.0.162.
Nota
Para el resto del tutorial usaré esta IP, por supuesto, se reemplazará de acuerdo con la que realmente tiene
Luego edite el archivo /etc/resolv.conf
vim /etc/resolv.conf
Y añadir :
nameserver 192.168.0.162
Configuración DNS
Edite el archivo /etc/bind/named.conf.local
cd /etc/bind/
vim named.conf.local
Y añadir :
zone "raspberry.pi"{
 type master;
 file "/etc/bind/db.raspberry.pi";
};
zone "0.168.192.in-addr.arpa"{
 type master;
 file "/etc/bind/db.192.168.0.inv";
};
Crea el archivo db.raspberry.pi
vim db.raspberry.pi ---
Y poner en ello :
$TTL 604800
@ IN SOA ojn.raspberry.pi. root.raspberry.pi. (
 1 ; Serial
 604800 ; Refresh
 86400 ; Retry
 2419200 ; Expire
 604800 ) ; Negative Cache TTL
;
@ IN NS ojn.raspberry.pi.
ojn IN A 192.168.0.162
192.168.0.162 IN A 192.168.0.162
Luego crea este archivo db.192.168.0.inv
vim db.192.168.0.inv
Y poner :
$TTL 604800
@ IN SOA ojn.raspberry.pi. root.localhost. (
 2 ; Serial
 604800 ; Refresh
 86400 ; Retry
 2419200 ; Expire
 604800 ) ; Negative Cache TTL
;
@ IN NS ojn.raspberry.pi.
162 IN PTR ojn.raspberry.pi.
Importante
Recuerde reemplazar el 162 en la última línea con la última parte de la ip de su sistema
Lanzar DNS :
/etc/init.d/bind9 start
Prueba si es bueno :
ping ojn.raspberry.pi
Deberías tener :
root@cubox-i:/home/ojn# ping ojn.raspberry.pi
PING ojn.raspberry.pi (192.168.0.162) 56(84) bytes of data.
64 bytes from ojn.raspberry.pi (192.168.0.162): icmp_seq=1 ttl=64 time=0.069 ms
64 bytes from ojn.raspberry.pi (192.168.0.162): icmp_seq=2 ttl=64 time=0.067 ms
64 bytes from ojn.raspberry.pi (192.168.0.162): icmp_seq=3 ttl=64 time=0.059 ms
64 bytes from ojn.raspberry.pi (192.168.0.162): icmp_seq=4 ttl=64 time=0.068 ms
^C
--- ojn.raspberry.pi ping statistics ---
4 packets transmitted, 4 received, 0% packet loss, time 3000ms
rtt min/avg/max/mdev = 0.059/0.065/0.069/0.010 ms
Nota
Tienes que hacer ctrl + c para salir del ping
Por seguridad también agregaremos la resolución en / etc / hosts, do :
vim /etc/hosts
Y añadir :
192.168.0.162 ojn.raspberry.pi
Recuperación de Openjabnab
Primero crearemos el usuario :
adduser ojn
cd /home/ojn
Luego clone openjabnab :
git clone https://github.com/OpenJabNab/OpenJabNab.git
chown -R ojn:ojn /home/ojn/OpenJabNab/
chmod 0777 /home/ojn/OpenJabNab/http-wrapper/ojn_admin/include
Configuración del servidor web
Hacer :
cd /etc/apache2/sites-available/
vim ojn.conf
Y añadir :
<VirtualHost *:80>
        DocumentRoot /home/ojn/OpenJabNab/http-wrapper/
        ServerName ojn.raspberry.pi
         <Directory />
                 Options FollowSymLinks
                AllowOverride None
         </Directory>
         <Directory /home/ojn/OpenJabNab/http-wrapper/>
                 Options Indexes FollowSymLinks MultiViews
                 AllowOverride all
                Order allow,deny
                 allow from all
         </Directory>
</VirtualHost>
Luego active el sitio :
a2ensite ojn
Luego debe autorizar el directorio del servidor openjabnab, hacer :
vim /etc/apache2/apache2.conf
Y añadir :
<Directory /home/ojn/>
        Options Indexes FollowSymLinks
        AllowOverride None
        Require all granted
</Directory>
Luego reiniciamos apache :
service apache2 reload
Instalación de openjabnab
Hacer :
su ojn
cd /home/ojn/OpenJabNab/server
qmake -r
make
Nota
Este paso puede ser muy largo (hasta 45 minutos)
Configuración de Openjabnab
Hacer :
cp openjabnab.ini-dist bin/openjabnab.ini
vim bin/openjabnab.ini
Y cambia las siguientes líneas :
StandAloneAuthBypass = true
AllowAnonymousRegistration = true
AllowUserManageBunny = true
AllowUserManageZtamp = true
Y reemplazar todo my.domain.com por ojn.raspberry.pi
Configuración del servidor web Openjabnab
En tu publicación debes editar el archivo C:\Windows\System32\drivers\etc y añadir :
192.168.0.162 ojn.raspberry.pi
Entonces sigue :
http://ojn.raspberry.pi/ojn_admin/install.php
Validar todo
Lanzamiento del servidor
Ahora todo está listo, todo lo que queda es iniciar el servidor :
su ojn
cd ~/OpenJabNab/server/bin
./openjabnab
Ahora ve a :
http://ojn.raspberry.pi/ojn_admin/index.php
Nota
Si todo está bien, debería tener las estadísticas que aparecen a continuación
Configuración de conejo
Para configurar el conejo es bastante simple, tienes que desenchufarlo y volver a enchufarlo, sigue presionando su botón. Normalmente debería iluminarse de azul.
Luego, con su PC, debe tener una nueva red wifi nabaztagXX, conéctese escribiendo 192.168.0.1.
Una vez encendido ingrese su configuración wifi y la siguiente información :
DHCP enabled : no
Local Mask : 255.255.255.0
Local gateway : 192.168.0.1 ou 192.168.0.254 (en fonction de votre réseau)
DNS server : 192.168.0.162
Supervisión del servidor Openjabnab e inicio automático
Como notará si cierra su sesión, el servidor openjabnab se detiene. Entonces, agregue un pequeño script para monitorear el servidor e iniciarlo automáticamente. Hacer :
cd /home/ojn
vim checkojn.sh
Y agrega :
if [ $(ps ax | grep openjabnab | grep -v grep | wc -l) -eq 0 ]; then
    su ojn; cd /home/ojn/OpenJabNab/server/bin;nohup ./openjabnab >> /dev/null 2>&1 &
fi
Entonces haz :
chmod +x checkojn.sh
Ahora debemos agregar el script al inicio y una verificación cada 15 minutos, por ejemplo :
crontab -e
Y añadir :
@reboot /home/ojn/checkojn.sh
*/15 * * * * /home/ojn/checkojn.sh
Importante
Es absolutamente necesario ponerlo en el crontab raíz, si todavía está con el usuario ojn do ctrl + D
Configuración de tu conejo en openjabnab
Seguir :
http://ojn.raspberry.pi/ojn_admin/index.php
Usted debe tener :
Ahora debe crear una cuenta haciendo clic en crear usuario :
Complete la información solicitada e inicie sesión :
Una vez conectado, vaya al servidor :
Luego baje para encontrar la lista de conejos conectados y obtenga su dirección mac :
Luego vaya a la cuenta y complete el nombre y el campo mac del conejo y confirme :
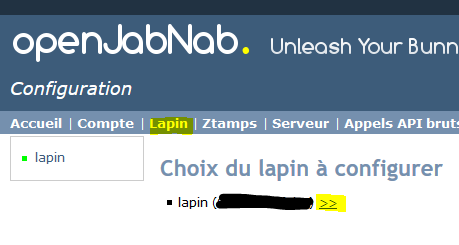
Ahora encontrará su conejo en la página del conejo, haga clic en él para abrir su configuración :
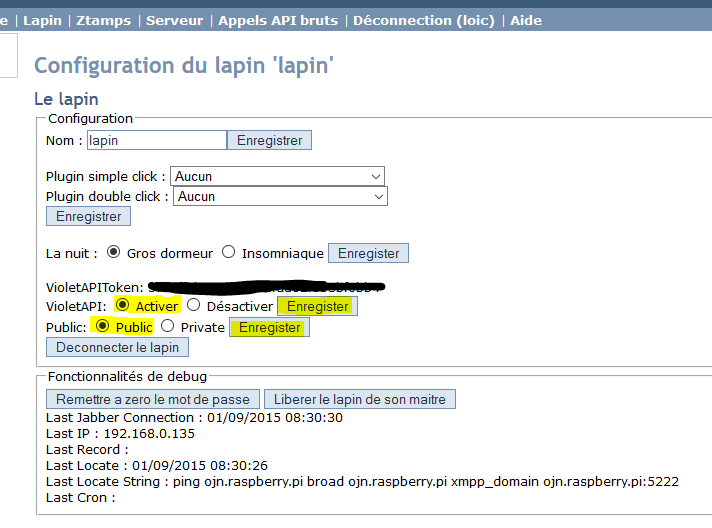
Ahora debe activar la API púrpura y pasarla en público, también es aquí donde encontrará la clave API púrpura que se usará para Jeedom :
A continuación encontrará la lista de complementos, no olvide activarlos (tipo TTS o control auditivo) :
Configuración de Jeedom
La configuración en Jeedom es bastante simple, primero debe conectarse en SSH a Jeedom (si tiene un cuadro Jeedom, los identificadores están en el documento de instalación). Luego edite el archivo / etc / hosts
vim /etc/hosts
Y agregue la siguiente línea :
192.168.0.162 ojn.raspberry.pi
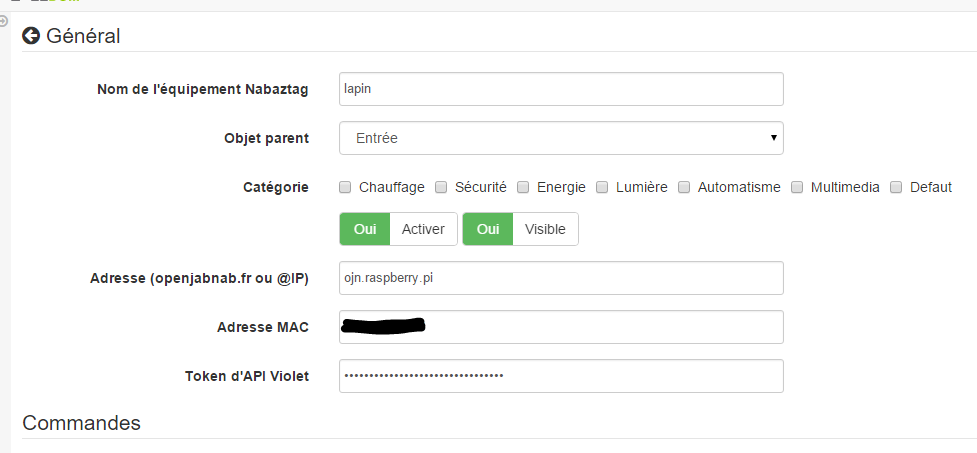
Entonces todo sucede en Jeedom, después de crear tu conejo aquí está la configuración para poner:
Aquí está tu conejo ahora tiene su propia madriguera local !!!!!
Poner el TTS localmente
Todo es local excepto el TTS que pasa por el sitio de Acapela, pero es posible modificando algunos archivos para pasarlo localmente
Nota
Consideraré que oenjabnab está instalado en / home / ojn / OpenJabNab y que ha iniciado sesión como usuario de openjabnab, aquí ojn
Creación de tts jeedom
Necesita crear una carpeta jeedom en servver / tts :
mkdir /home/ojn/OpenJabNab/server/tts/jeedom
Entonces tienes que hacer 3 archivos :
jeedom.pro
######################################################################
# Automatically generated by qmake (2.01a) sam. janv. 19 19:10:01 2008
######################################################################

TEMPLATE = lib
CONFIG -= debug
CONFIG += plugin qt release
QT += network xml
QT -= gui
INCLUDEPATH += . ../../server ../../lib
TARGET = tts_jeedom
DESTDIR = ../../bin/tts
DEPENDPATH += . ../../server ../../lib
LIBS += -L../../bin/ -lcommon
MOC_DIR = ./tmp/moc
OBJECTS_DIR = ./tmp/obj
win32 {
  QMAKE_CXXFLAGS_WARN_ON += -WX
}
unix {
  QMAKE_LFLAGS += -Wl,-rpath,\'\$$ORIGIN\'
  QMAKE_CXXFLAGS += -Werror
}

# Input
HEADERS += tts_jeedom.h
SOURCES += tts_jeedom.cpp
tts\jeedom.h
#ifndef _TTSACAPELA_H_
#define _TTSACAPELA_H_

#include <QHttp>
#include <QMultiMap>
#include <QTextStream>
#include <QThread>
#include "ttsinterface.h"

class TTSJeedom : public TTSInterface
{
  Q_OBJECT
  Q_INTERFACES(TTSInterface)

public:
  TTSJeedom();
  virtual ~TTSJeedom();
  QByteArray CreateNewSound(QString, QString, bool);

private:
};

#endif
tts\jeedom.cpp
#include <QDateTime>
#include <QUrl>
#include <QCryptographicHash>
#include <QMapIterator>
#include "tts_jeedom.h"
#include "log.h"
#include <QNetworkReply>
#include <QNetworkRequest>
#include <QNetworkAccessManager>

Q_EXPORT_PLUGIN2(tts_jeedom, TTSJeedom)

TTSJeedom::TTSJeedom():TTSInterface("jeedom", "Jeedom")
{
  voiceList.insert("fr", "fr");
}

TTSJeedom::~TTSJeedom()
{
}

QByteArray TTSJeedom::CreateNewSound(QString text, QString voice, bool forceOverwrite)
{
  QEventLoop loop;
  if(!voiceList.contains(voice))
    voice = "fr";
  // Check (and create if needed) output folder
  QDir outputFolder = ttsFolder;
  if(!outputFolder.exists(voice))
    outputFolder.mkdir(voice);

  if(!outputFolder.cd(voice))
  {
    LogError(QString("Cant create TTS Folder : %1").arg(ttsFolder.absoluteFilePath(voice)));
    return QByteArray();
  }

  // Compute fileName
  QString fileName = QCryptographicHash::hash(text.toAscii(), QCryptographicHash::Md5).toHex().append(".mp3");
  QString filePath = outputFolder.absoluteFilePath(fileName);

  if(!forceOverwrite && QFile::exists(filePath))
    return ttsHTTPUrl.arg(voice, fileName).toAscii();

  // Fetch MP3
  QHttp http("TODO_IP_JEEDOM");
  QObject::connect(&http, SIGNAL(done(bool)), &loop, SLOT(quit()));

  QByteArray ContentData;
  ContentData += "apikey=TODO_API_JEEDOM&text="+QUrl::toPercentEncoding(text);

  QHttpRequestHeader Header;
  Header.addValue("Host", "TODO_IP_JEEDOM");

  Header.setContentLength(ContentData.length());
  Header.setRequest("GET", "/core/api/tts.php?apikey=TODO_API_JEEDOM&text="+QUrl::toPercentEncoding(text), 1, 1);

  http.request(Header, ContentData);
  loop.exec();

  QFile file(filePath);
  if (!file.open(QIODevice::WriteOnly))
  {
    LogError("Cannot open sound file for writing : "+filePath);
    return QByteArray();
  }
  file.write(http.readAll());
  file.close();
  return ttsHTTPUrl.arg(voice, fileName).toAscii();
}
Nota
No olvides reemplazar los TODOs
Luego active el tts jeedom modificando el archivo /home/ojn/OpenJabNab/server/tts/tts.pro agregando libertad a SUBDIRS :
TEMPLATE = subdirs
SUBDIRS = acapela google jeedom
Recompilation
cd /home/ojn/OpenJabNab/server
qmake -r
make
Modificación del servicio tts
Edite el archivo /home/ojn/OpenJabNab/server/bin/openjabnab.ini y cambiar TTS=acapela por TTS=jeedom
Relanzamiento de openjabnab
La forma más fácil es reiniciar la máquina para reiniciar openjabnab


