Installation on Smart/Atlas
Jeedom Backup
Before reinstalling the system, it is essential to download a recent backup of Jeedom that can be restored once the procedure is complete:
-
From the Jeedom interface, click on the Settings → System → Backups menu.
-
Click the Start Backup button.
-
When the operation is complete, click Download Backup.
System Restoration
Starting with version 4.4.20, the Jeedom team has been developing its own automatic system Restoration feature, which runs just before the system boots up. The process takes about twenty minutes, during which time the system is unavailable.
Once complete, the system starts up once before automatically rebooting, after which it becomes visible on the network and accessible. On Smart, you can monitor the progress by connecting a display.
IMPORTANT
Patience is key: even though it may seem like nothing is happening, 20 minutes isn’t really that long after all.
INFORMATION
The MAC address of your router (and therefore the IP address) may change depending on the kernel version. Please refer to the Ways to find the router on the local network if needed.
The procedure can be performed directly from Jeedom by clicking on the Settings → System → Restoration menu, using one of two different modes:
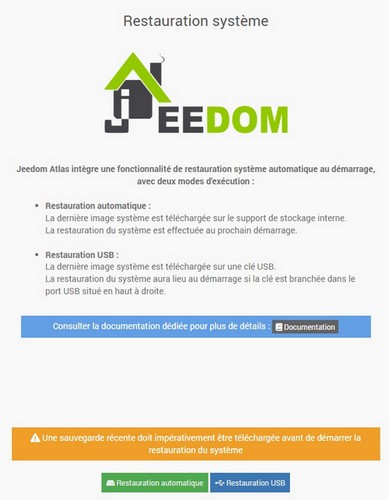
Automatic mode
In this mode, the entire process is carried out fully automatically without the need to physically access the box.
After clicking the Automatic Restoration button, the latest system image is downloaded directly from our servers to the internal storage device. The image’s integrity is verified, and then the file is renamed.
The system will be updated the next time it starts up, unless the restoration file is deleted or moved from its download directory.
INFORMATION
To “manually” prepare for an automatic Restoration without using the Jeedom utility, simply send a compatible system image renamed to
JeedomSystemUpdate.img.gzin the folder/install/updateby Jeedom (/var/www/html/install/update/JeedomSystemUpdate.img.gz).
USB Mode
This mode requires you to plug in a USB flash drive, the first partition of which is formatted as FAT (or ExFAT + diagram “Master Boot Record (MBR)” on MacOS), in the port located at the top right when viewed from the back.
The USB Restoration button first detects, verifies, and mounts the USB drive. Next, the latest system image is downloaded from our servers to the USB drive. The integrity of the image is verified, and then the USB configuration file is written.
The system is updated at startup if the prepared USB drive is plugged into the first port at the top right.
A file JeedomSystemUpdate.log is generated on the USB drive during the process. It contains details of the system Restoration steps and is primarily used to prevent the system from updating in a loop. You must delete this file to restart the system update (on an identical set-top box with the same USB drive, for example).
INFORMATION
To create a Restoration USB drive yourself, simply use File Explorer (no burning required) to copy the files to the root of the first partition on the USB drive (format
FAT) :
- either a compatible system image renamed to
JeedomSystemUpdate.img.gz- either a compatible system image along with the USB configuration file
JeedomSystemUpdate.iniwhose content isupdate_filename="Jeedom****-*.*.*_******-1*.*.img.gz".
Jeedom****-*.*.*_******-1*.*.img.gzmatching the filename on the USB drive.
Logs
The operations performed by the system restoration utility can be viewed in the Analysis → Logs menu, under the recovery section.
System Images
The system images currently provided by the Jeedom team are freely available for viewing and downloading at the following addresses, depending on the hardware in question:
View Documentation for official system images for more details.
Smart eMMC Programming
The new system restoration features cannot be installed on a Smart device still running Debian 10. In this case, you must first format the removable eMMC storage to upgrade to a newer version of Debian; see the documentation Guides → Tutorials → Smart Factory Reset for more details.
First connection
View the documentation related to First login to access the Jeedom interface after installation.