Installation sur machine virtuelle
La procédure suivante est basée sur l’utilisation d’un fichier d’image système incluant Debian et Jeedom préinstallé.
Information
Pour installer Jeedom manuellement sur une machine virtuelle sous Debian, se référer à la documentation concernant l’installation en ligne de commande.
Création de la VM
Vous avez très certainement un hyperviseur déjà en place pour lire cette documentation. Même si le processus de création d’une machine virtuelle (VM) est assez semblable d’une solution à l’autre, il est bien entendu indispensable de suivre la documentation adaptée à la plateforme utilisée.
Pour citer quelques hyperviseurs connus à titre d’exemple :
- VirtualBox : Hyperviseur de type 2, gratuit et open source, idéal pour les environnements de test ou les postes de travail. Compatible avec Windows, macOS et Linux.
- VMware : Large gamme d’hyperviseurs, dont VMware Workstation (type 2) pour les postes de travail et VMware ESXi (type 1) pour les serveurs. Solution robuste et largement utilisée en entreprise.
- Proxmox : Plateforme open source basée sur KVM (type 1), combinant virtualisation complète et conteneurs LXC. Très adaptée aux serveurs et aux environnements professionnels ou homelabs.
- Hyper-V : Hyperviseur natif de Microsoft intégré à Windows Server et aux éditions Pro/Entreprise de Windows.
Configuration de la VM
Il n’y a pas réellement de configuration recommandée pour Jeedom car cela va dépendre du degré de charge de chaque instance.
Pour une machine robuste sans être disproportionnée, on peut convenir que les valeurs suivantes sont suffisantes dans la plupart des cas :
| CPU | Mémoire | Disque |
|---|---|---|
| 2 Cores | 2048 MiB | 16 GiB |
Démarrage sur l’image système
L’équipe Jeedom fournit des images système optimisées à destination des ordinateurs 64 bits.
Avant de démarrer la machine virtuelle, il faut télécharger l’image système que vous souhaitez installer (certains hyperviseurs permettent de télécharger le fichier directement depuis son lien URL) :
Information
Consulter la documentation dédiée pour plus de détails sur les images système Jeedom.
Le fichier image au format iso doit ensuite être chargé dans le lecteur optique (CD/DVD) émulé par la machine virtuelle, lui-même placé en première position dans l’ordre de démarrage.
IMPORTANT
En cas de difficultés, se référer à la documentation de l’hyperviseur.
Options d’installation
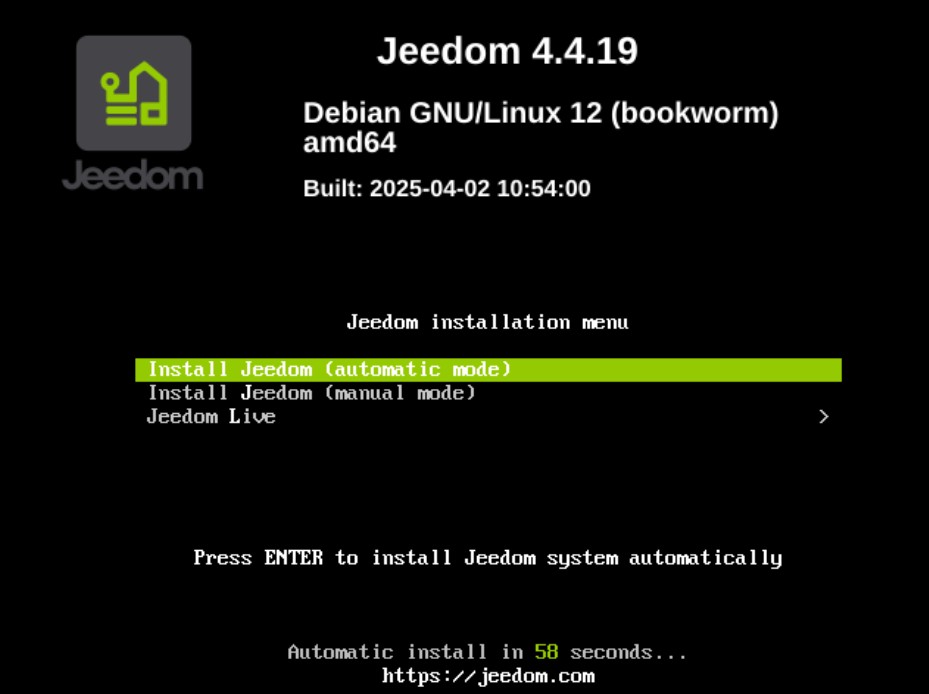
Différentes options d’installation sont affichées à l’écran après avoir démarré la machine virtuelle avec l’image système chargée dans le lecteur optique :
- Install Jeedom (automatic mode) : installe le système automatiquement sans aucune intervention nécessaire. La machine est éteinte à la fin de l’opération.
IMPORTANT
Ce mode est exécuté par défaut au bout de 60 secondes, l’installation peut donc être réalisée sans se connecter à l’écran virtuel.
-
Install Jeedom (manual mode) : dans ce mode, vous devez renseigner manuellement la configuration du système à installer (langue, pays, réseau, support de stockage, etc.).
- Jeedom Live : permet de tester Jeedom dans un environnement non persistant sans installer le système.
Information
Cette fonctionnalité est accessible à partir de Debian 12 Bookworm.
Compatibilité matérielle
La liste, non exhaustive, des hyperviseurs supportés par Jeedom est visible dans la documentation Compatibilité
Première connexion
Consulter la documentation relative à la Première connexion pour accéder à l’interface Jeedom suite à l’installation.
