Bacnet
Description
Le plugin Bacnet permet de récupérer les informations de vos équipements Bacnet/IP et d’interagir avec eux depuis votre Jeedom. Il supporte de nombreuses fonctionnalités avancées telles que l’importation de fichiers EDE, l’ajout manuel de points, la visualisation des calendriers (schedules) et bien plus encore.
Plugin configuration
Après téléchargement du plugin, il faut tout d’abord l’activer, comme tout plugin Jeedom :

Then, you have to start the installation of dependencies (even if they appear OK) :
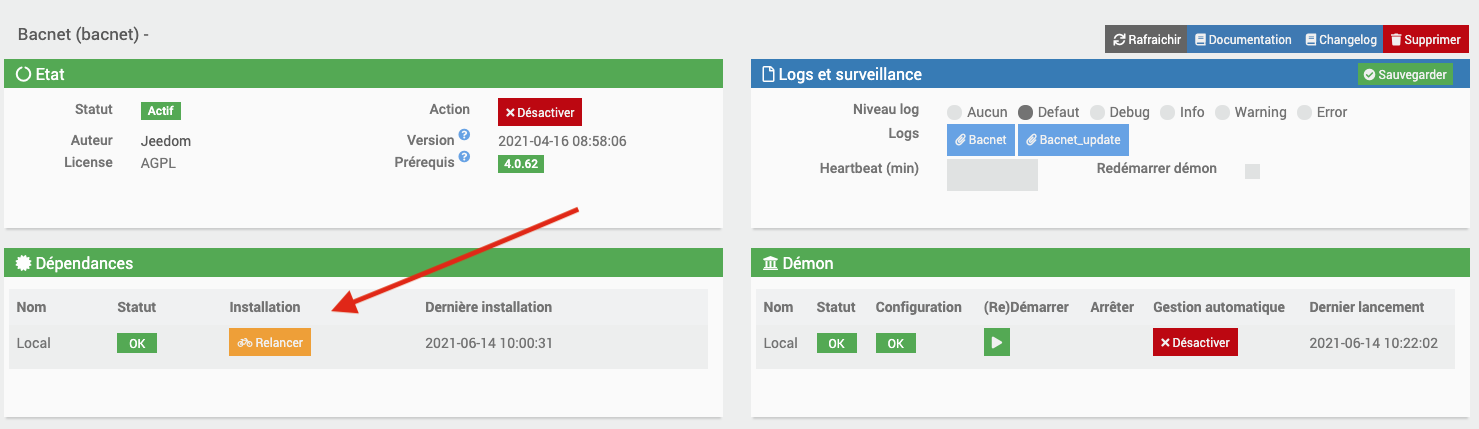
Finally, we must start the demon :

Rien n’est à modifier dans le champ « Port socket interne » de la section « Configuration ».

In this same tab, you must choose the Cron value for updating your equipment.
Comment déclarer un équipement Bacnet dans Jeedom
Détection automatique
IMPORTANT
Vos équipements BACNET doivent se trouver sur le même réseau que votre Jeedom pour être détectés automatiquement.
Rendez-vous dans le menu « Plugins → Protocole domotique → Bacnet » :
Vous pouvez lancer un scan de type broadcast, qui enverra un whois à tout votre réseau pour trouver les équipements Bacnet. Une fenetre s’affichera avec les résultats. Vous pourrez scanner ensuite les points du/des device(s) choisis.
Sur une grande installation;un whois global peut perturber les équipements bacnet, il est conseillé alors d’ajouter un équipement manuellement (vous pourrez lui choisir son adresse IP et son device ID) : un bouton Scan de point est présent sur chaque équipement pour faire un scan de cet équipement en particulier
Following the scan, a table with all the inputs / outputs of your equipment will be displayed.
Suivant les constructeurs d’équipements, certaines valeurs ne sont pas disponibles.
Il vous suffit de sélectionner les commandes à créer en cochant une des options suivant votre choix (commande de type info ou de type action), vous pouvez valider à la suite, et vous serez amené sur la page de l’équipement avec les commandes créées.
- Cliquez ensuite sur votre équipement créé, puis cochez « Activer » et « Visible » pour le voir apparaître sur votre dashboard.
Pour ajouter des commandes ultérieurement à un équipement existant, il faudra refaire un scan des points de cet équipements. Les commandes deja créées auront leur checkbox deja cochées sur le tableau des points.
Ajout manuel de point
Si votre équipement n’est pas lu, du à un nombre trop grand d’objets, une erreur vous indiquera qu’il faut ajouter les points manuellement (ou injecter un EDE)
Depuis la page de l’équipement, cliquez sur le bouton “Ajouter manuellement des points” :
- Renseignez l’ID d’instance de chaque point
- Sélectionnez le type d’objet (Analog Input, Binary Output, etc.)
- Choisissez le mode (lecture seule ou lecture/écriture)
- Donnez un nom à la commande
- Ajoutez éventuellement une unité et une description
- Cliquez sur “+” pour ajouter d’autres points si nécessaire
Une fois tous vos points configurés, cliquez sur “Créer les commandes” pour les ajouter à votre équipement.
Importation via fichier EDE
Le plugin supporte l’importation de points Bacnet à partir d’un fichier EDE (Engineering Data Exchange). Cette méthode est particulièrement utile pour les systèmes complexes avec de nombreux points.
Depuis la page de l’équipement, cliquez sur le bouton “Importer fichier EDE” :
- Sélectionnez votre fichier EDE au format CSV
- Le système analysera le fichier et vous montrera un aperçu des données
- Vous pourrez sélectionner les points que vous souhaitez importer
- Configurez les options d’importation (historisation, visibilité)
- Cliquez sur “Importer” pour créer les commandes
Le plugin détectera automatiquement le séparateur utilisé dans le fichier (virgule, point-virgule ou tabulation) et analysera la structure pour extraire correctement les informations des points Bacnet.
The orders
Rendez-vous dans l’onglet « Commandes » de la page de configuration du nouvel équipement Bacnet.
Ici vous pouvez masquer et rendre visibles les différentes commandes de type « action » et « info » disponibles (les commandes de type « info » peuvent également être historisées) :

All the equipment created will have 2 commands by default : une commande info « Connexion Bacnet » et une commande action « Refresh », qui serviront à voir l’état de la connexion Bacnet sur votre dashboard, et à rafraîchir les valeurs de vos commandes.

Visualisation et gestion des calendriers (schedules)
Le plugin permet désormais de visualiser et gérer les calendriers (schedules) BACnet des équipements qui supportent cette fonctionnalité.
Depuis la page de l’équipement, cliquez sur le bouton “Calendriers/Planifications” :
Une fenêtre s’ouvre et affiche tous les calendriers disponibles sur l’équipement. Pour chaque calendrier, vous pouvez :
- Visualiser la programmation hebdomadaire
- Consulter les exceptions (jours fériés, etc.)
- Modifier les horaires et valeurs des événements
- Ajouter de nouveaux événements de planification
- Supprimer des événements existants
Tous les changements peuvent être enregistrés sur l’équipement (si celui-ci supporte l’écriture des schedules, ce qui est rare sur certains équipements).
NOTE
La gestion des calendriers est particulièrement utile pour les systèmes CVC (chauffage, ventilation, climatisation) qui fonctionnent selon des plages horaires définies.
IMPORTANT
Regarding writing: for security, the Bacnet protocol provides by default a writing system with priority levels on the inputs / outputs of its equipment. There are 16 priority levels (the lowest level taking priority over all others)). Your equipment may be programmed in such a way that the write function developed in this plugin does not take priority over the logic programming of the equipment / system by default. For Output type I / O, the plugin is configured with priority 8 writing (Manual Operator). More info on the subject :
https://store.chipkin.com/articles/bacnet-why-doesnt-the-present-value-change
Pour une écriture sur un équipement Bacnet, on interagit sur la PresentValue de l’entrée/sortie correspondante. You should know that the PresentValues of the inputs / outputs type: Analog Output, Binary Output and Multistate Output are always controllable. Celles des entrées/sorties de type AnalogValue, BinaryValue ou MultistateValue sont commandables si le fabricant a implanté cette fonctionnalité. It is at the sole discretion of the manufacturer. Veuillez vous renseigner auprès de la documentation de votre équipement pour en savoir plus à ce sujet.
When creating the chosen write-type orders, an associated action order will also be created, by default not visible on the dashboard. By clicking on it, it resets the write priority table of an input / output to the default. It will have a name with « resetPrioritesEcriture » Pour rendre visible cette commande sur votre dashboard, il faut vous rendre dans les commandes de votre équipement et cocher la case “Afficher”.
List on Command Action (for MultiStateValue)
Quand vous avez créé une commande d’Écriture comme habituellement depuis les résultats du scan, elle est de base en Slider ou On Off, suivant le type de point Bacnet remonté (analog, binary) : now, if you choose a multiState, the command will be of type Slider by default, but you can list it in the list of equipment commands; a new Value List field will appear; Vous pouvez y mettre les valeurs que vous désirez, séparées par un -, sans espace : for example 1-4-5-8 When saving the equipment, this will put these values in the list of the order on the Dashboard Au changement de cette valeur, cela enverra la valeur à écrire sur le point paramétré.
Write priority
A Handle with care
A Write Priority field is available on each order created
As per the documentation :
In BACnet, object to which we can write often provide what is called the priorityArray. This array contains 16 levels to which we can write (1 being the highest priority).
Typical usage of priority is :
1 Manual-Life Safety 2 Automatic-Life Safety 3 Available 4 Available 5 Critical Equipment Control 6 Minimum On/Off 7 Available 8 Manual Operator (Override) 9 Available 10 Available (Typical Control from a Supervisor) 11 Available 12 Available 13 Available 14 Available 15 Available (Schedule) 16 Available
Vous pouvez choisir une priorité d’écriture sur les commandes souhaitées, en choisissant un nombre entre 1 et 16
If no value entered on a write command, by default the value will be set to 8.
Informations supplémentaires des protocoles supportés
Le plugin BACnet supporte les types d’objets suivants :
- Analog Input, Output, Value
- Binary Input, Output, Value
- Multi-State Input, Output, Value
- Schedule
- Calendar
- Device
Les protocoles de communication supportés sont :
- BACnet/IP (UDP/IP)
Le plugin est compatible avec les équipements respectant la norme ASHRAE 135 qui définit le protocole BACnet.
Dépannage et diagnostic
Si vous rencontrez des problèmes avec votre équipement BACnet, voici quelques étapes de dépannage :
- Vérifiez que le démon est bien en cours d’exécution
- Assurez-vous que votre équipement est bien sur le même réseau que Jeedom
- Vérifiez qu’aucun pare-feu ne bloque les ports UDP 47808 (port BACnet par défaut)
- Consultez les logs du plugin pour identifier d’éventuelles erreurs
Pour les équipements qui ne sont pas détectés automatiquement, utilisez l’ajout manuel ou l’importation via fichier EDE.