OpenZWave plugin
This plugin allows the exploitation of Z-Wave modules through the OpenZwave library.
Introduction
Z-Wave communicates using low power radio technology in the 868.42 MHz frequency band. It is specifically designed for home automation applications. The Z-Wave radio protocol is optimized for low bandwidth exchanges (between 9 and 40 kbit / s) between devices on battery or powered by mains.
Z-Wave operates in the sub-gigahertz frequency range, according to the regions (868 MHz in Europe, 908 MHz in the US, and other frequencies according to the ISM bands of the regions). The theoretical range is around 30 meters indoors and 100 meters outdoors. Z-Wave network uses mesh technology to increase range and reliability. Z-Wave is designed to be easily integrated into low-power electronic products, including battery-powered devices such as remote controls, smoke detectors and security sensors.
The Z-Wave +, brings certain improvements including a better range and improves the life of the batteries among others. Full backward compatibility with the Z-Wave.
Distances to be Respected with Other Wireless Signal Sources
Radio receivers must be positioned at a minimum distance of 50 cm from other radio sources.
Examples of radio sources:
- Ordinateurs
- Microwave appliances
- Electronic transformers
- audio and video equipment
- Pre-coupling devices for fluorescent lamps
Tip
If you have a USB controller (Z-Stick), it is recommended to move it away from the box using a simple USB extension cable of 1M for example.
The distance between other wireless transmitters such as cordless phones or radio audio transmissions should be at least 3 meters. The following radio sources should be considered :
- Interference by switch of electric motors
- Interference from defective electrical devices
- Interference from HF welding equipment
- medical treatment devices
Effective wall thickness
The locations of the modules must be chosen in such a way that the direct connection line works only for a very short distance through the material (a wall), in order to avoid attenuations as much as possible.
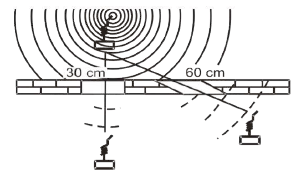
Metal parts of the building or furniture can block electromagnetic waves.
Meshing and Routing
Mains Z-Wave nodes can transmit and repeat messages that are not within direct range of the controller. This allows greater flexibility of communication, even if there is no direct wireless connection or if a connection is temporarily unavailable, due to a change in the room or building.

The controller Id 1 can communicate directly with nodes 2, 3 and 4. Node 6 is outside of its radio range, however, it is in the radio coverage area of node 2. Therefore, the controller can communicate with node 6 via node 2. In this way, the path of the controller via node 2 to node 6, is called route. In case direct communication between node 1 and node 2 is blocked, there is yet another option to communicate with node 6, using node 3 as another signal repeater.
It becomes obvious that the more sector nodes you have, the more the routing options increase, and the more the network stability increases. Z-Wave protocol is capable of routing messages through up to four repeat nodes. It is a compromise between the size of the network, the stability and the maximum duration of a message.
Tip
It is strongly recommended at the start of installation to have a ratio between sector nodes and node on batteries of 2/3, in order to have a good network mesh. Favor micromodules over smart plugs. The micro modules will be in a final location and will not be disconnected, they also generally have a better range. A good start is the lighting of common areas. It will allow you to properly distribute the sector modules at strategic locations in your home. Then you can add as many modules on the stack as desired, if your basic routes are good.
Tip
The Network graph as well as Routing table allow you to view the quality of your network.
Tip
There are repeater modules to fill areas where no sector module is useful.
Properties of Z-Wave devices
| Neighbors | Road | Possible functions | |
|---|---|---|---|
| Controller | Knows all the neighbors | Has access to the complete routing table | Can communicate with all devices in the network, if a channel exists |
| Slave | Knows all the neighbors | Has no information on the routing table | Cannot reply to the node it received the message. Therefore, cannot send unsolicited messages |
| Routing slaves | Knows all its neighbors | With partial knowledge of the routing table | Can reply to the node it received the message from and can send unsolicited messages to a number of nodes |
In summary:
- Each Z-Wave device can receive and acknowledge messages
- Les contrôleurs peuvent envoyer des messages à tous les nœuds du réseau, sollicités or non « The maître peut parler quand il veut and à qui il veut »
- Les esclaves ne peuvent pas envoyer des messages non sollicités, mais seulement une réponse aux demandes «L’esclave ne parle que si on le lui demande »
- Les esclaves de routage peuvent répondre à des demandes and ils sont autorisés à envoyer des messages non sollicités à certains nœuds que le contrôleur a prédéfini « L’esclave est toujours un esclave, mais sur autorisation, il peut parler »
Plugin configuration
After downloading the plugin, you just need to activate and configure it.
Once activated, the demon should launch. The plugin is preconfigured with default values; you normally have nothing more to do. However you can change the configuration.
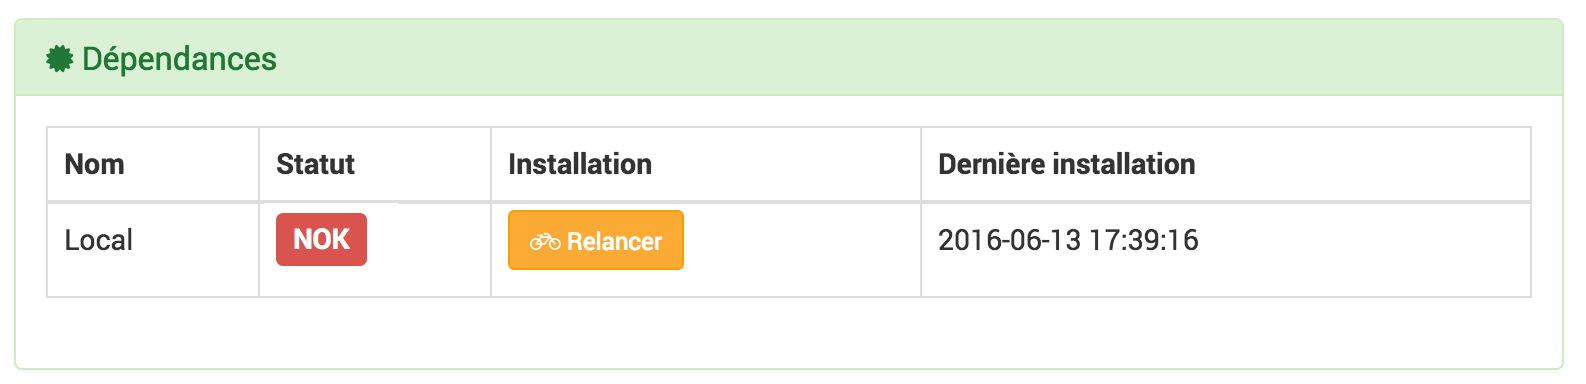
Dependencies
This part allows you to validate and install the dependencies required for the proper functioning of the Zwave plugin (both locally and remotely, here locally) 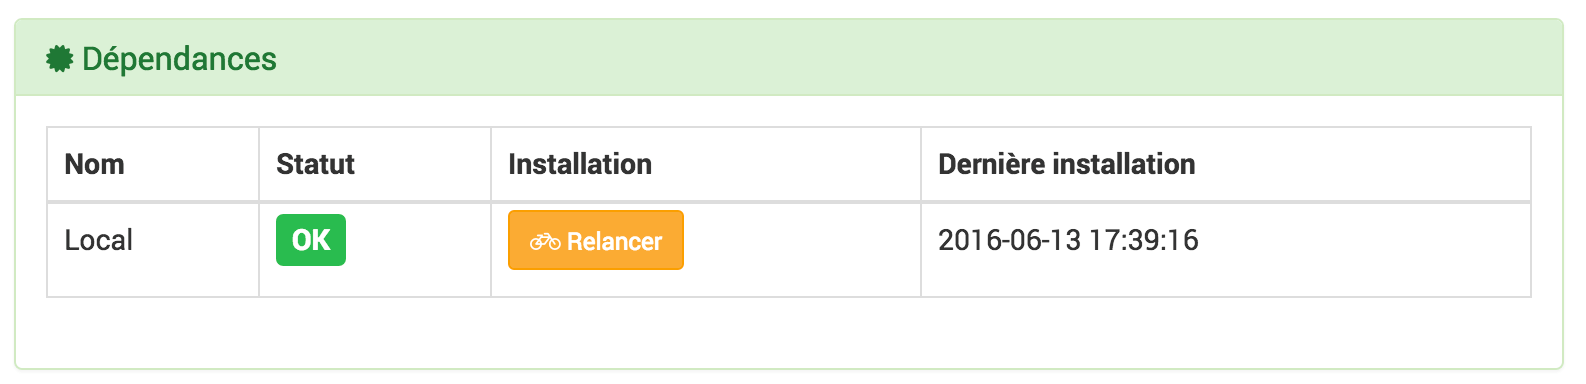
- A status Okay confirms dependencies are met.
- If the status is NOk, dependencies will have to be reinstalled using the button

Tip
Updating dependencies can take more than 20 minutes depending on your hardware. Progress is displayed in real time and a log Openzwave_update is accessible.
Important
Updating dependencies is normally to be performed only if the Status is NOk, but it is however possible, to solve certain problems, to be called to redo the installation of dependencies.
Tip
If you are in remote mode, the dependencies of the local daemon can be NOK, this is completely normal.
Daemon
This part allows you to validate the current state of the daemon (s) and to configure the automatic management of these. 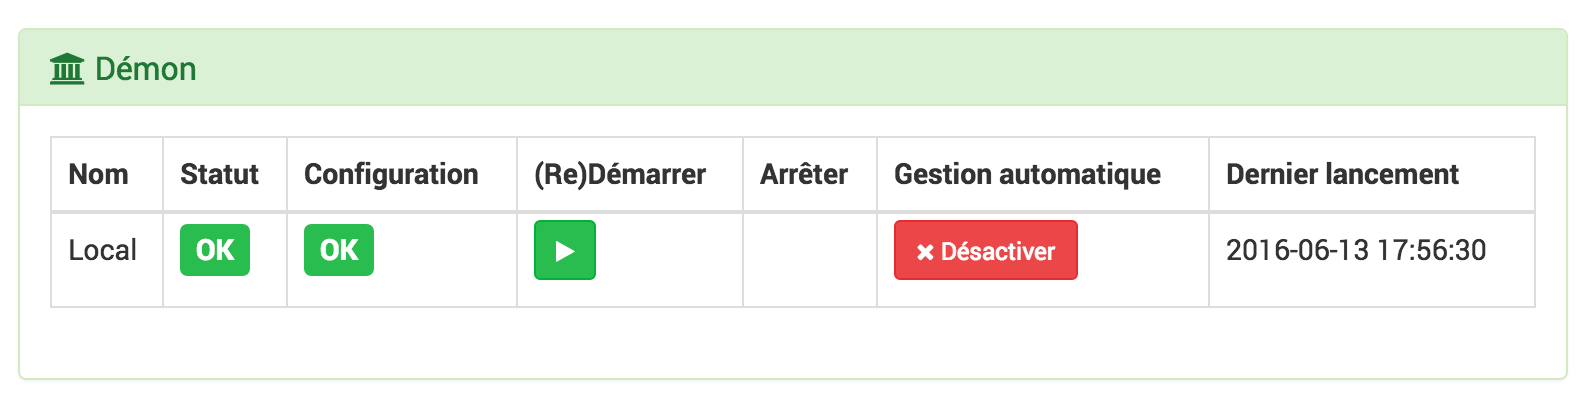 The local demon and all the deported demons will be displayed with their different information
- The Status indicates that the demon is currently running.
- The Setup indicates if the configuration of the daemon is valid.
- The button (To restart allows to force the restart of the plugin, in normal mode or to launch it for the first time.
- The button Stopped, visible only if automatic management is disabled, forces the demon to stop.
- The Automatic management allows Jeedom to automatically launch the daemon when Jeedom starts, as well as to restart it in the event of a problem.
- The Last launch is as its name indicates the date of the last known launch of the demon.
Log
This part allows you to choose the log level as well as to consult its content.
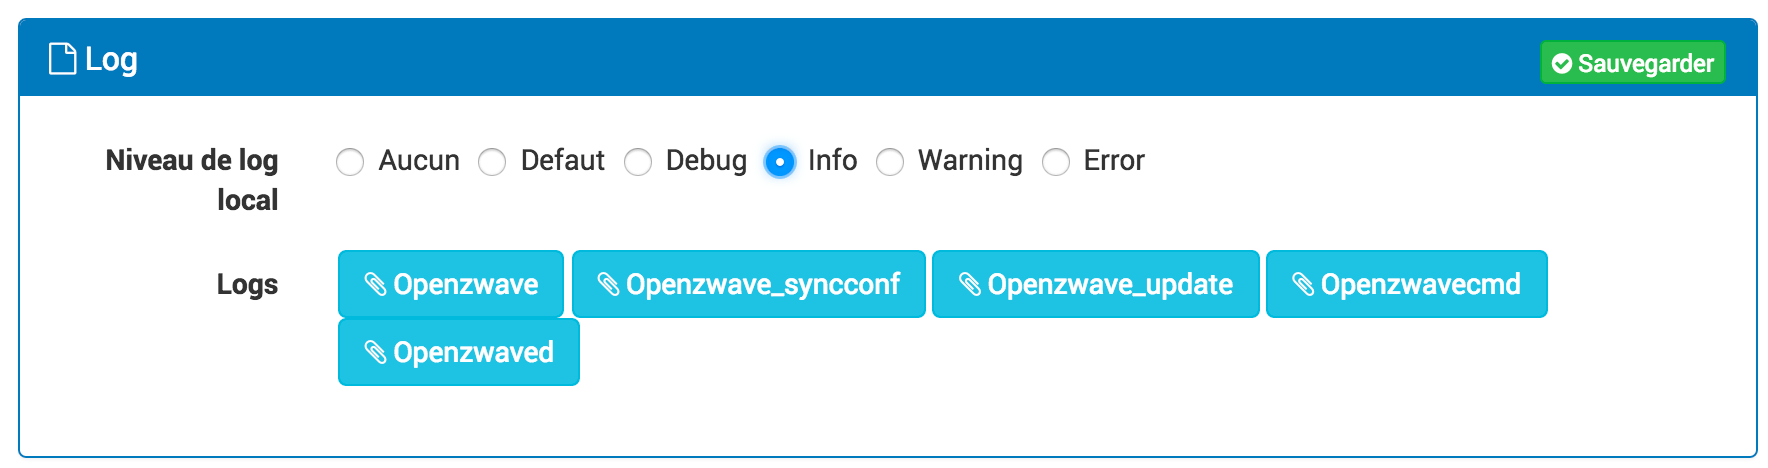
Select the level then save, the daemon will then be restarted with the instructions and traces selected.
Level Debug or Info can be useful to understand why the demon plants or does not go up a value.
Important
In mode Debug the demon is very verbose, it is recommended to use this mode only if you have to diagnose a particular problem. It is not recommended to let the demon run while Debug permanently, if we use a SD-Card. Once the debug is over, don’t forget to return to a lower level like the level Error which only goes back to possible errors.
Configuration
This part allows you to configure the general parameters of the plugin 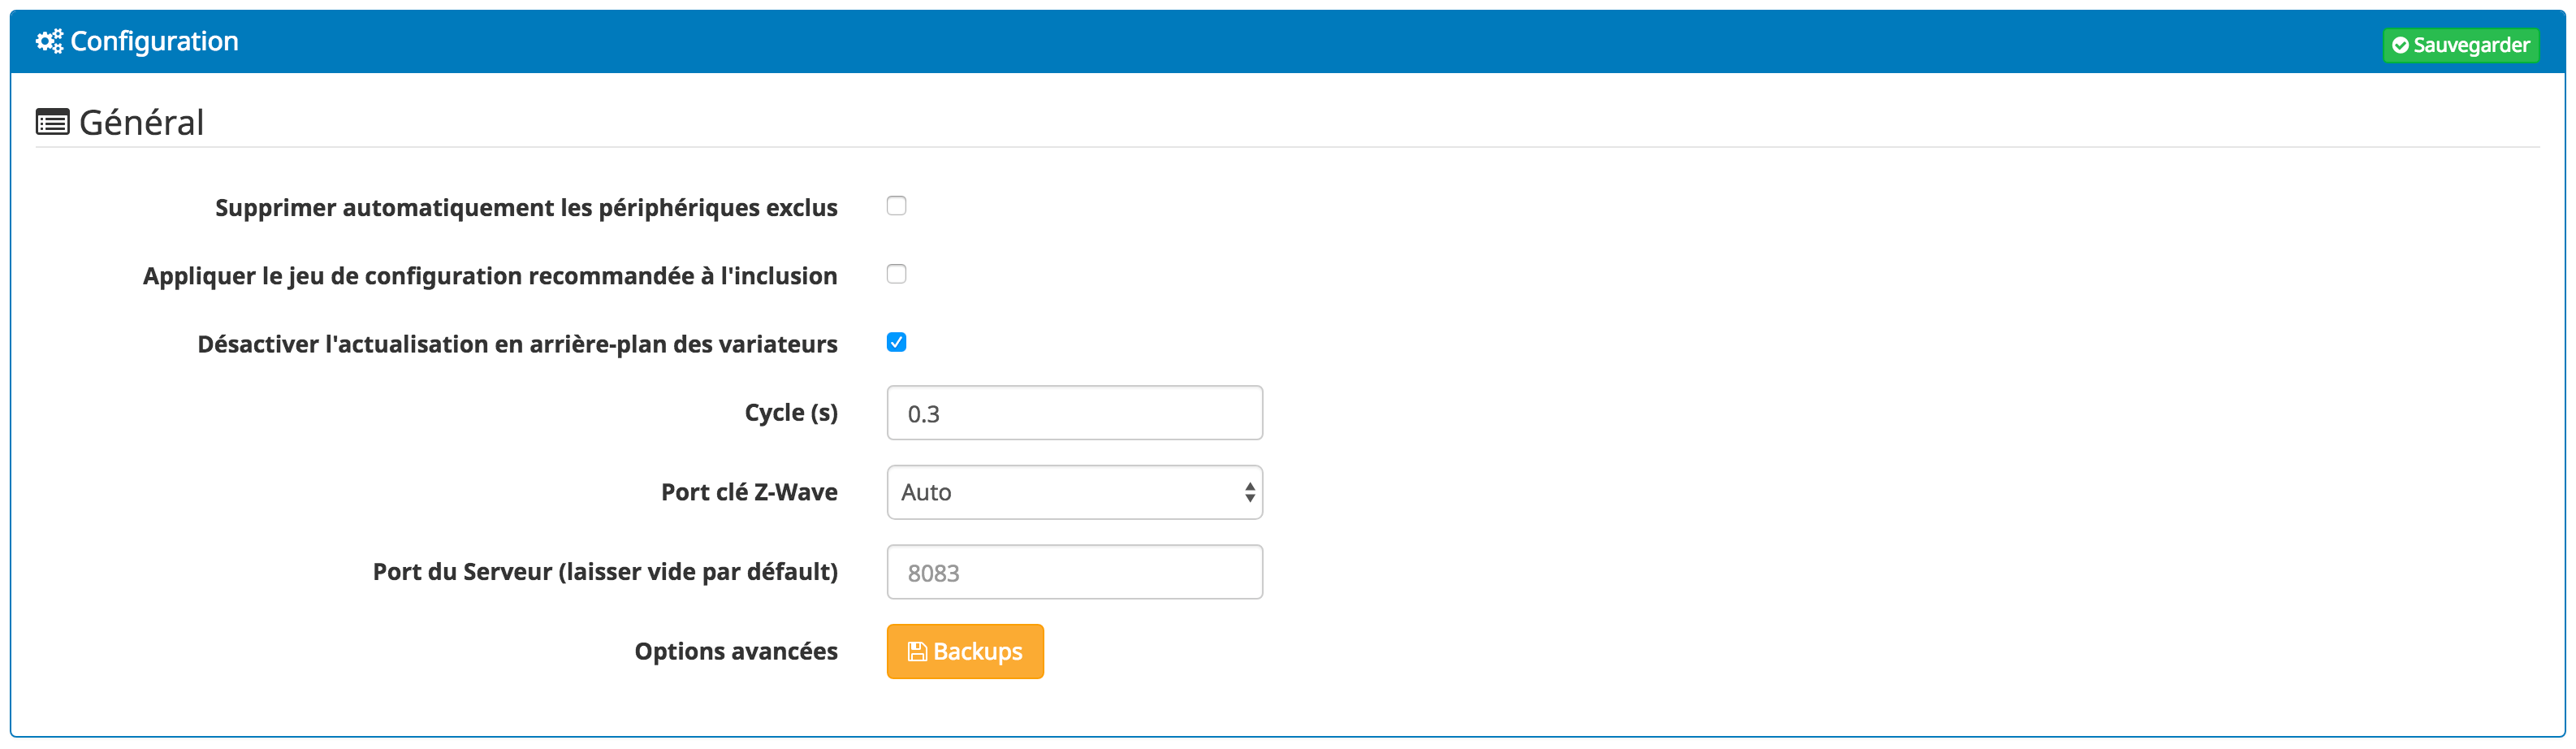
- Main :
- Automatically delete excluded devices :The Yes option allows you to delete devices excluded from the Z-Wave network. The No option allows you to keep the equipment in Jeedom even if it has been excluded from the network. The equipment will then have to be deleted manually or reused by assigning it a new Z-Wave ID if you are migrating from the main controller.
- Apply the recommended configuration set for inclusion : option to directly apply the configuration set recommended by the Jeedom team for inclusion (recommended)
- Deactivate the background update of the drives : Do not ask for refreshment of drives in the background.
- Cycle (s) : allows to define the frequency of lifts to jeedom.
- Z-Wave key port : the USB port on which your Z-Wave interface is connected. If you use the Razberry, you have, depending on your architecture (RPI or Jeedomboard) the 2 possibilities at the end of the list.
- Server Port (dangerous modification, must have the same value on all Z-Wave remote Jeedoms) : allows to modify the internal communication port of the daemon.
- Backups : allows you to manage backups of the network topology file (see below)
-
Config modules : allows to recover, manually, the OpenZWave configuration files with the parameters of the modules as well as the definition of the commands of modules for their uses.
Tip
Module configurations are retrieved automatically every night.
Tip
Restarting the daemon after updating module configurations is useless.
Important
If you have an unrecognized module and a configuration update has just been applied, you can manually start the recovery of module configurations.
Once the configurations have been retrieved, depending on the changes made:
- For a new module without configuration or control : exclude and re-include the module.
- For a module for which only the parameters have been updated : start the regeneration of the node detection, via the Actions tab of the module (the plugin must restart).
-
Pour un module dont le « mapping » de commandes a été corrigé : the magnifying glass on the controls, see below.
Tip
If in doubt, exclude and re-include the module is recommended.
Do not forget to  if you make a change.
Important
If you are using Ubuntu : For the daemon to work, you must have ubuntu 15.04 (lower versions have a bug and the daemon cannot start). Be careful if you update from 14.04 it takes once in 15.04 restart the installation of dependencies.
Important
Selecting the Z-Wave Key Port in automatic detection mode, Auto, only works for USB dongles.
Mobile Panel

Allows you to display or not the mobile panel when you use the application on a phone.
Equipment configuration
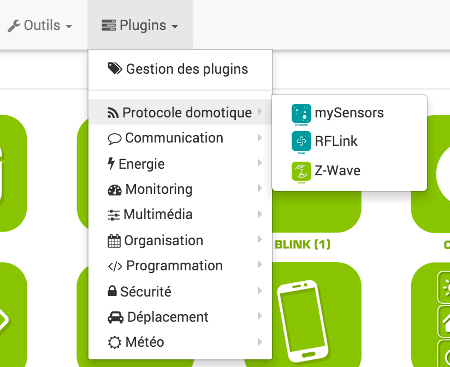
Z-Wave equipment configuration is accessible from the plugin menu :
Below an example of a Z-Wave plugin page (presented with some equipment) :
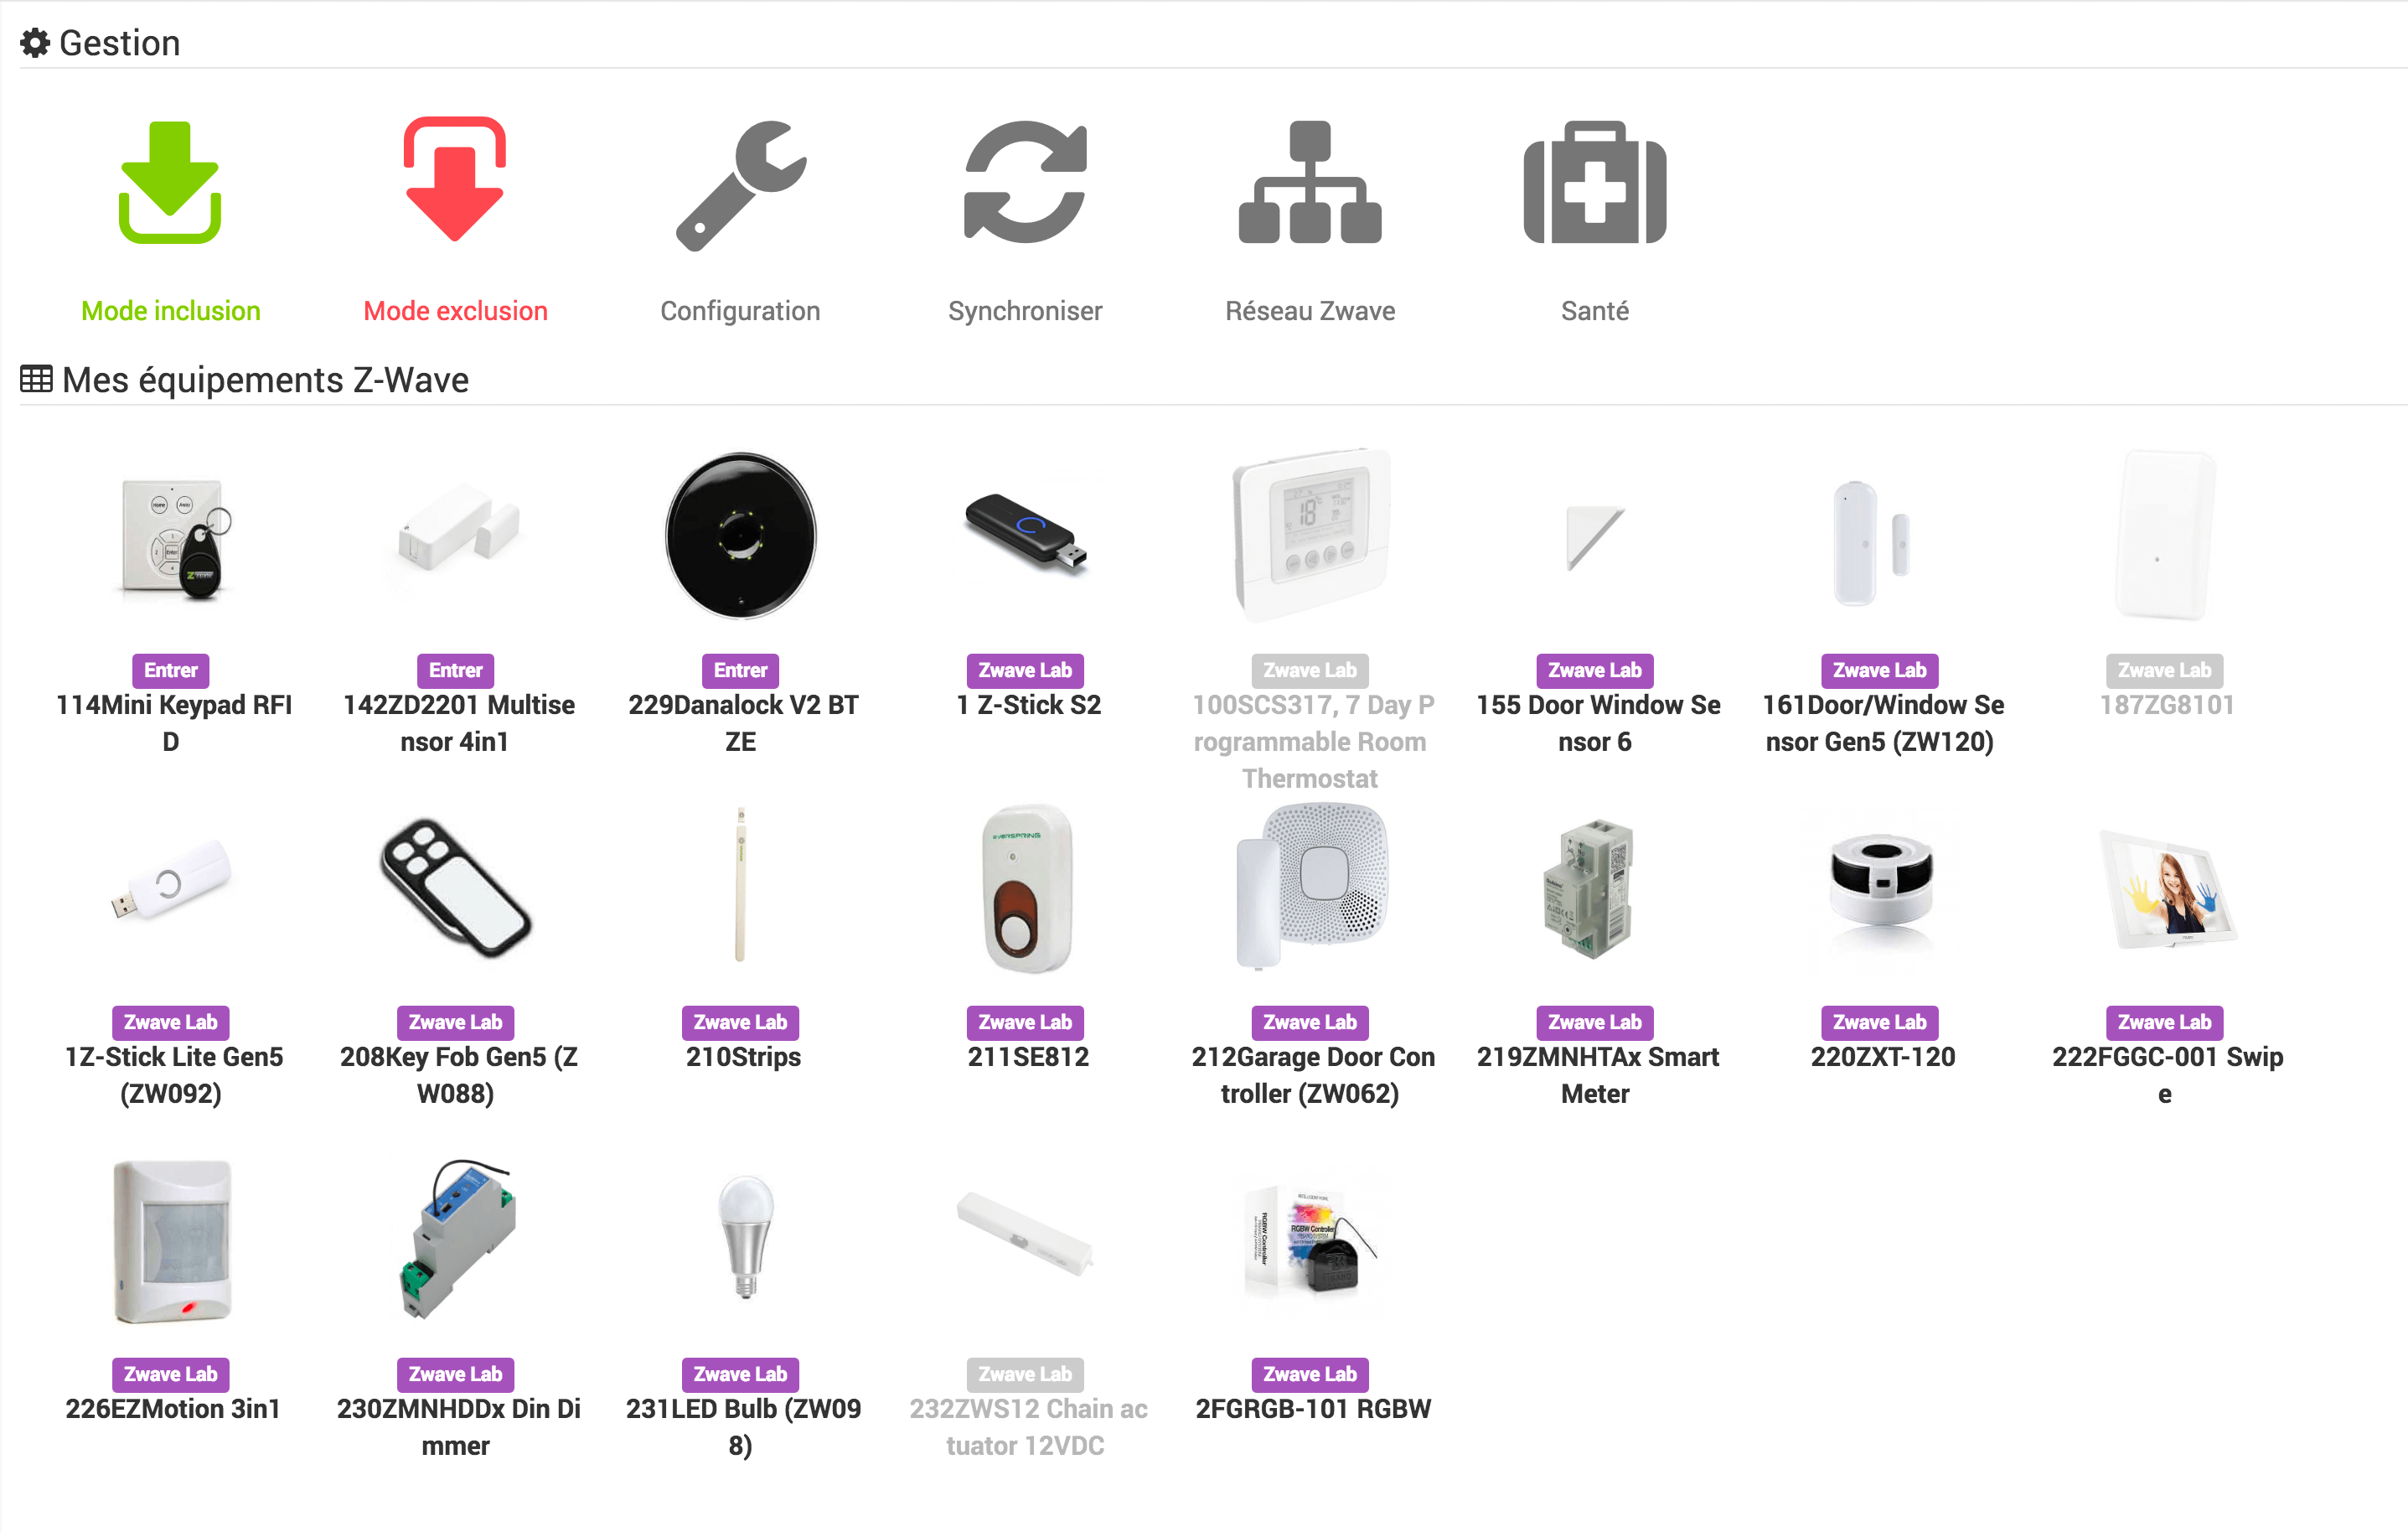
Tip
As in many places on Jeedom, placing the mouse on the far left allows a quick access menu to appear (you can, from your profile, always leave it visible).
Tip
The buttons on the top line Synchronize, Zwave Network and Health, are visible only if you are in mode Expert.

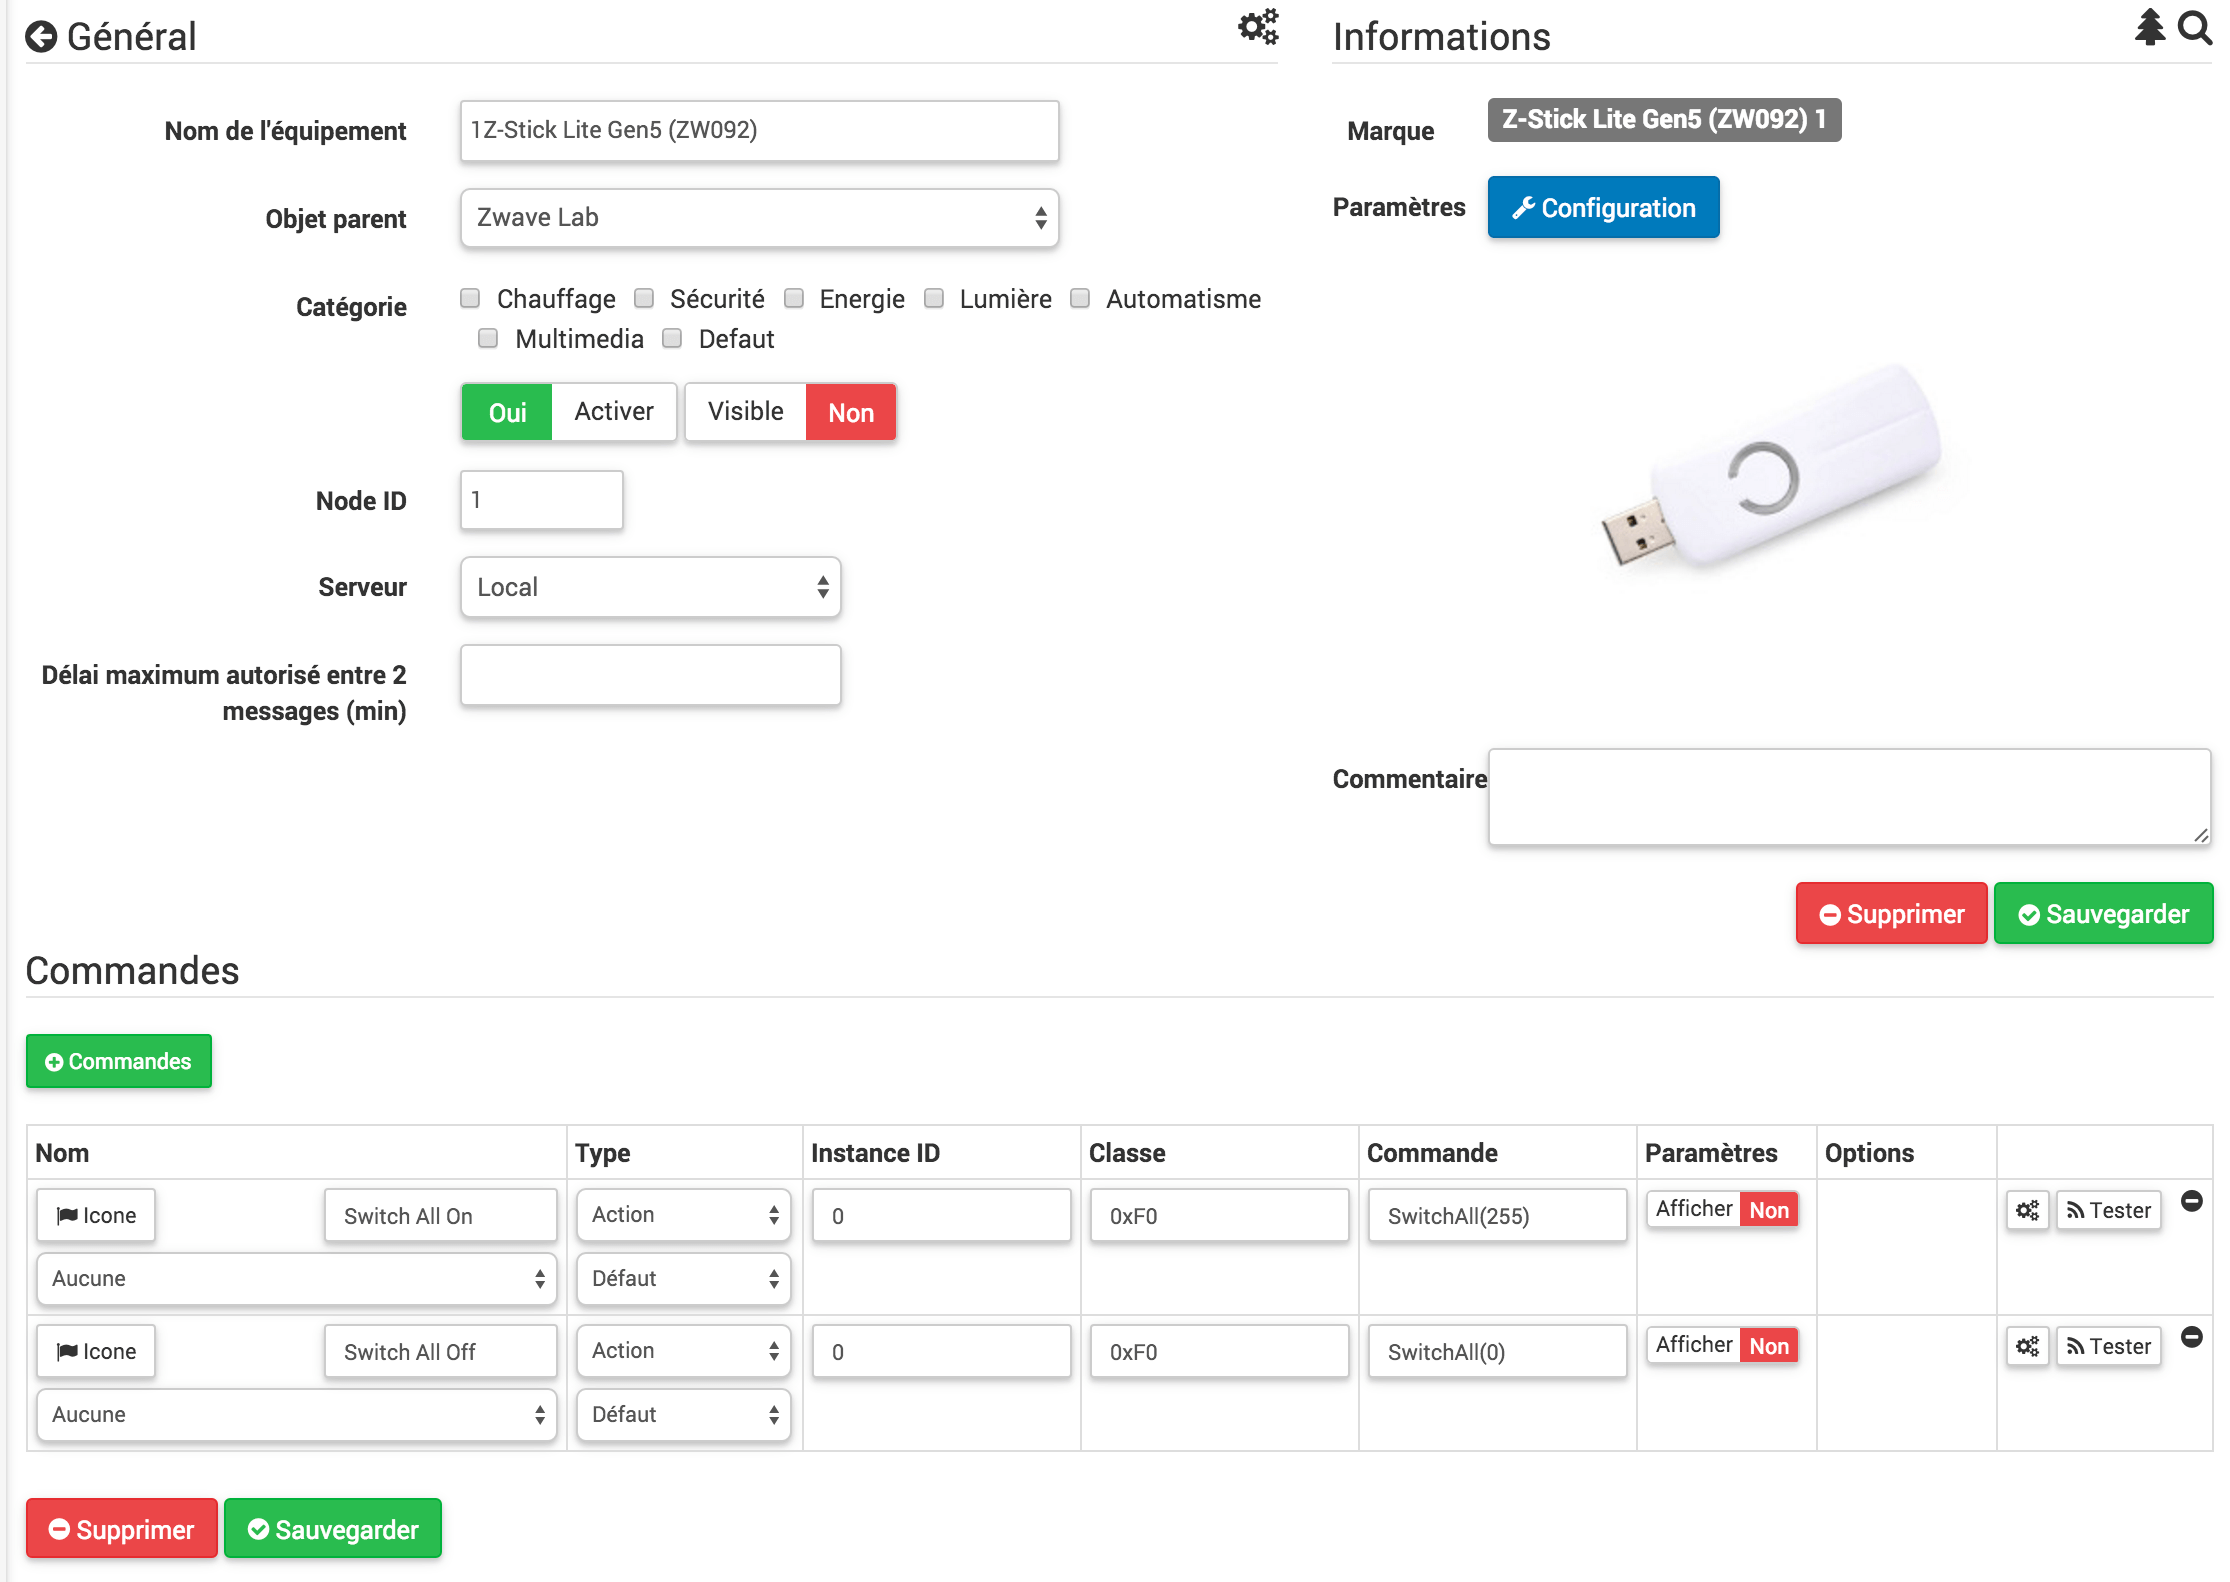
Main
Here you find all the configuration of your equipment :
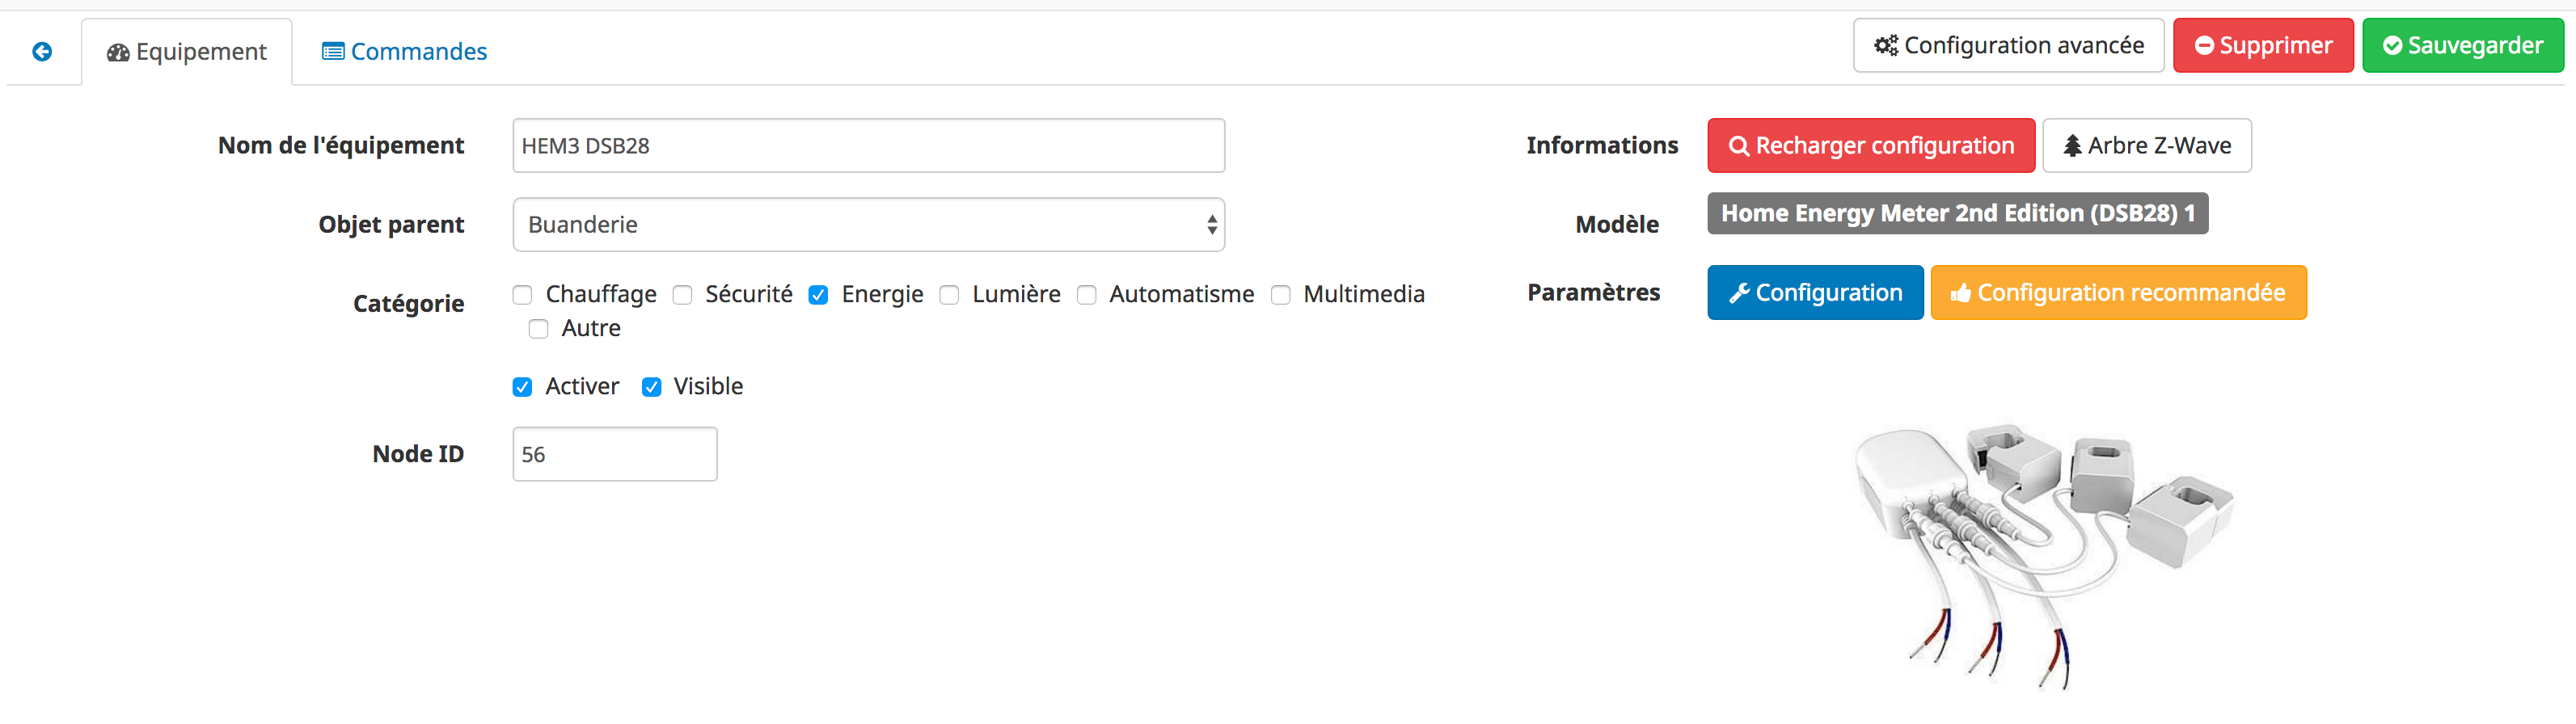
- Name of equipment : name of your Z-Wave module.
- Parent object : indicates the parent object to which the equipment belongs.
- Category : equipment categories (it can belong to several categories).
- Activate : makes your equipment active.
- Visible : makes it visible on the dashboard.
- Node ID : Module ID on the Z-Wave network. This can be useful if, for example, you want to replace a faulty module. Just include the new module, retrieve its ID, and put it in place of the ID of the old module and finally delete the new module.
-
Module : this field only appears if there are different types of configuration for your module (case for modules that can make pilot wires for example). It allows you to choose the configuration to use or modify it later
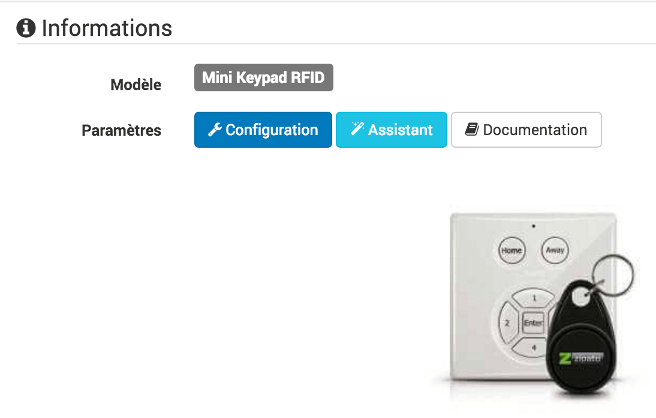
- Mark : manufacturer of your Z-Wave module.
- Setup : module settings configuration window
- Assistant : only available on certain modules, it helps you configure the module (case on the zipato keyboard for example)
- Documentation : this button allows you to directly open the Jeedom documentation concerning this module.
- Delete : Allows you to delete an item of equipment and all of these attached commands without excluding it from the Z-Wave network.
Important
Deleting equipment does not lead to exclusion of the module from the controller.
Deleted equipment that is still attached to its controller will be automatically recreated following synchronization.
Commandes
Below you find the list of orders :
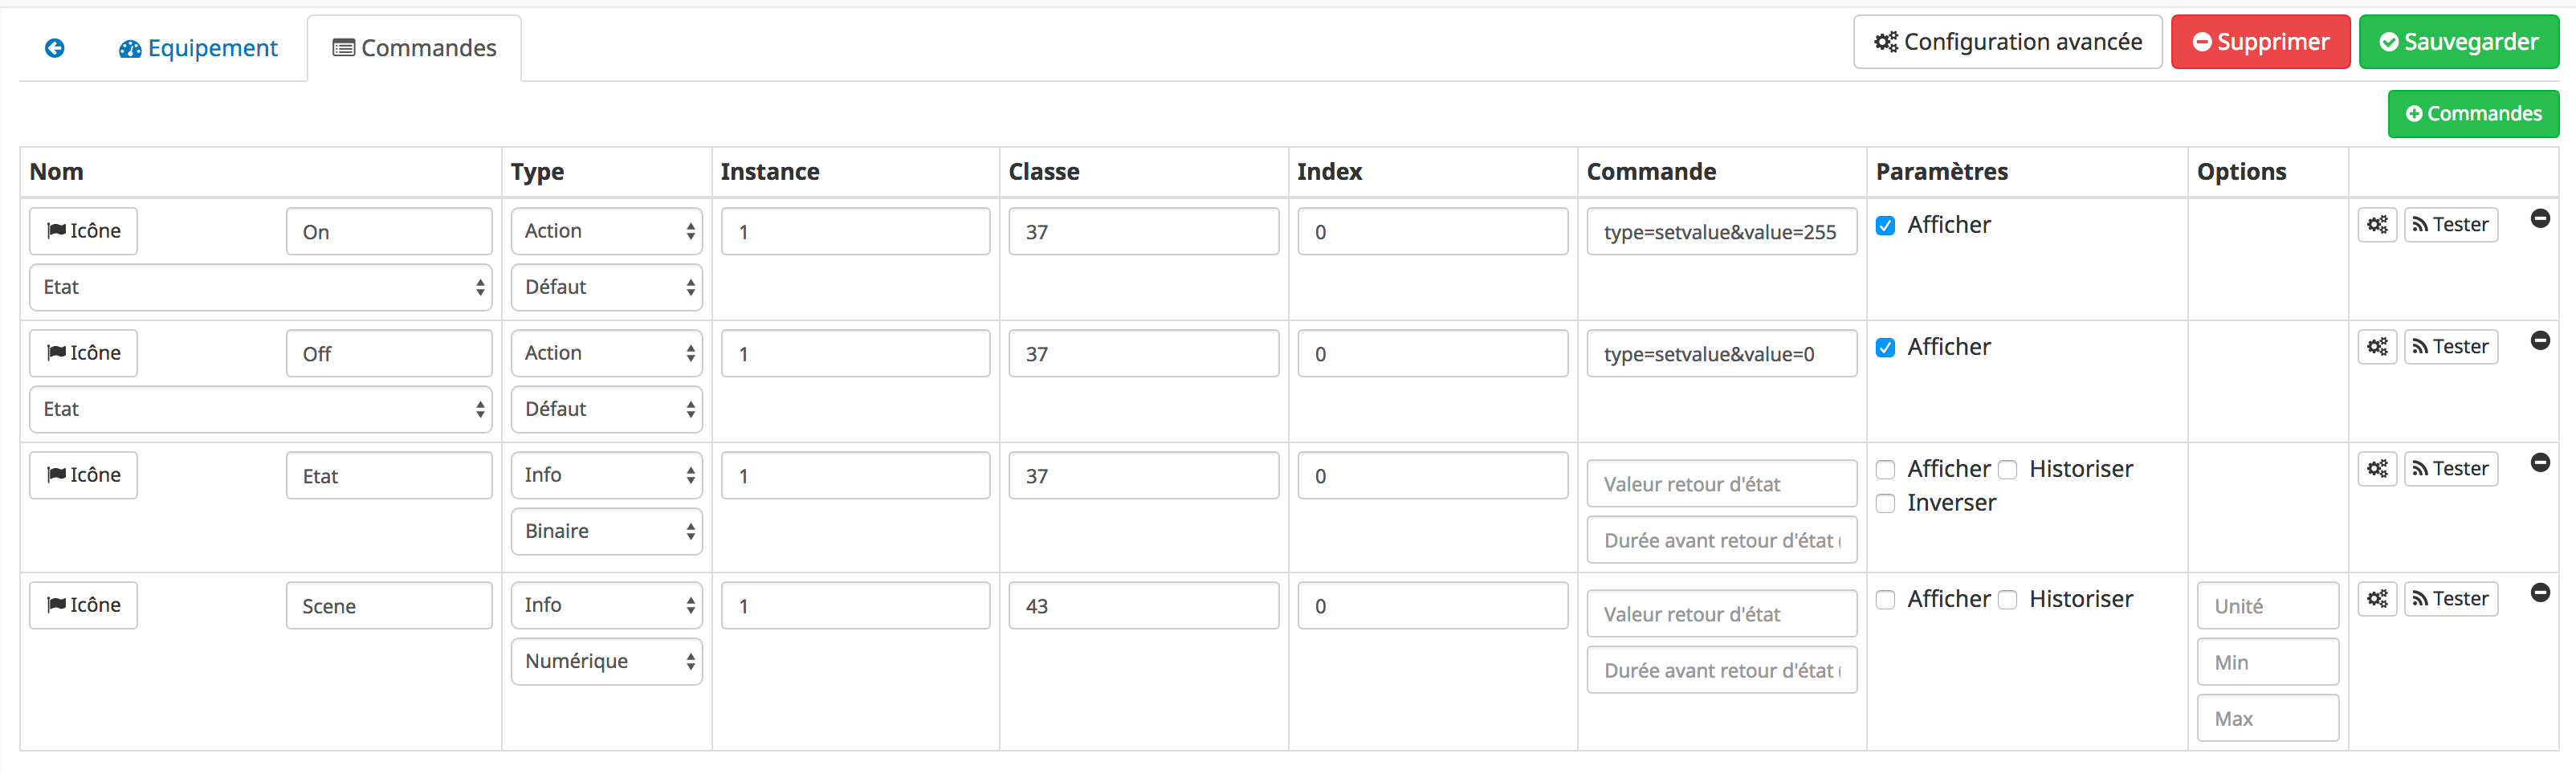
Tip
Depending on the types and subtypes, some options may be missing.
- the name displayed on the dashboard
- Icon : in the case of an action allows you to choose an icon to display on dashboard instead of text
- Order value : in the case of an action type command, its value can be linked to an info type command, this is where it is configured. Example for a lamp the intensity is linked to its state, this allows the widget to have the actual state of the lamp.
- type and subtype.
- the instance of this Z-Wave command (reserved for experts).
- the class of the Z-Wave control (reserved for experts).
- the value index (reserved for experts).
- the order itself (reserved for experts).
- “Status feedback value “and” Duration before status feedback” : allows to indicate to Jeedom that after a change on the information its value must return to Y, X min after the change. Example : in the case of a presence detector which emits only during a presence detection, it is useful to set for example 0 in value and 4 in duration, so that 4 min after a motion detection (and if then , there were no new ones) Jeedom resets the value of the information to 0 (no more movement detected).
- Historize : allows to historize the data.
- Pin up : allows to display the data on the dashboard.
- Invert : allows to invert the state for binary types.
- Unit : data unit (can be empty).
- Min / max : data bounds (may be empty).
-
Advanced configuration (small notched wheels) : displays the advanced configuration of the command (logging method, widget, etc.)).
- Test : Used to test the command.
- Delete (sign -) : allows to delete the command.
Important
The button Test in the case of an Info type command, will not query the module directly but the value available in the Jeedom cache. The test will return the correct value only if the module in question has transmitted a new value corresponding to the definition of the command. It is therefore completely normal not to obtain a result following the creation of a new Info command, especially on a battery-powered module which rarely notifies Jeedom.
The magnifying glass, available in the general tab, allows you to recreate all the commands for the current module.  If no command is present or if the commands are wrong the magnifying glass should remedy the situation.
Important
The magnifying glass will delete existing orders. If the commands were used in scenarios, you will then have to correct your scenarios in the other places where the commands were used.
Command Games
Some modules have several preconfigured command sets

You can select them via the possible choices, if the module allows it.
Important
You must magnify to apply the new command sets.
Documentation and Assistant
For a certain number of modules, specific help for the installation as well as recommendations of parameters are available.
The button Documentation provides access to specific module documentation for Jeedom.
Particular modules also have a specific assistant to facilitate the application of certain parameters or operations.
The button Assistant gives access to the specific assistant screen of the module.
Recommended configuration
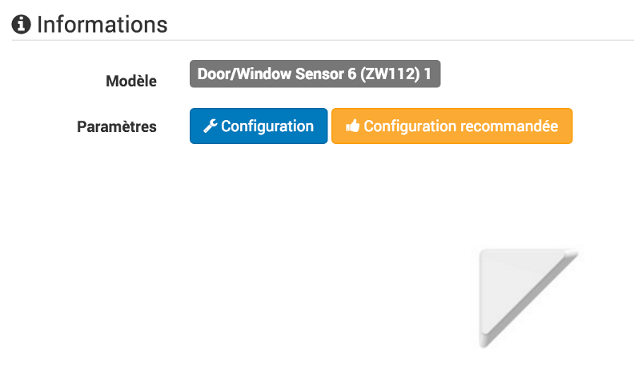
Apply a configuration set recommended by the Jeedom team.
Tip
When included, the modules have the manufacturer’s default parameters and certain functions are not activated by default.
The following elements, as applicable, will be applied to simplify the use of the module.
- Settings allowing rapid commissioning of all module functionalities.
- Association groups required for proper operation.
- Wake up interval, for modules on battery.
- Activation of manual refresh for modules that do not go up by themselves, their state changes.
To apply the recommended configuration set, click on the button : Recommended configuration, then confirm the application of the recommended configurations.
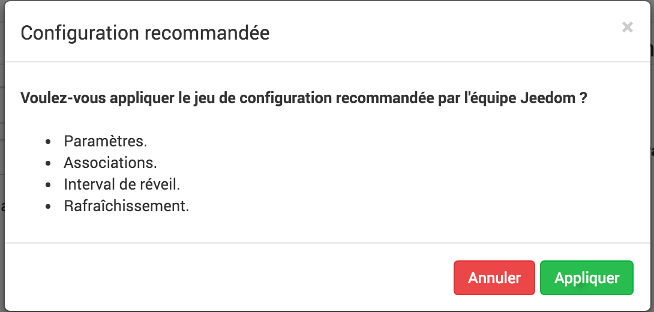
The assistant activates the various configuration elements.
A confirmation of the good progress will be displayed in the form of a banner

Important
Battery modules must be awakened to apply the configuration set.
The equipment page informs you if elements have not yet been activated on the module. Please refer to the module documentation to wake it up manually or wait for the next wake up cycle.
Tip
It is possible to automatically activate the application of the recommended configuration set when including a new module, see the Plugin configuration section for more details.
Configuration of modules
This is where you will find all the information about your module
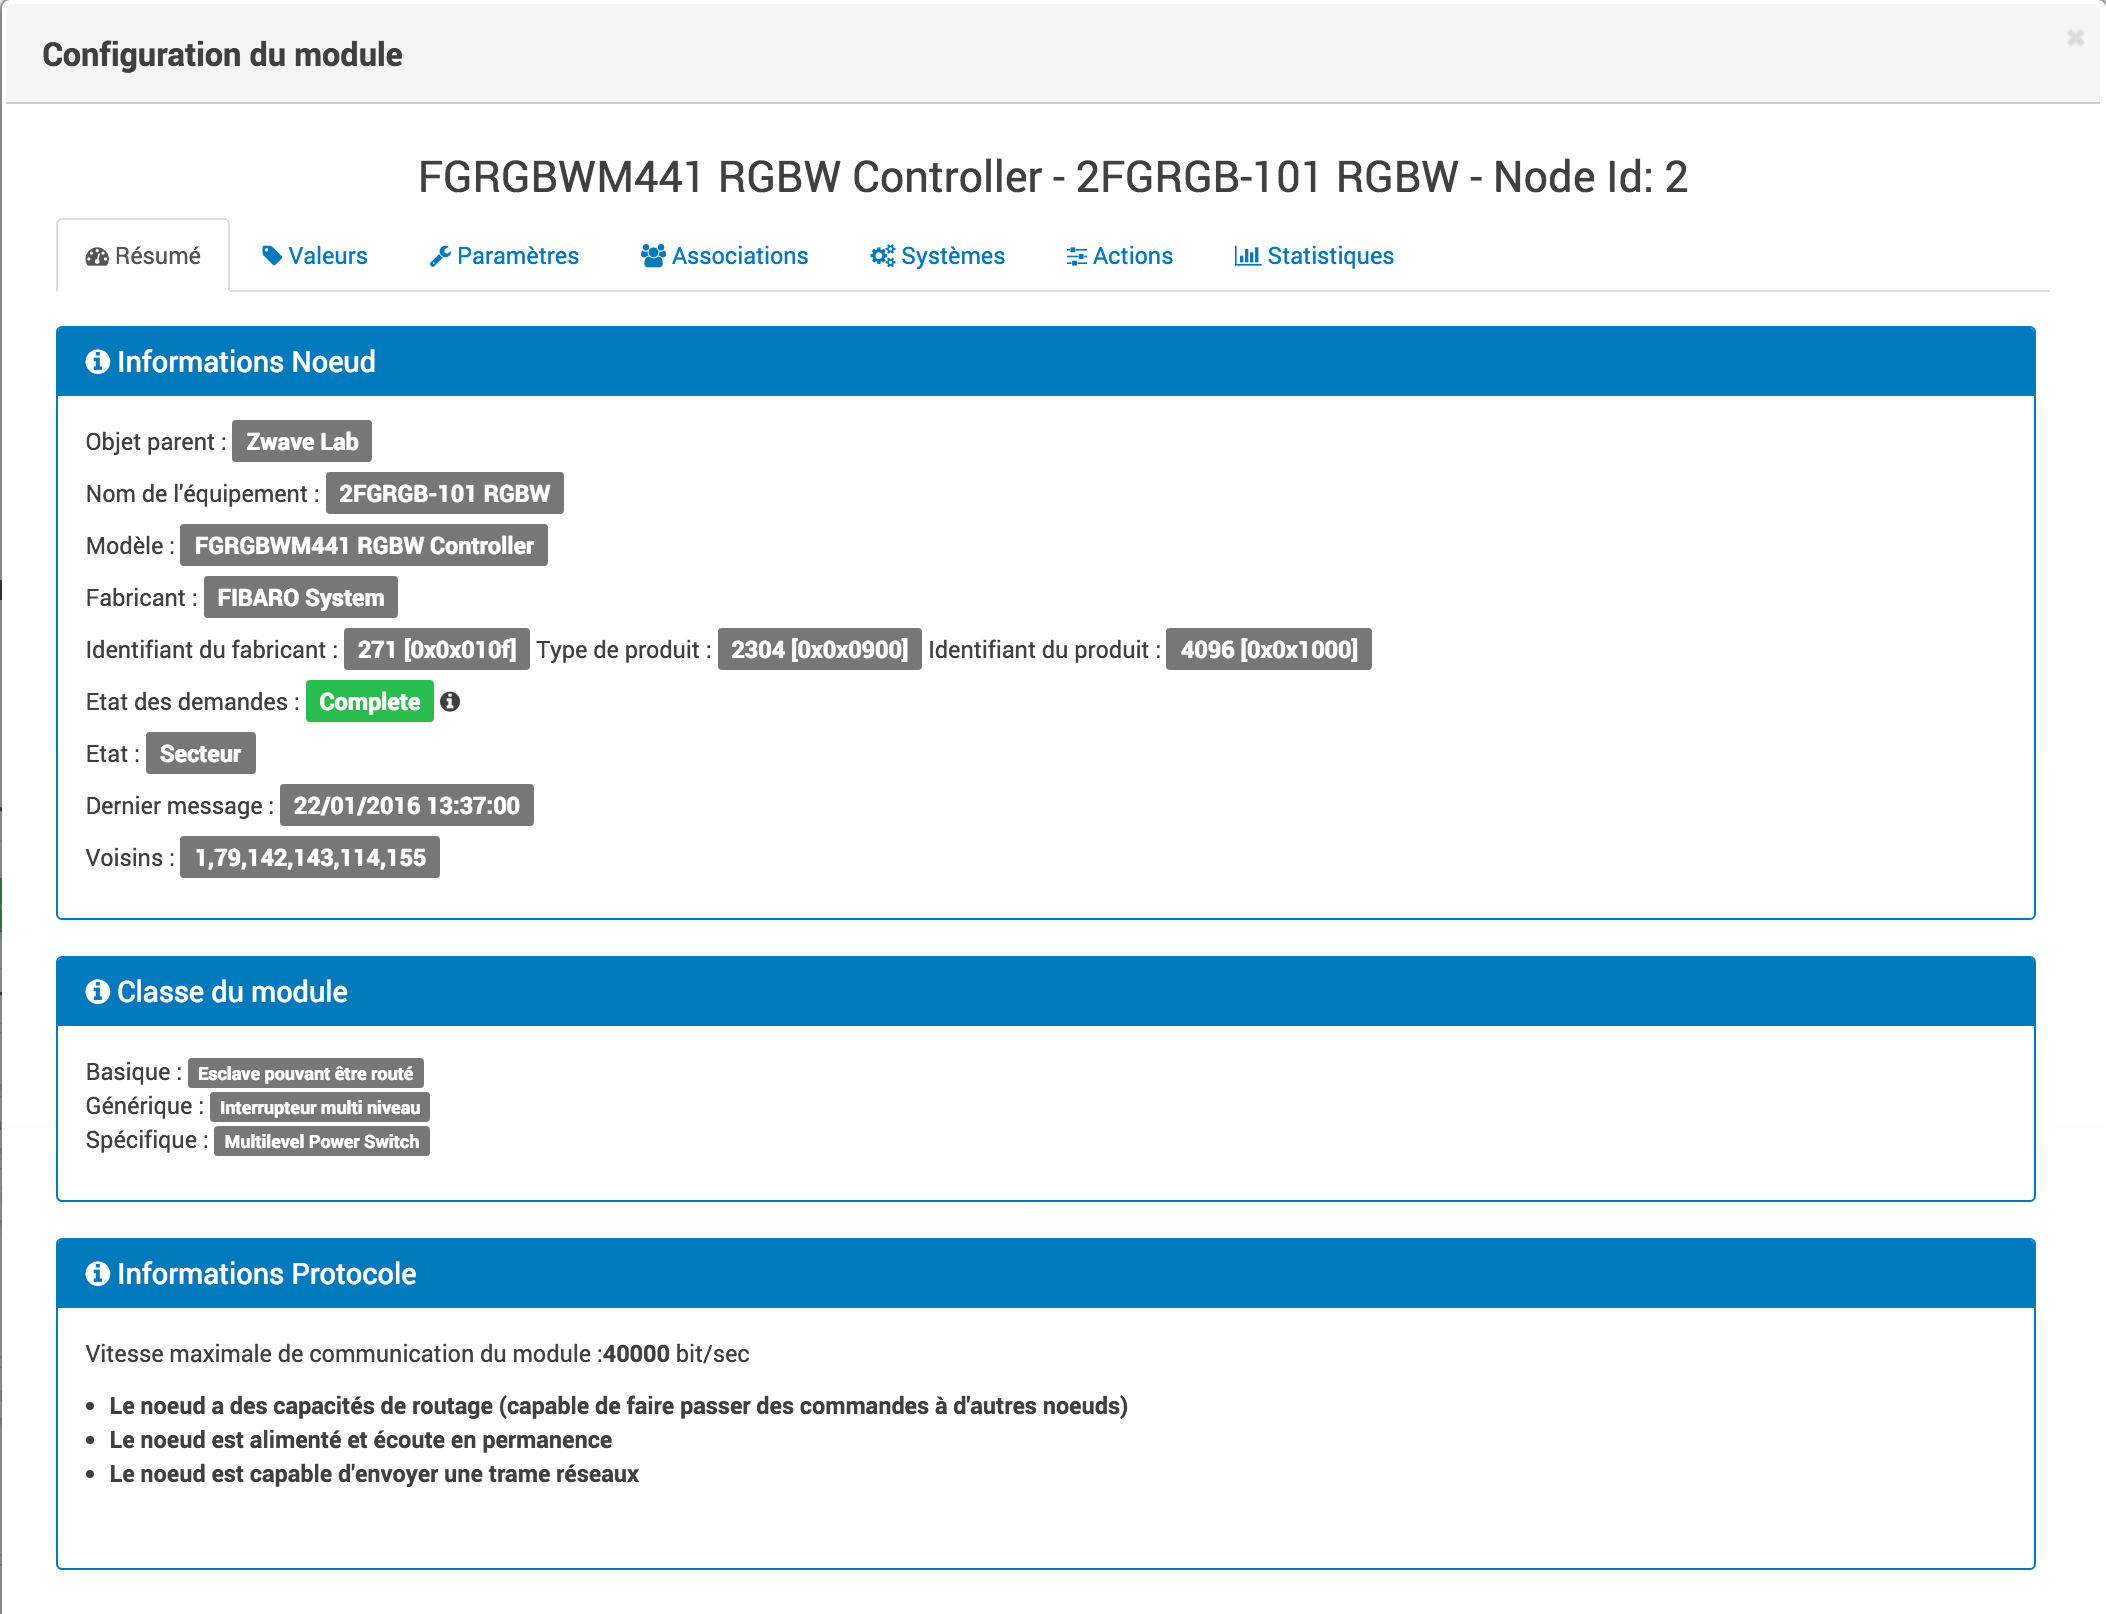
The window has several tabs :
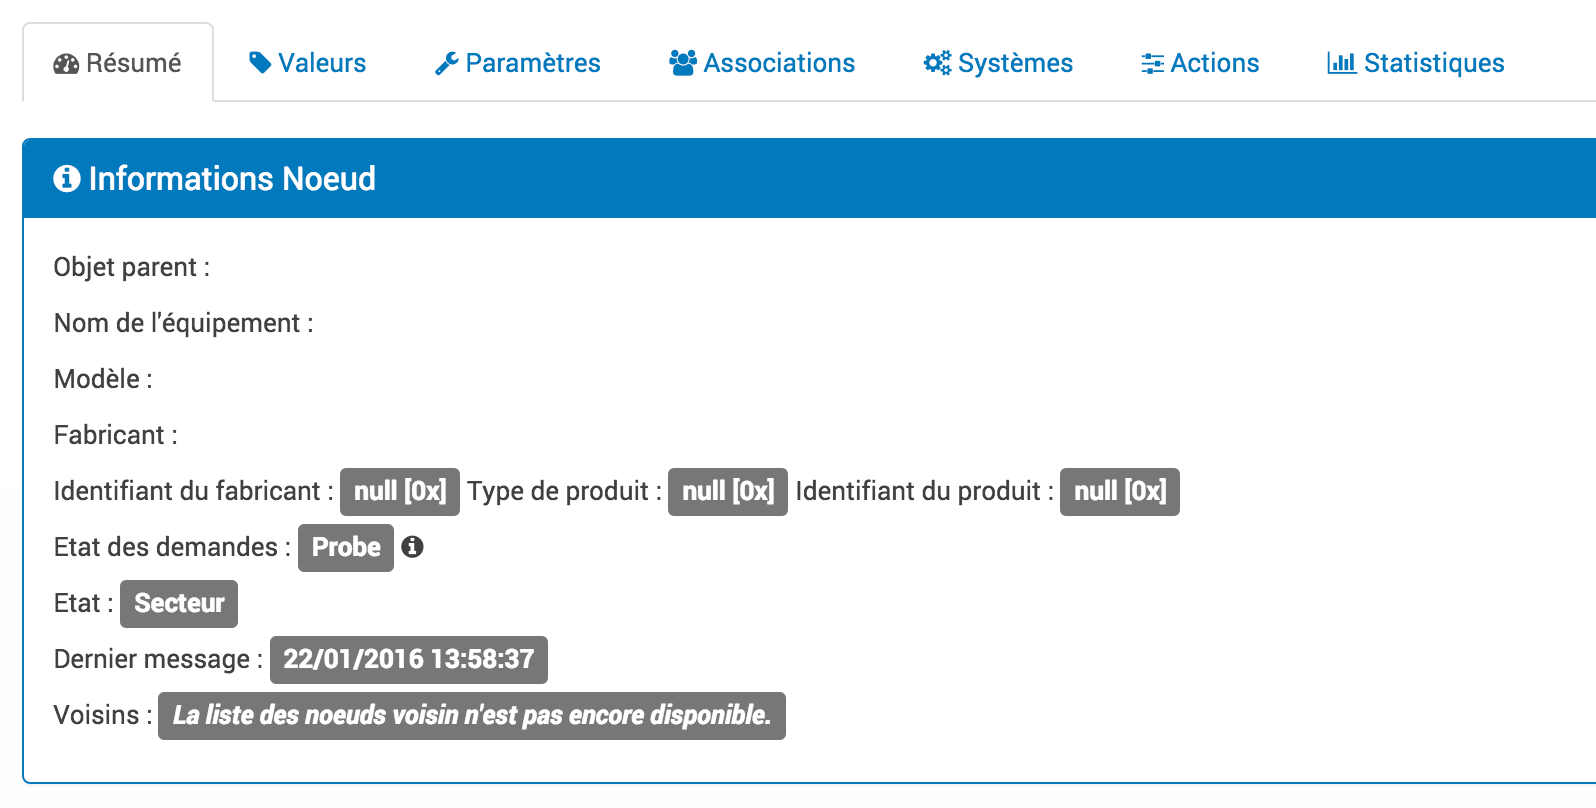
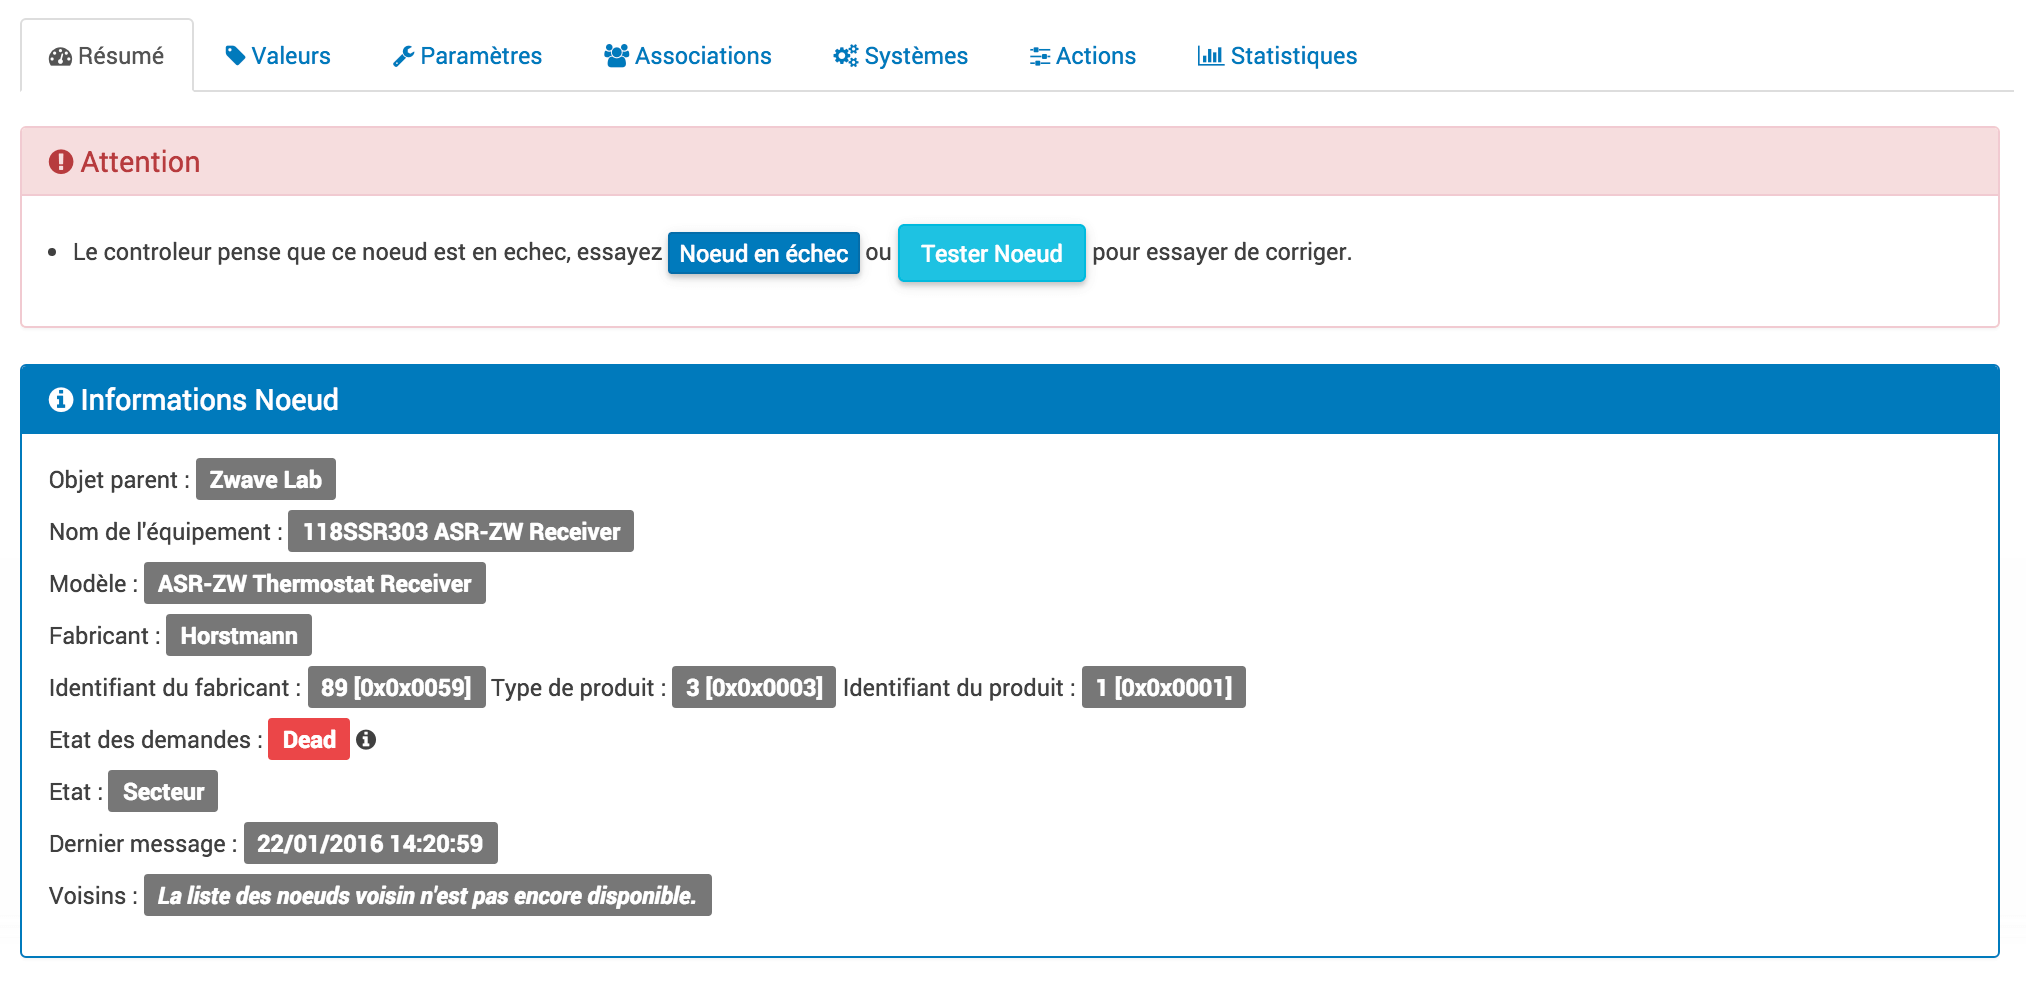
Summary
Provides a complete summary of your node with various information on it, such as the status of requests which lets you know if the node is waiting for information or the list of neighboring nodes.
Tip
On this tab it is possible to have alerts in case of possible detection of a configuration problem, Jeedom will tell you the procedure to follow to correct. Do not confuse an alert with an error, the alert is in most cases a simple recommendation.
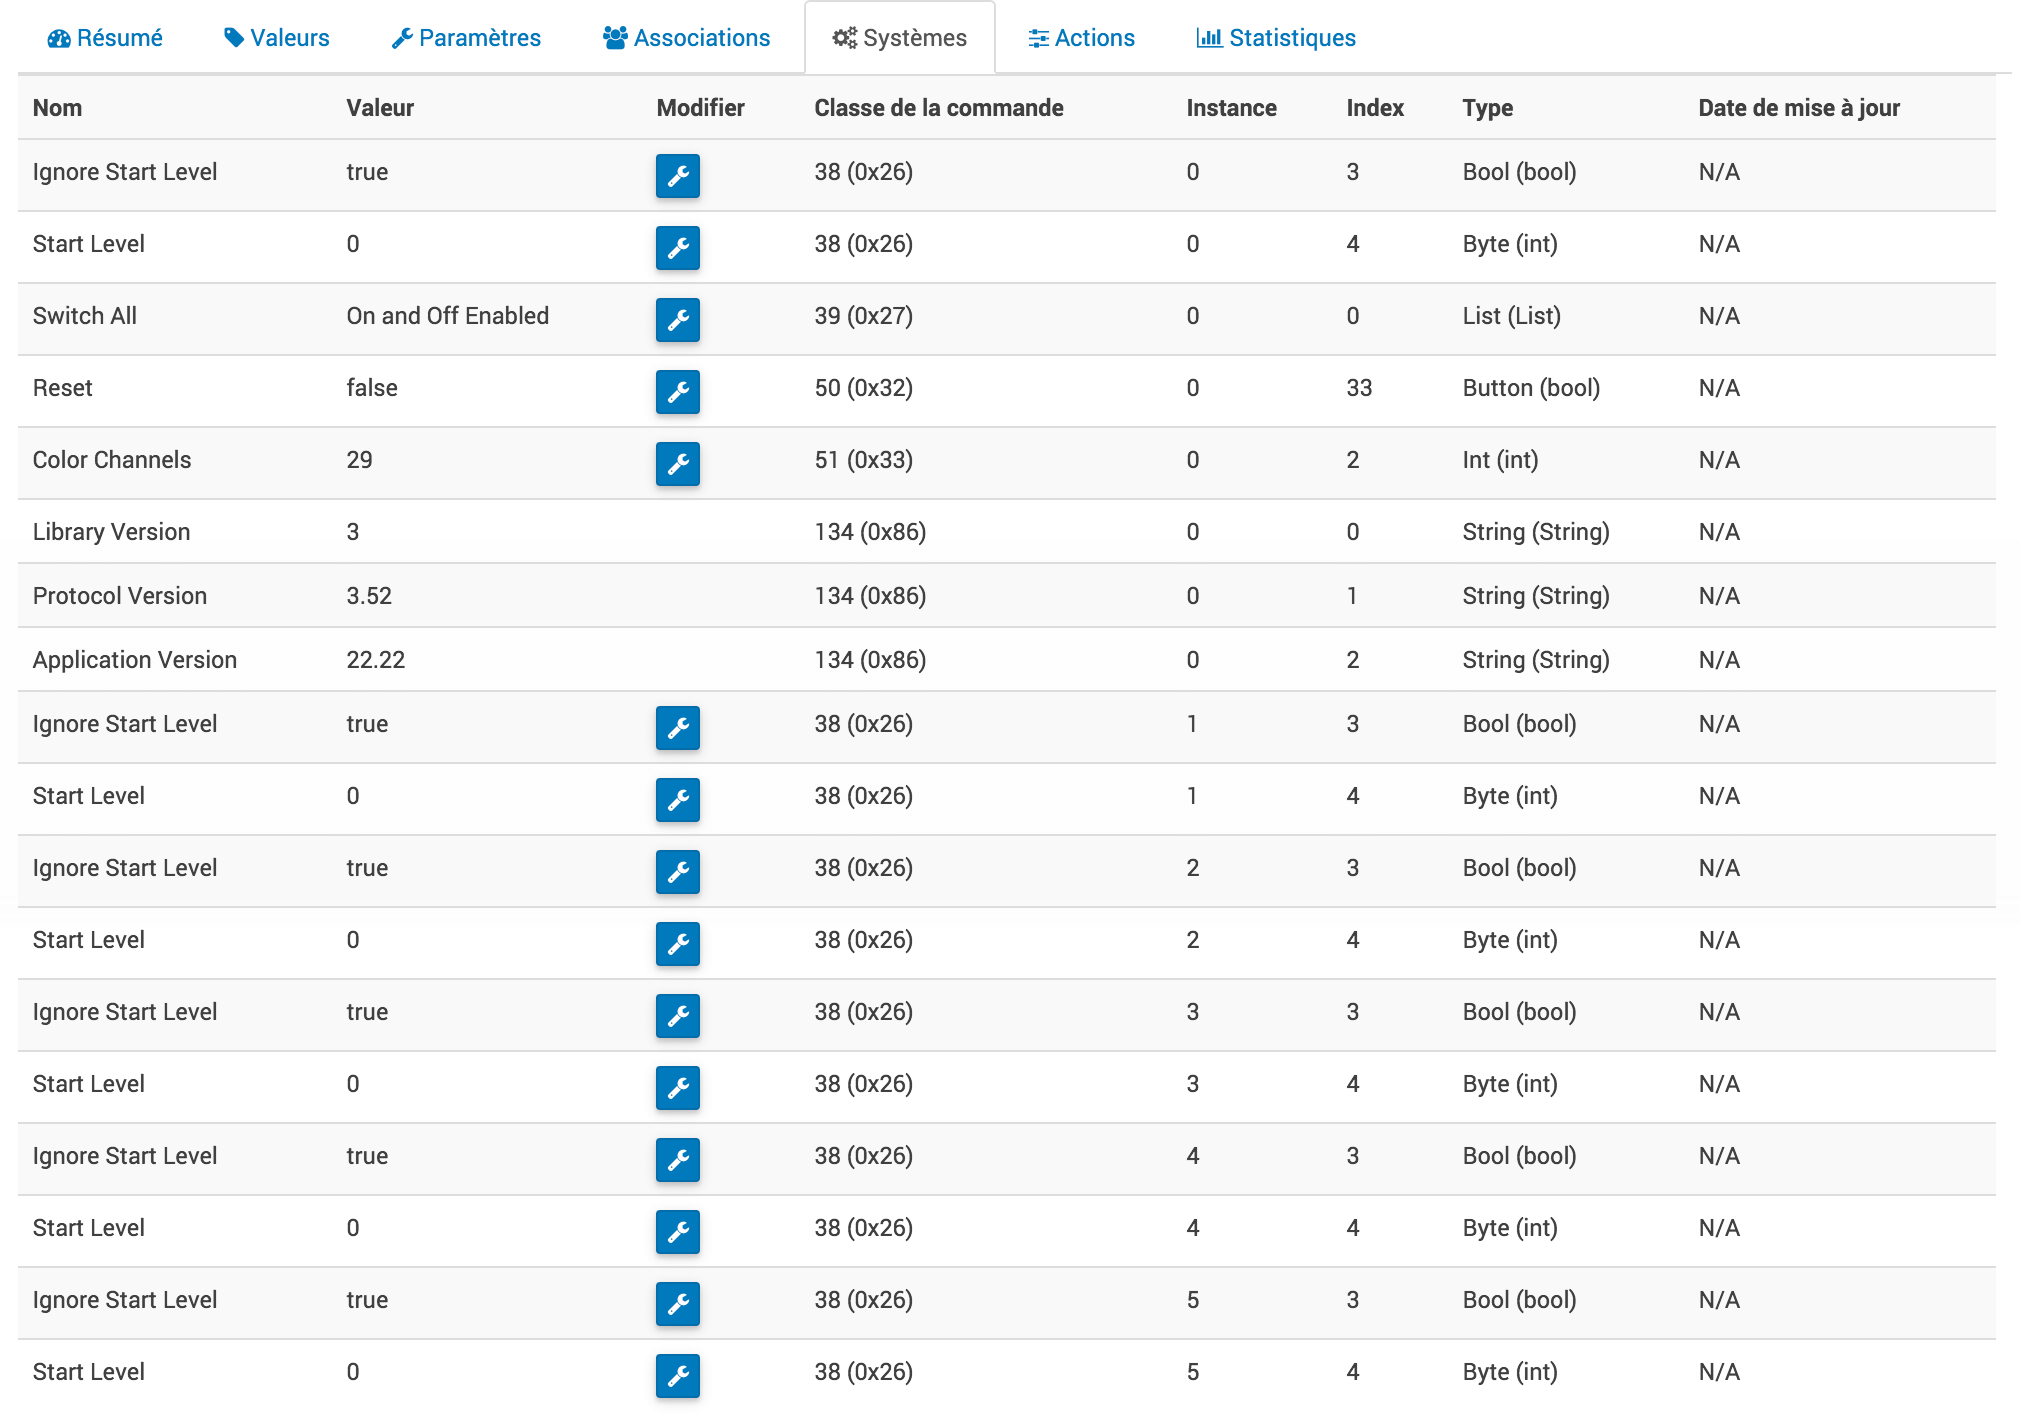
Valeurs
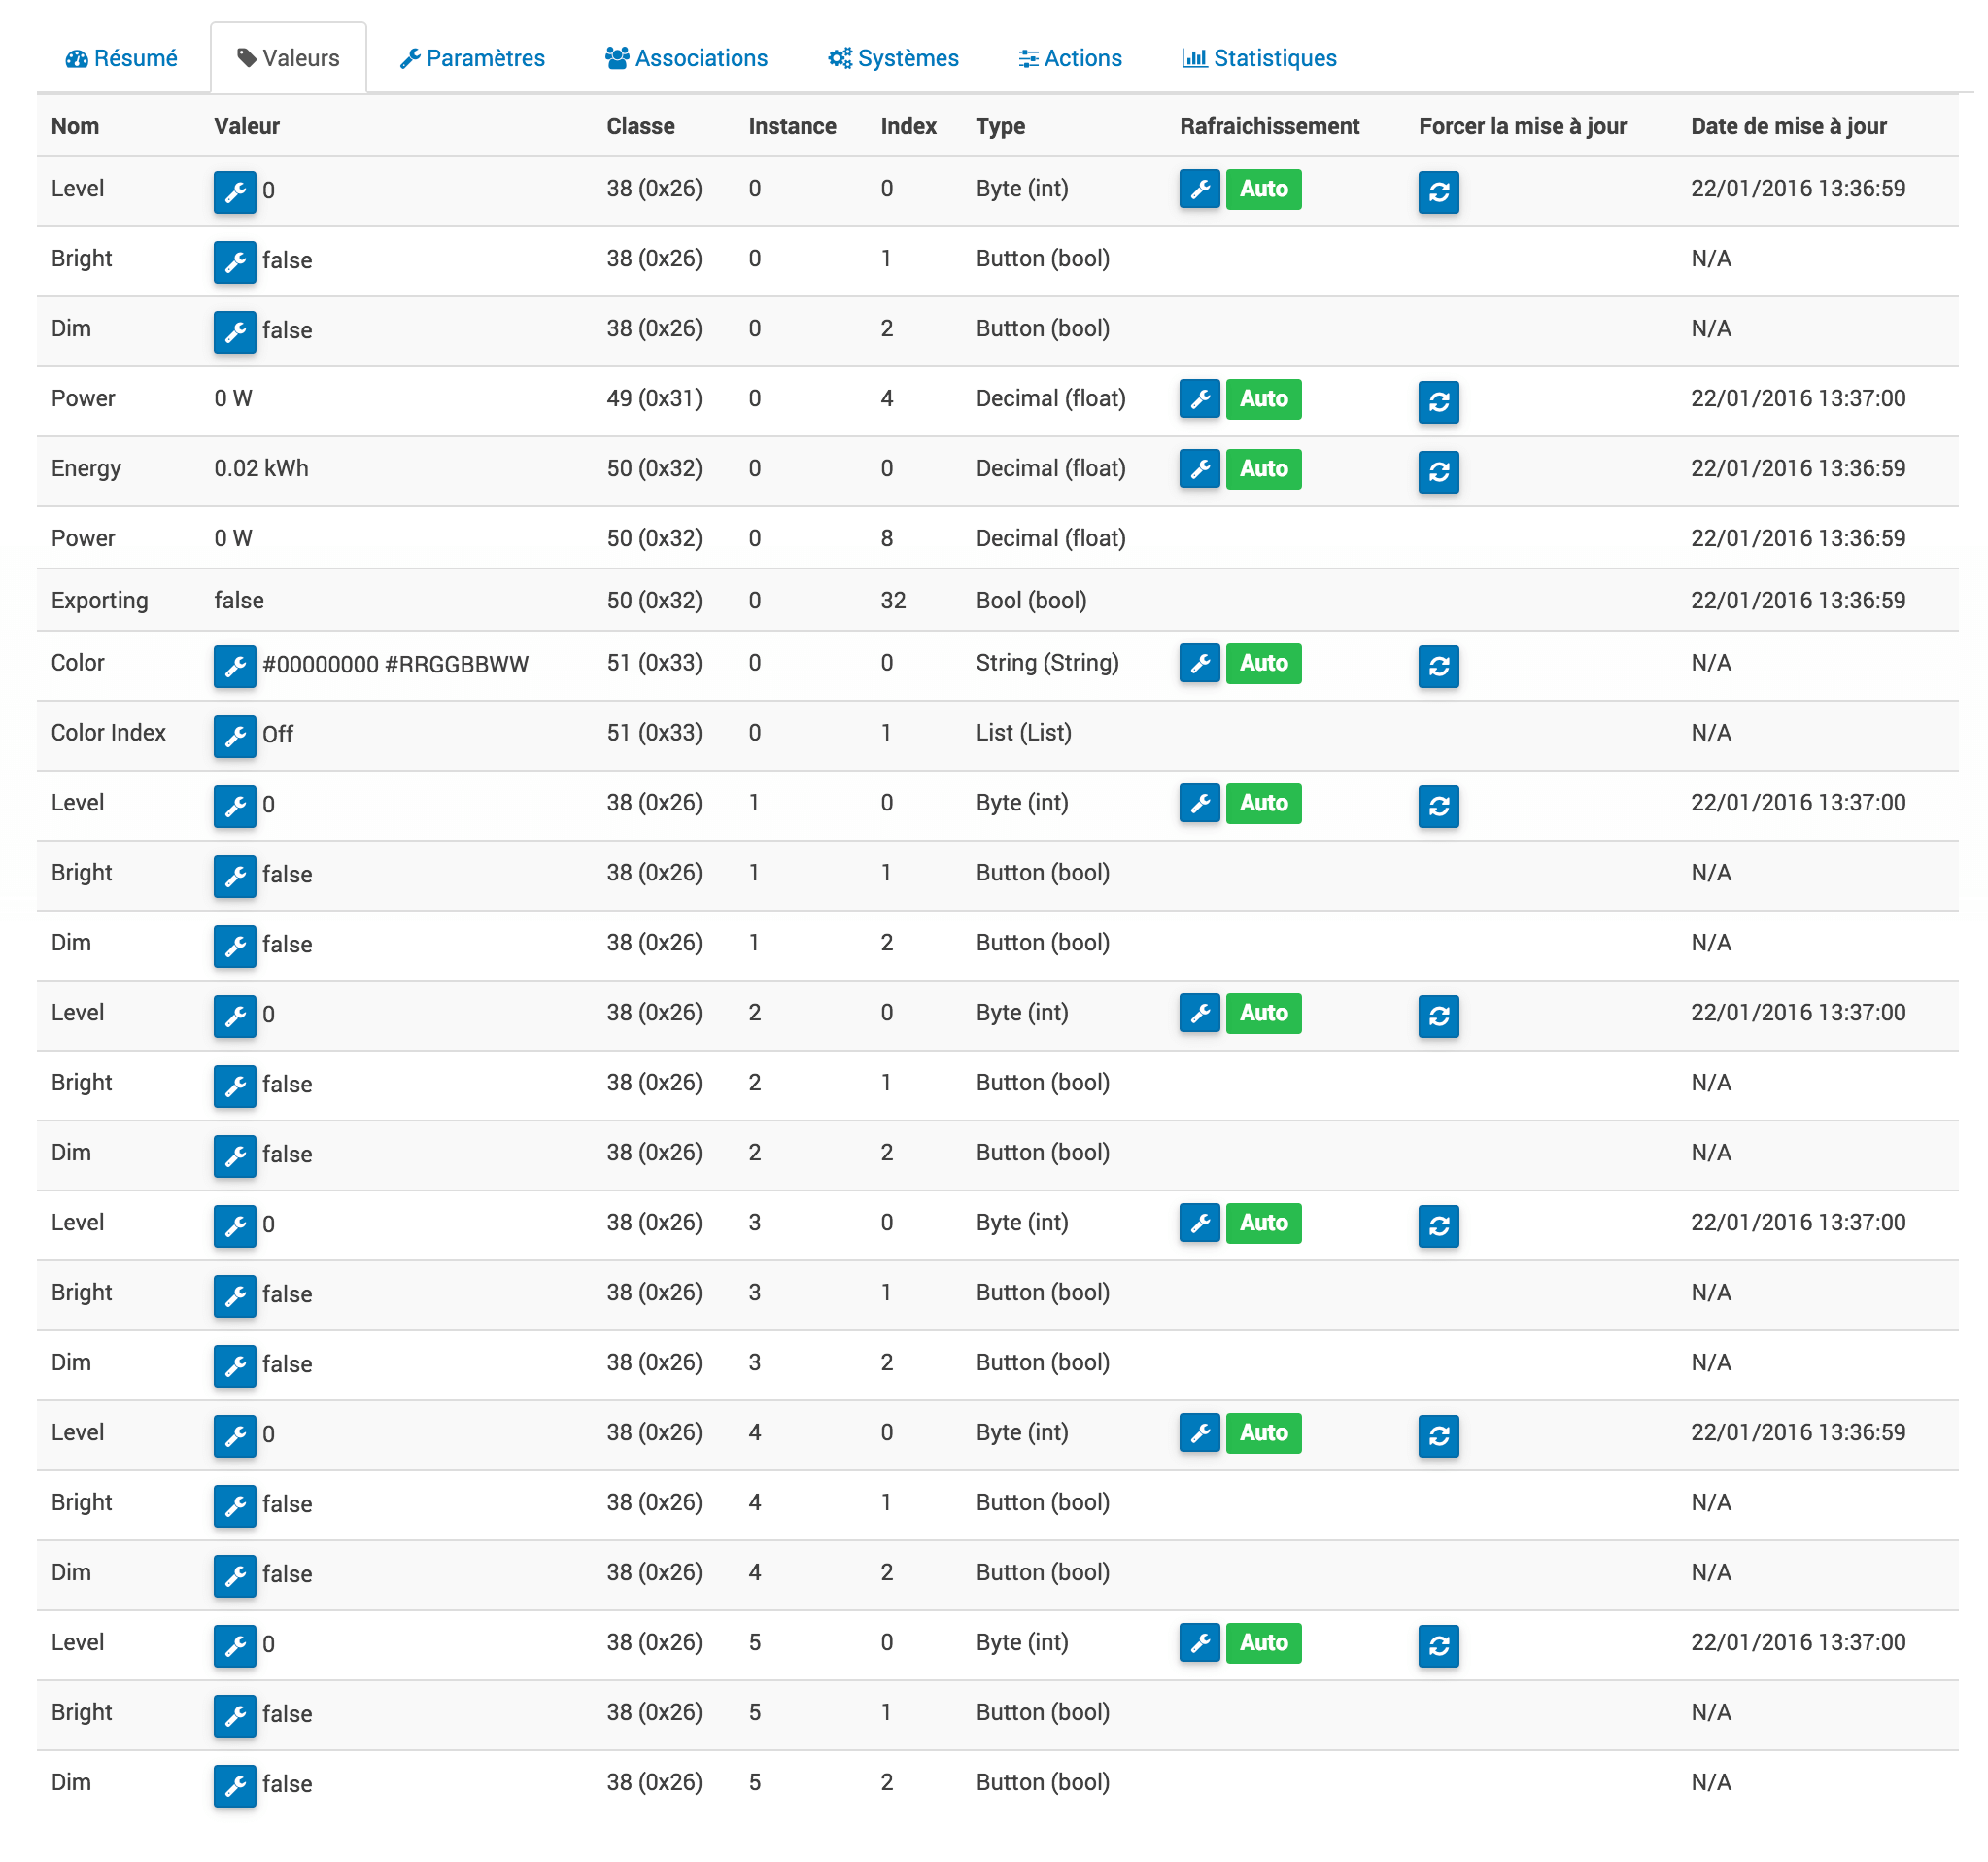
You will find here all the possible commands and states on your module. They are ordered by instance and command class then index. The « mapping » des commandes est entièrement basé sur ces informations.
Tip
Force update of a value. The modules on battery will refresh a value only at the next wake-up cycle. It is however possible to manually wake up a module, see the module documentation.
Tip
It is possible to have more orders here than on Jeedom, this is completely normal. In Jeedom the orders have been preselected for you.
Important
Some modules do not automatically send their states, in this case it is necessary to activate the manual refresh at 5 minutes on the desired value (s). It is recommended to automatically leave the refresh. Abuse of manual refresh can strongly impact the performance of the Z-Wave network, use only for the values recommended in the specific Jeedom documentation.
The set of values (index) of the instance of a class command will be reassembled, activating manual refresh on the smallest index of the instance of the class command. Repeat for each instance if necessary.
Settings
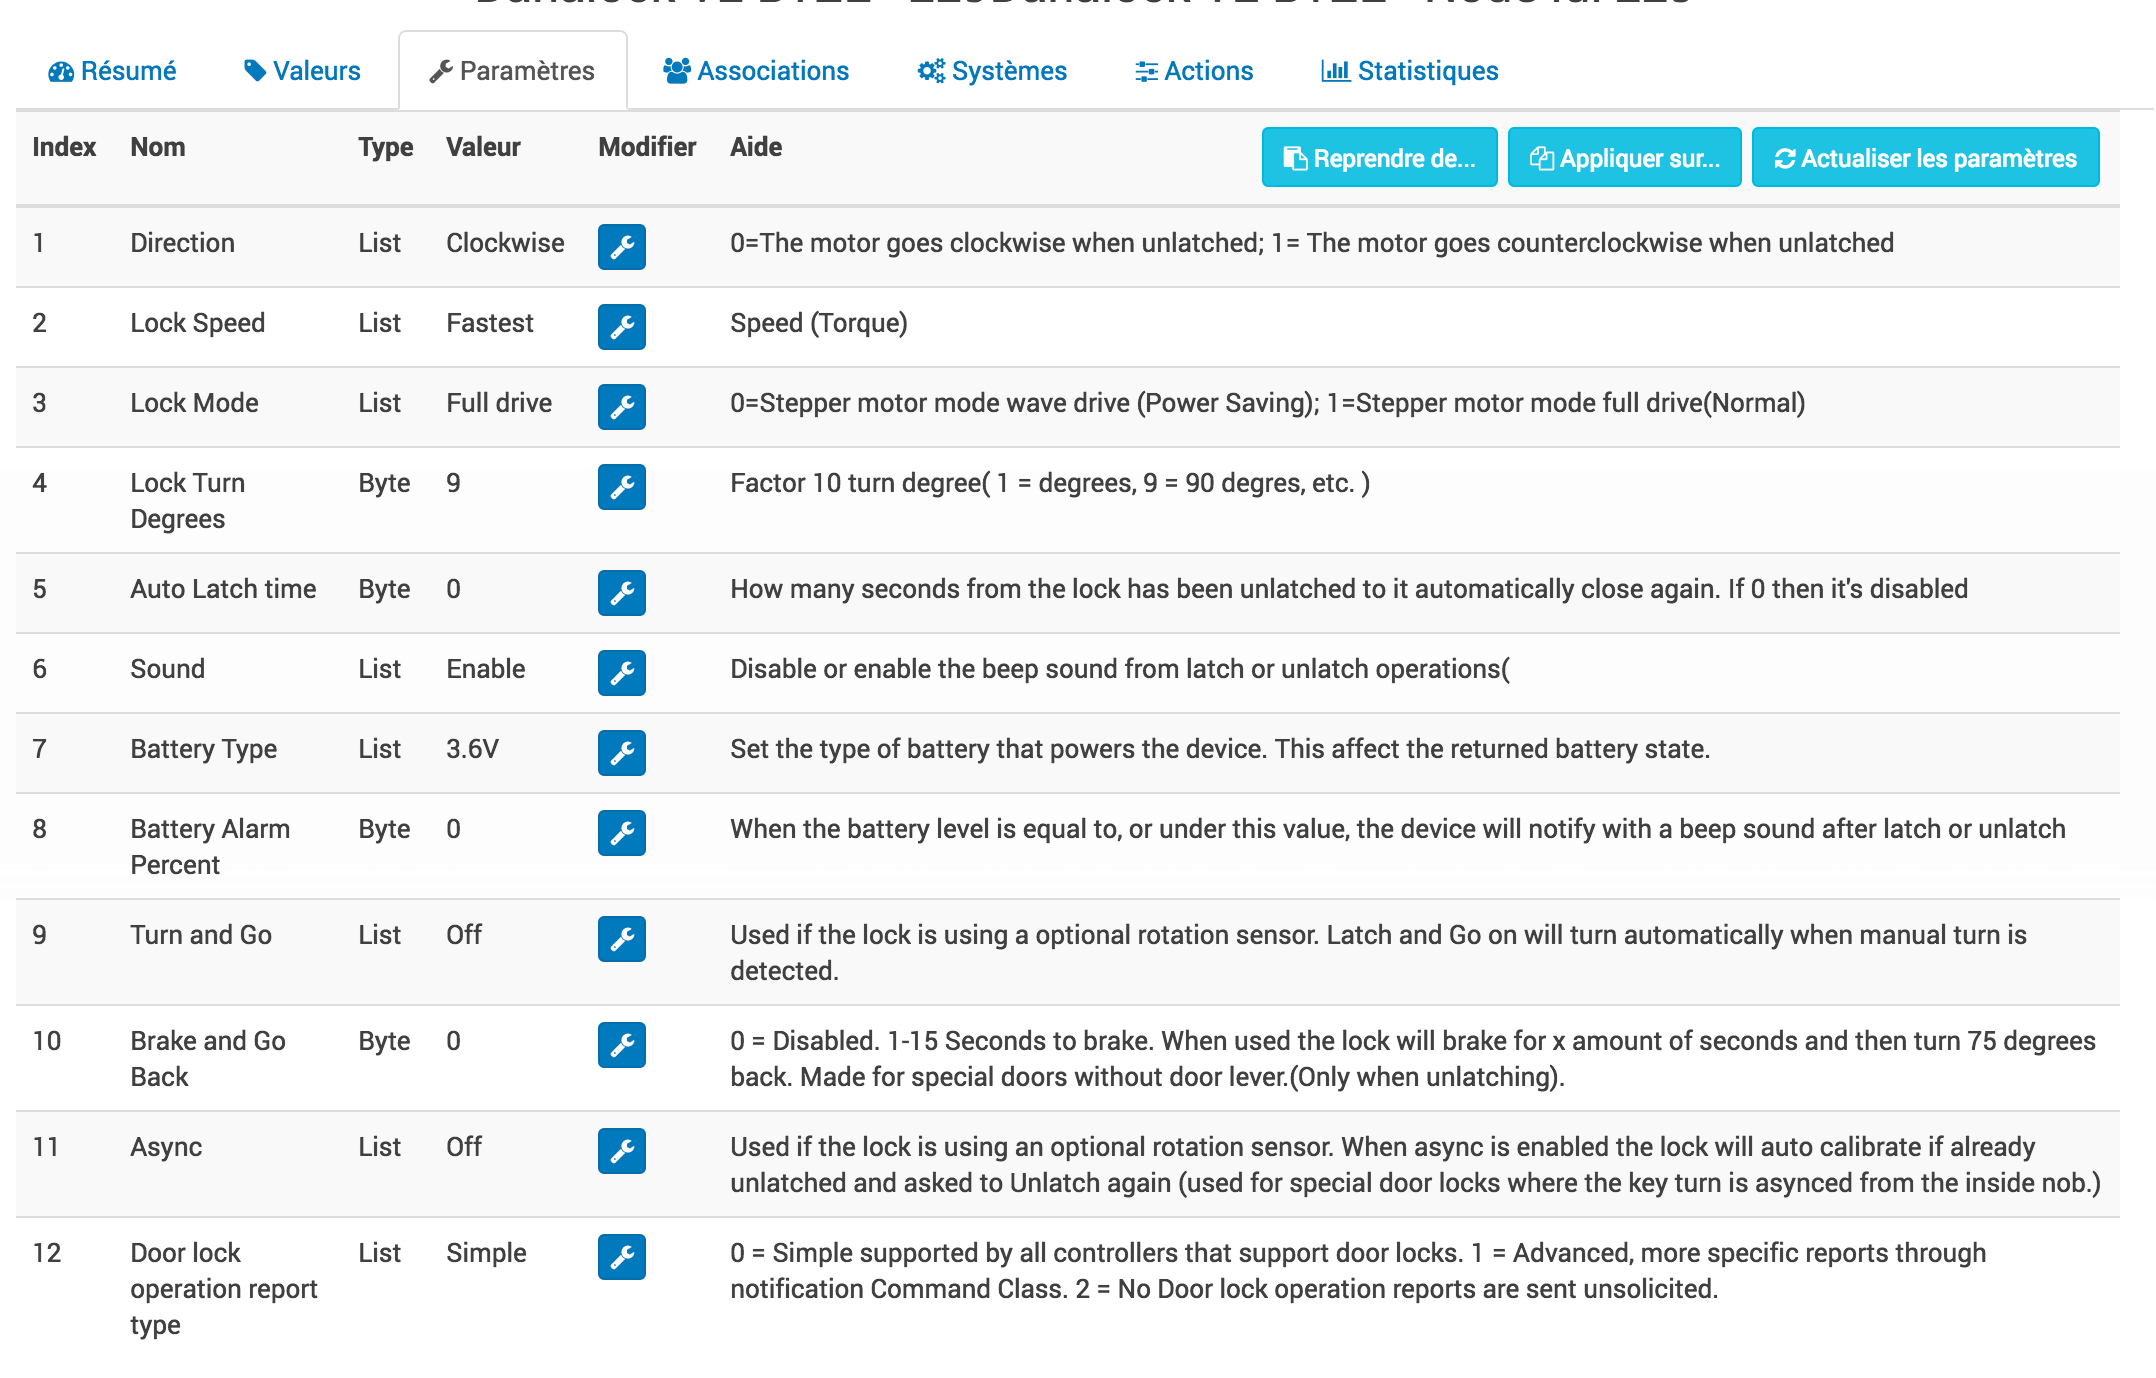
Here you will find all the possibilities for configuring the parameters of your module as well as the possibility of copying the configuration from another node already in place.
When a parameter is modified, the corresponding line turns yellow, 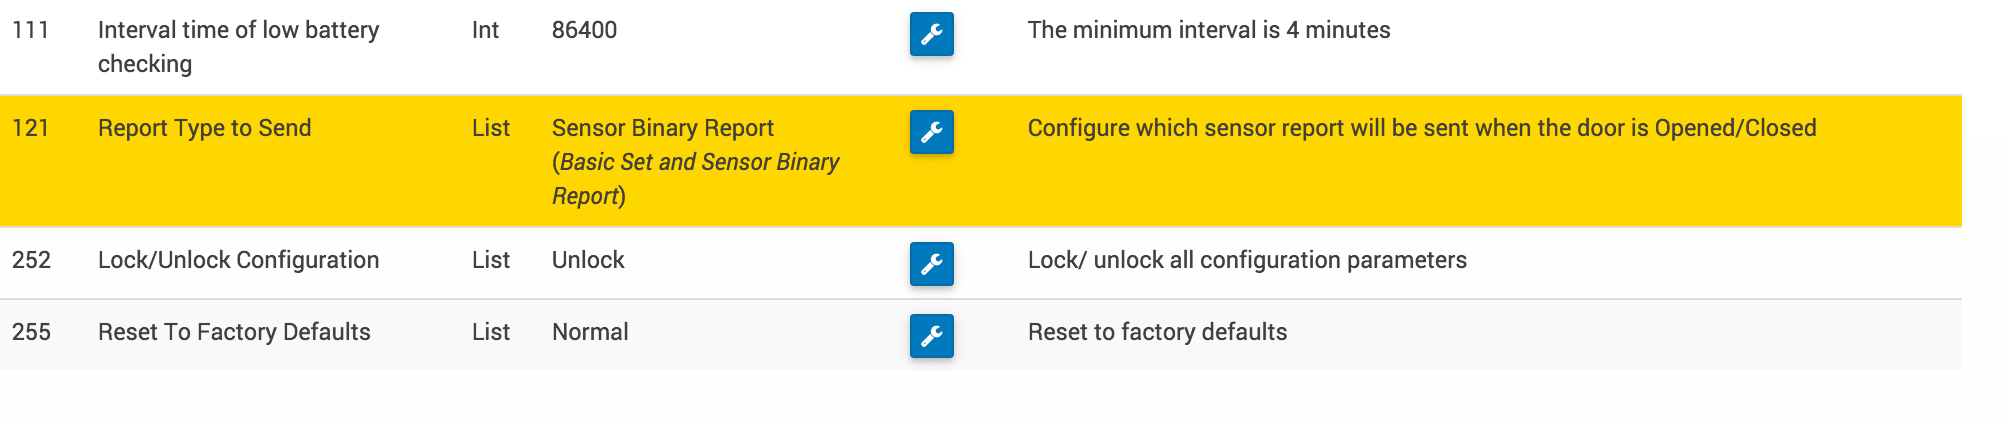 the setting is waiting to be applied.
If the module accepts the parameter, the line becomes transparent again.
If however the module refuses the value, the line will then turn red with the applied value returned by the module. 
On inclusion, a new module is detected with the manufacturer’s default settings. On some modules, functionalities will not be active without modifying one or more parameters. Refer to the manufacturer’s documentation and our recommendations in order to properly configure your new modules.
Tip
Battery modules will apply parameter changes only to the next wake-up cycle. It is however possible to manually wake up a module, see the module documentation.
Tip
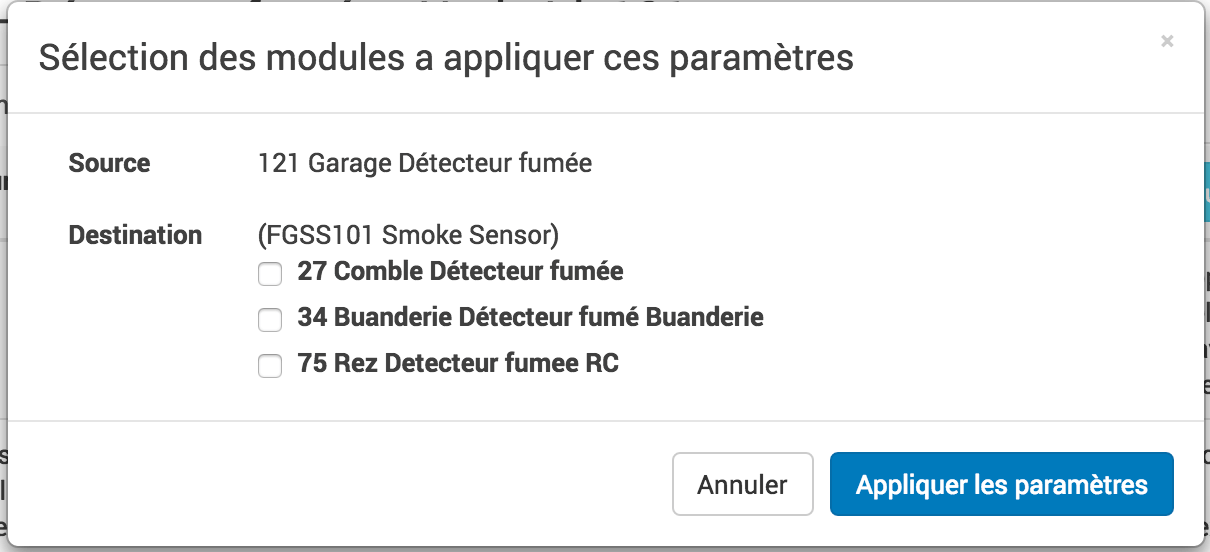
The command Resume from allows you to resume the configuration of another identical module, on the current module.

Tip
The command Apply on allows you to apply the current module configuration to one or more identical modules.
Tip
The command Update settings forces the module to update the parameters saved in the module.
If no configuration file is defined for the module, a manual wizard allows you to apply parameters to the module. 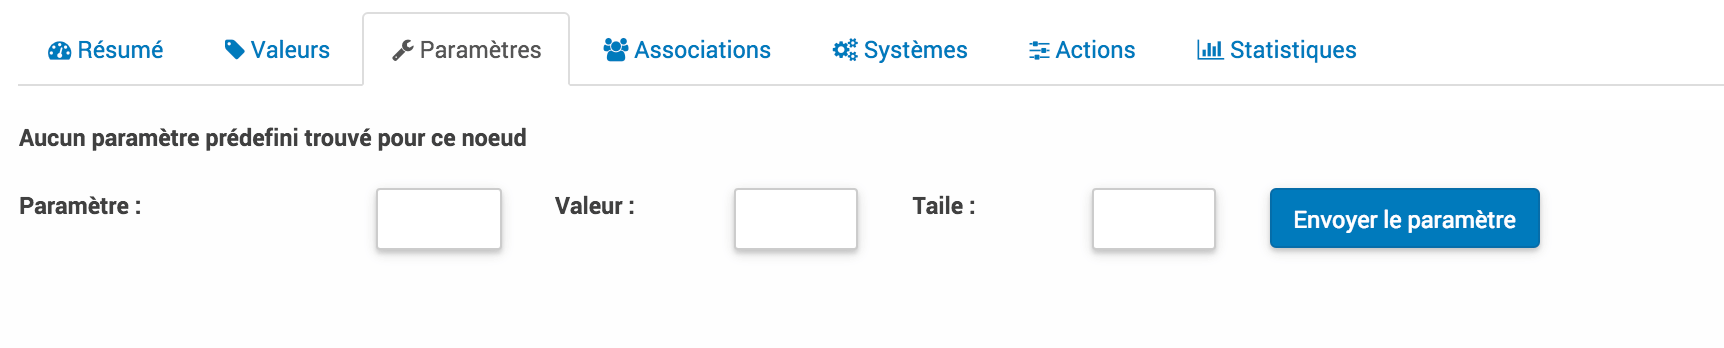 Please refer to the manufacturer’s documentation for the definition of the index, value and size.
##Associations
This is where you find the management of the association groups of your module.
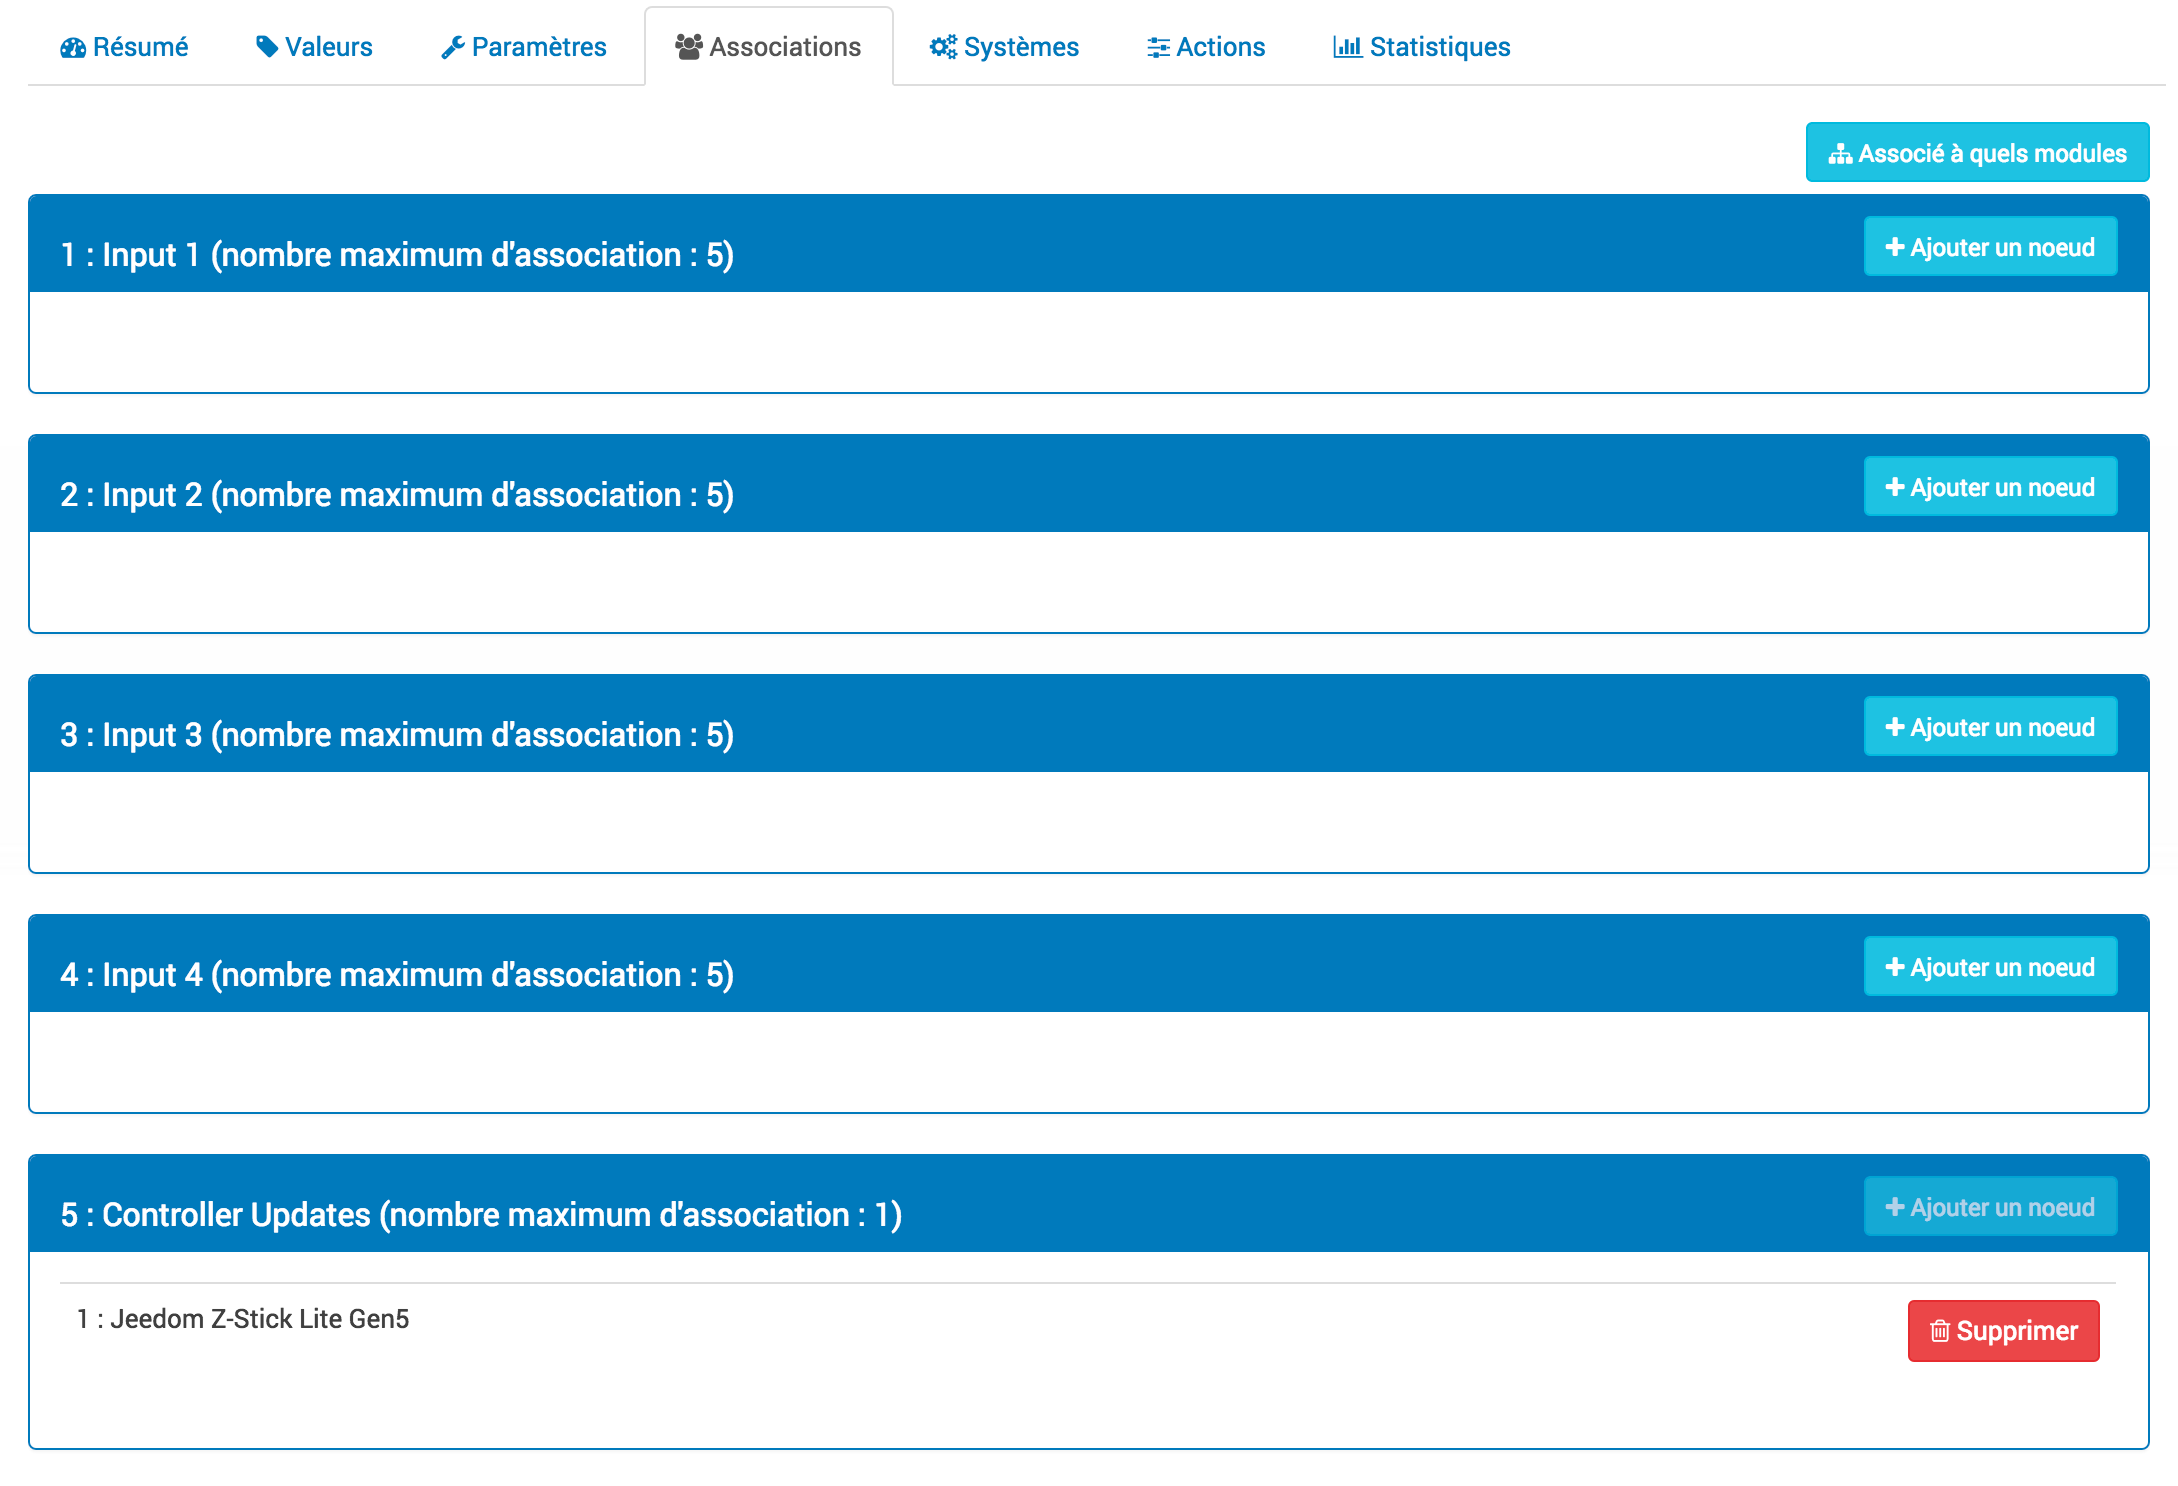
Z-Wave modules can control other Z-Wave modules, without going through the controller or Jeedom. The relationship between a control module and another module is called association.
In order to control another module, the command module needs to maintain a list of devices that will receive command control. These lists are called association groups and they are always linked to certain events (for example the button pressed, sensor triggers, etc ).
In the event that an event occurs, all devices registered in the association group concerned will receive a Basic command.
Tip
See the documentation of the module, to understand the different groups of possible associations and their behavior.
Tip
The majority of modules have an association group which is reserved for the main controller, it is used to send information to the controller. It is generally called : Report or LifeLine.
Tip
Your module may not have any groups.
Tip
The modification of the association groups of a battery module will be applied to the next wake-up cycle. It is however possible to manually wake up a module, see the module documentation.
To know with which other modules the current module is associated, just click on the menu Associated with which modules
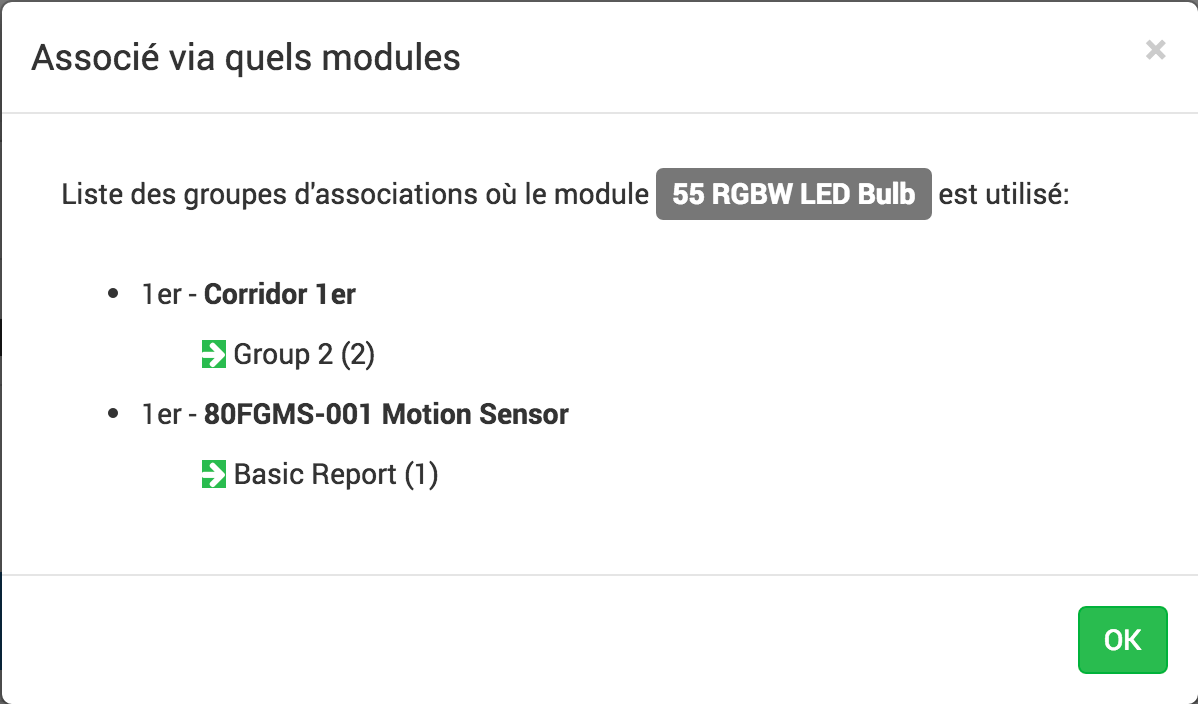
All the modules using the current module as well as the name of the association groups will be displayed.
Multi-instance associations
Some module supports a multi-instance associations class command. When a module supports this CC, it is possible to specify with which instance one wishes to create the association
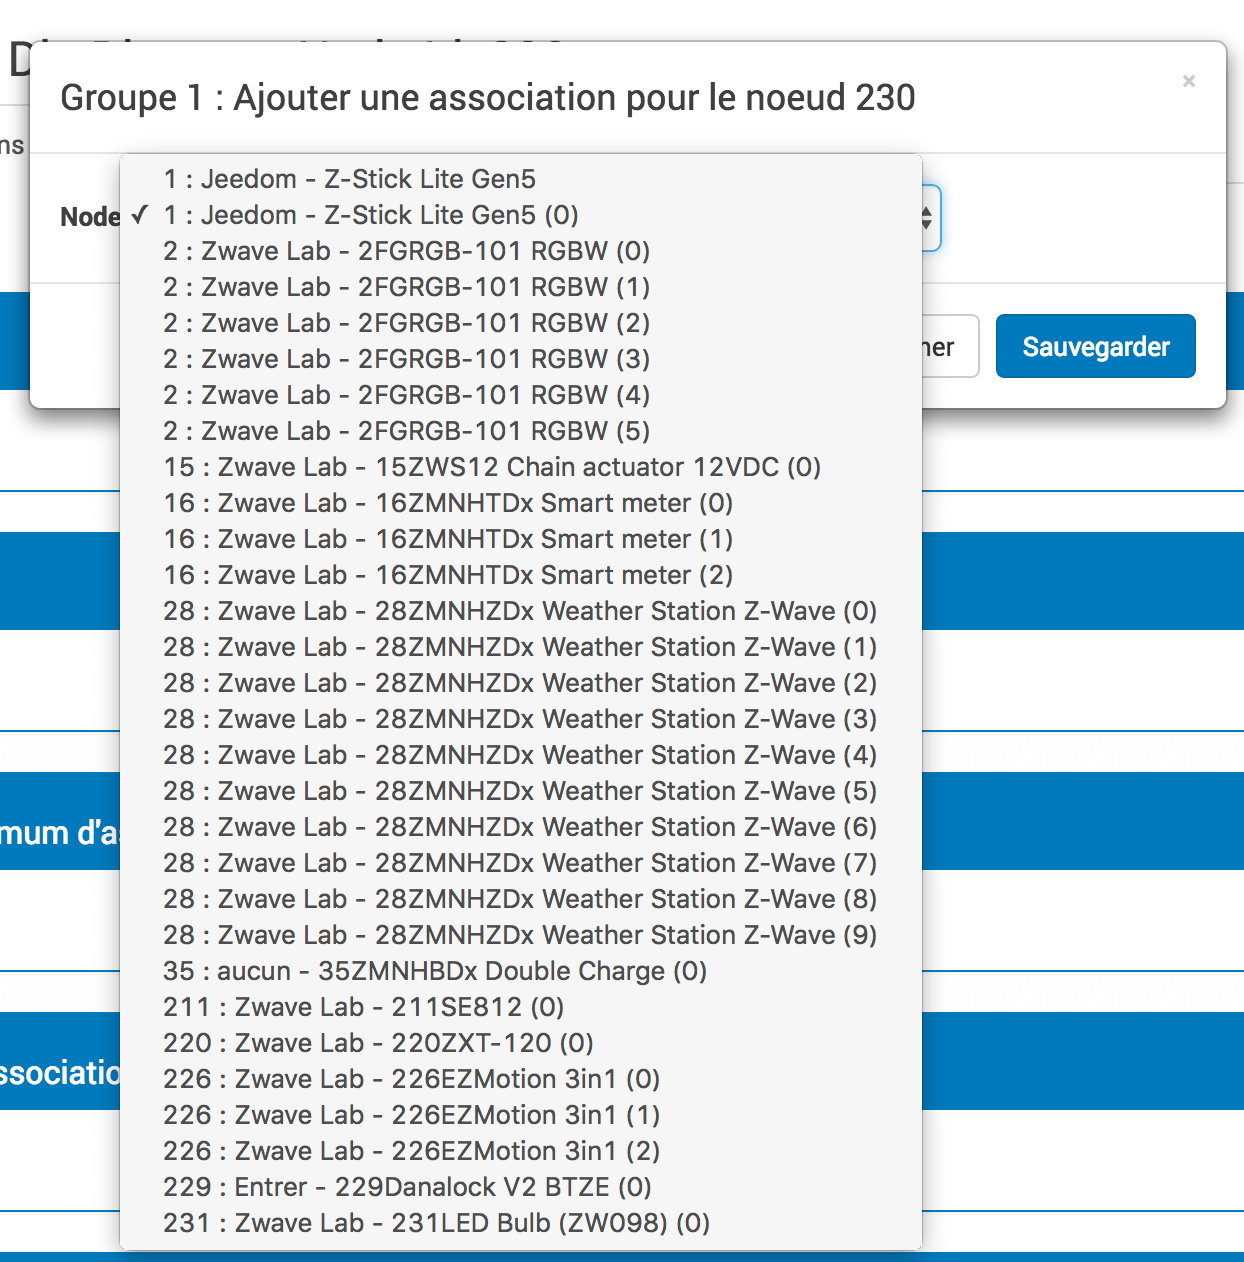
Important
Some modules must be associated with instance 0 of the main controller in order to function properly. For this reason, the controller is present with and without the instance 0.
Systems
Tab grouping the module’s system parameters.
Tip
Battery modules wake up at regular cycles, called Wakeup Interval). Wake-up interval is a compromise between maximum battery life and desired device responses. To maximize the life of your modules, adapt the Wakeup Interval value for example to 14,400 seconds (4h), see even higher depending on the modules and their use.

Tip
Modules Light switch and Dimmer can implement a special Command Class called SwitchAll 0x27. You can change the behavior here. Depending on the module, several options are available. The command SwitchAll On / OFF can be launched via your main controller module.
Actions
Allows you to perform certain actions on the module.
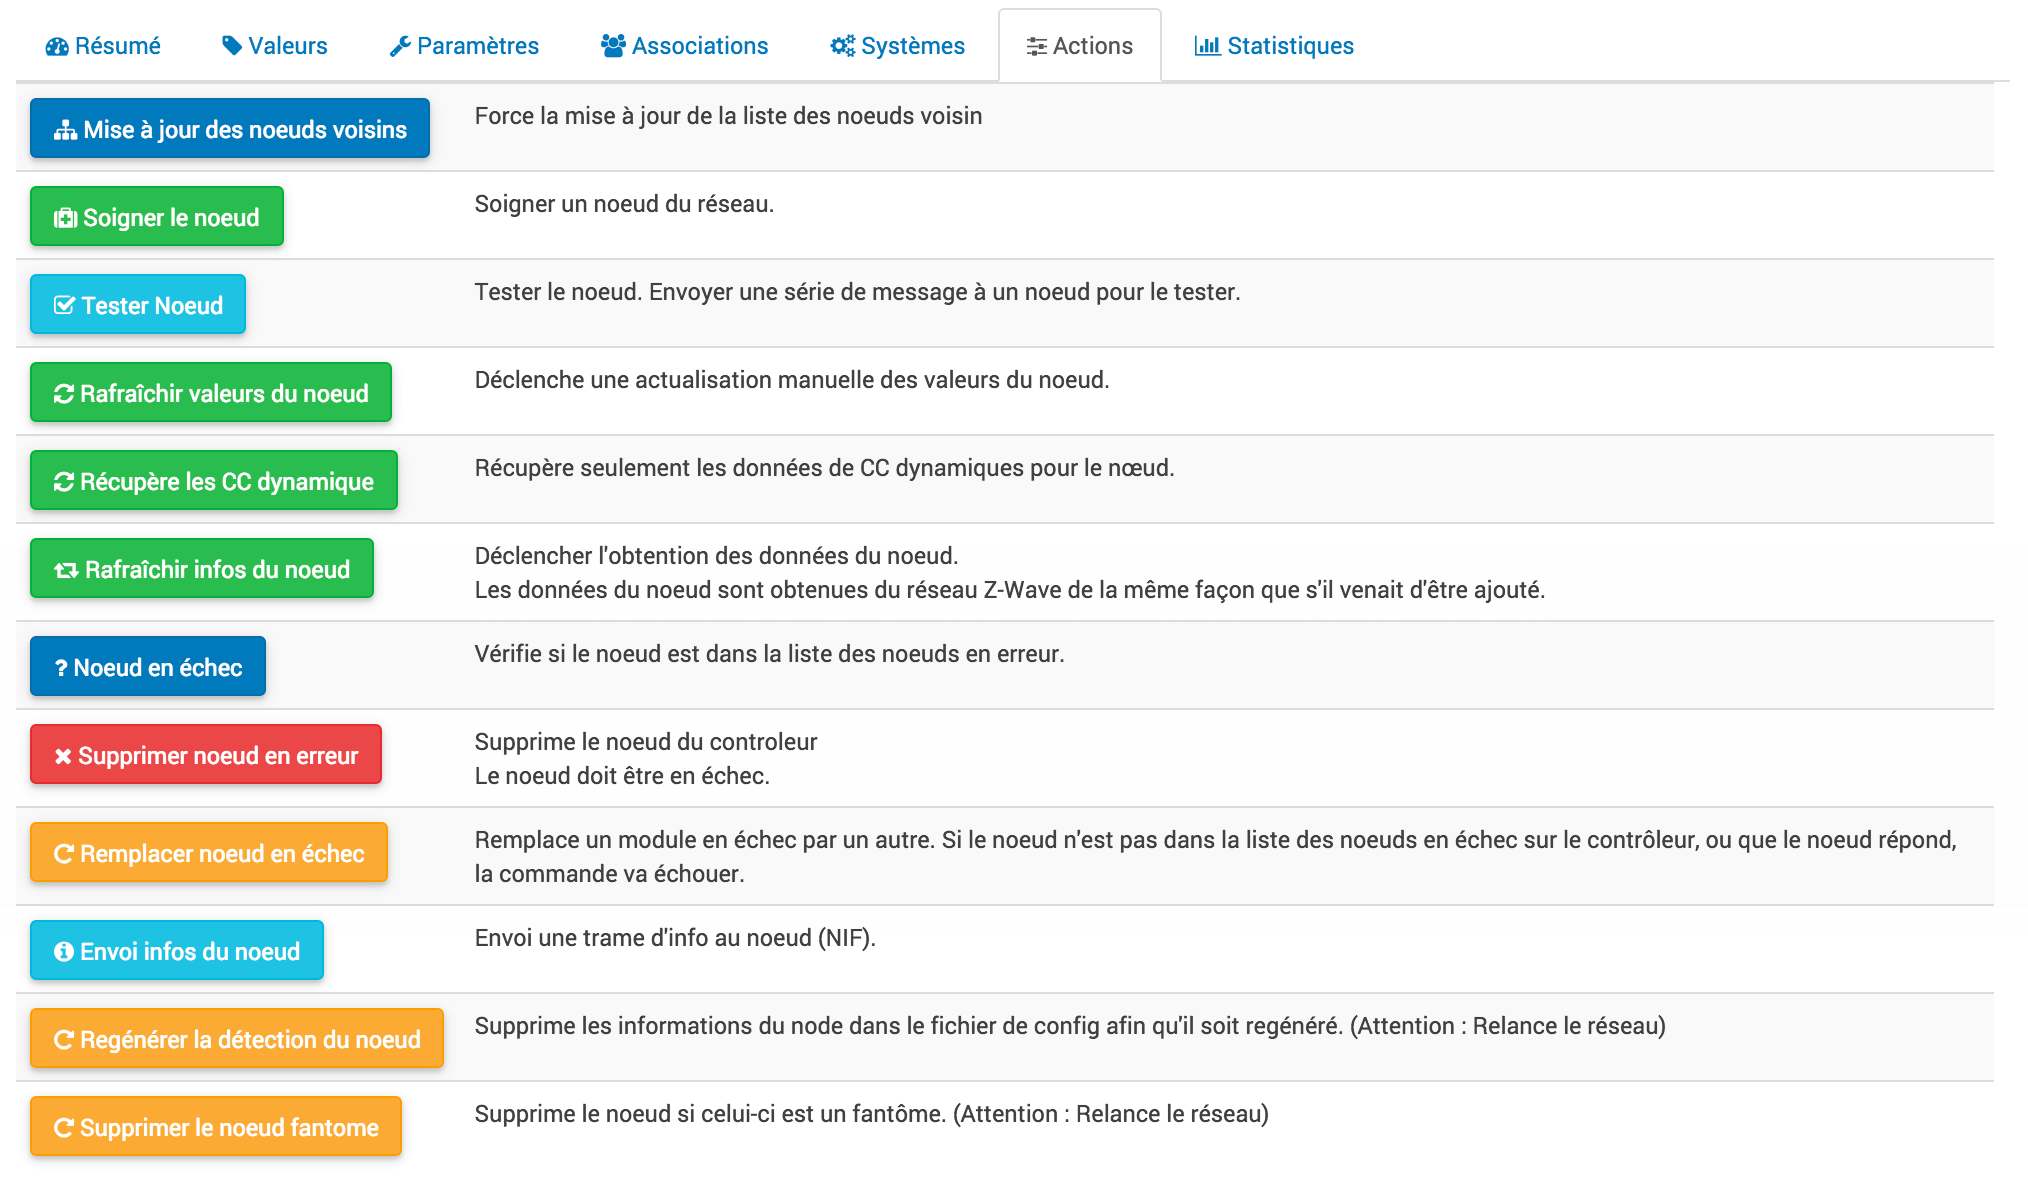
Certain actions will be active according to the type of module and its possibilities or according to the current state of the module such as if it is presumed dead by the controller.
Important
Do not use actions on a module if you do not know what you are doing. Some actions are irreversible. Actions can help solve problems with one or more Z-Wave modules.
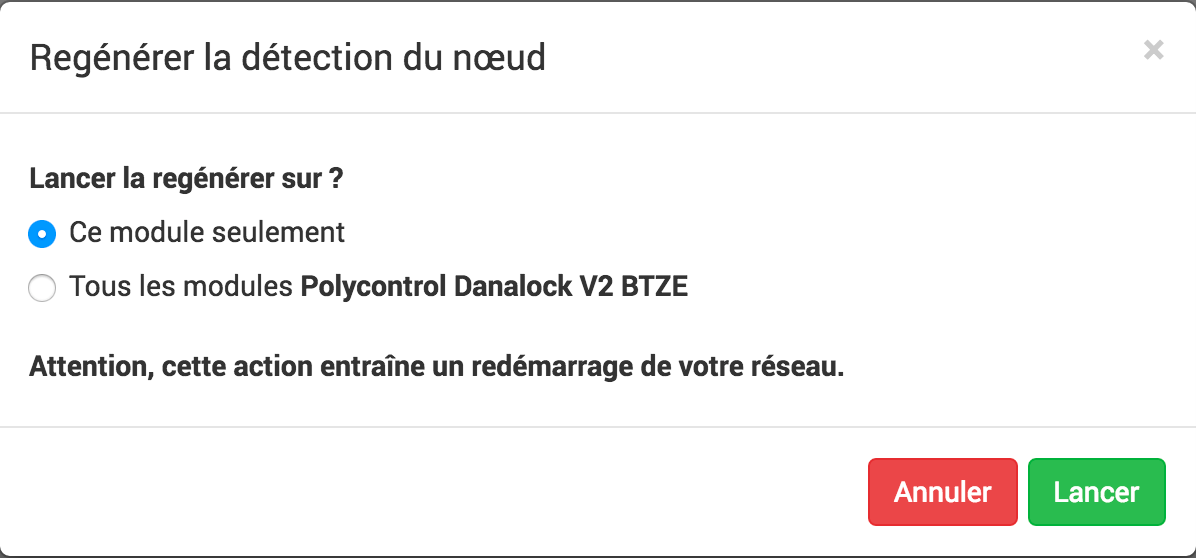
Tip
The Regeneration of node detection allows to detect the module to accept the last sets of parameters. This action is required when you are informed that an update of parameters and or behavior of the module is required for proper functioning. The regeneration of the detection of the node implies a restart of the network, the assistant carries out it automatically.
Tip
If you have several identical modules which are required to run the Regeneration of node detection, it is possible to launch it once for all identical modules.
Tip
If a module on a stack is no longer reachable and you want to exclude it, and the exclusion does not take place, you can launch Remove ghost node An assistant will perform various actions to remove the so-called ghost module. This action involves restarting the network and may take several minutes to complete.
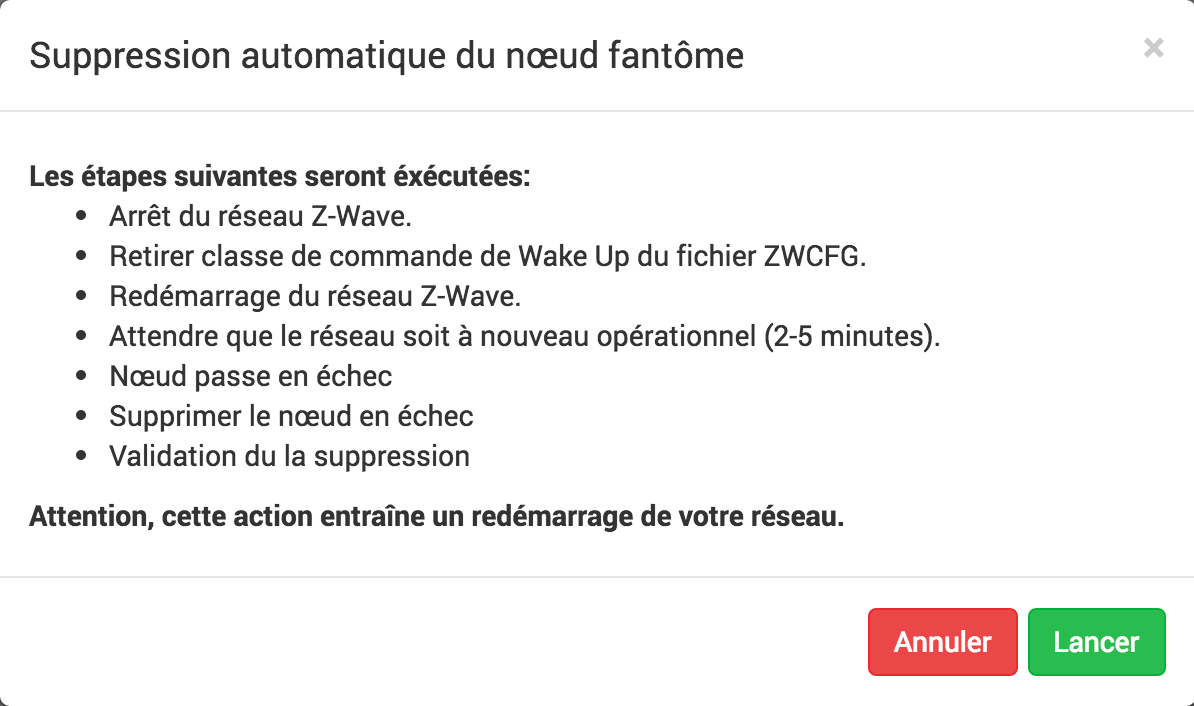
Once launched, it is recommended to close the module configuration screen and monitor the deletion of the module via the Z-Wave health screen.
Important
Only modules on battery can be deleted via this wizard.
Statistiques
This tab gives some communication statistics with the node.
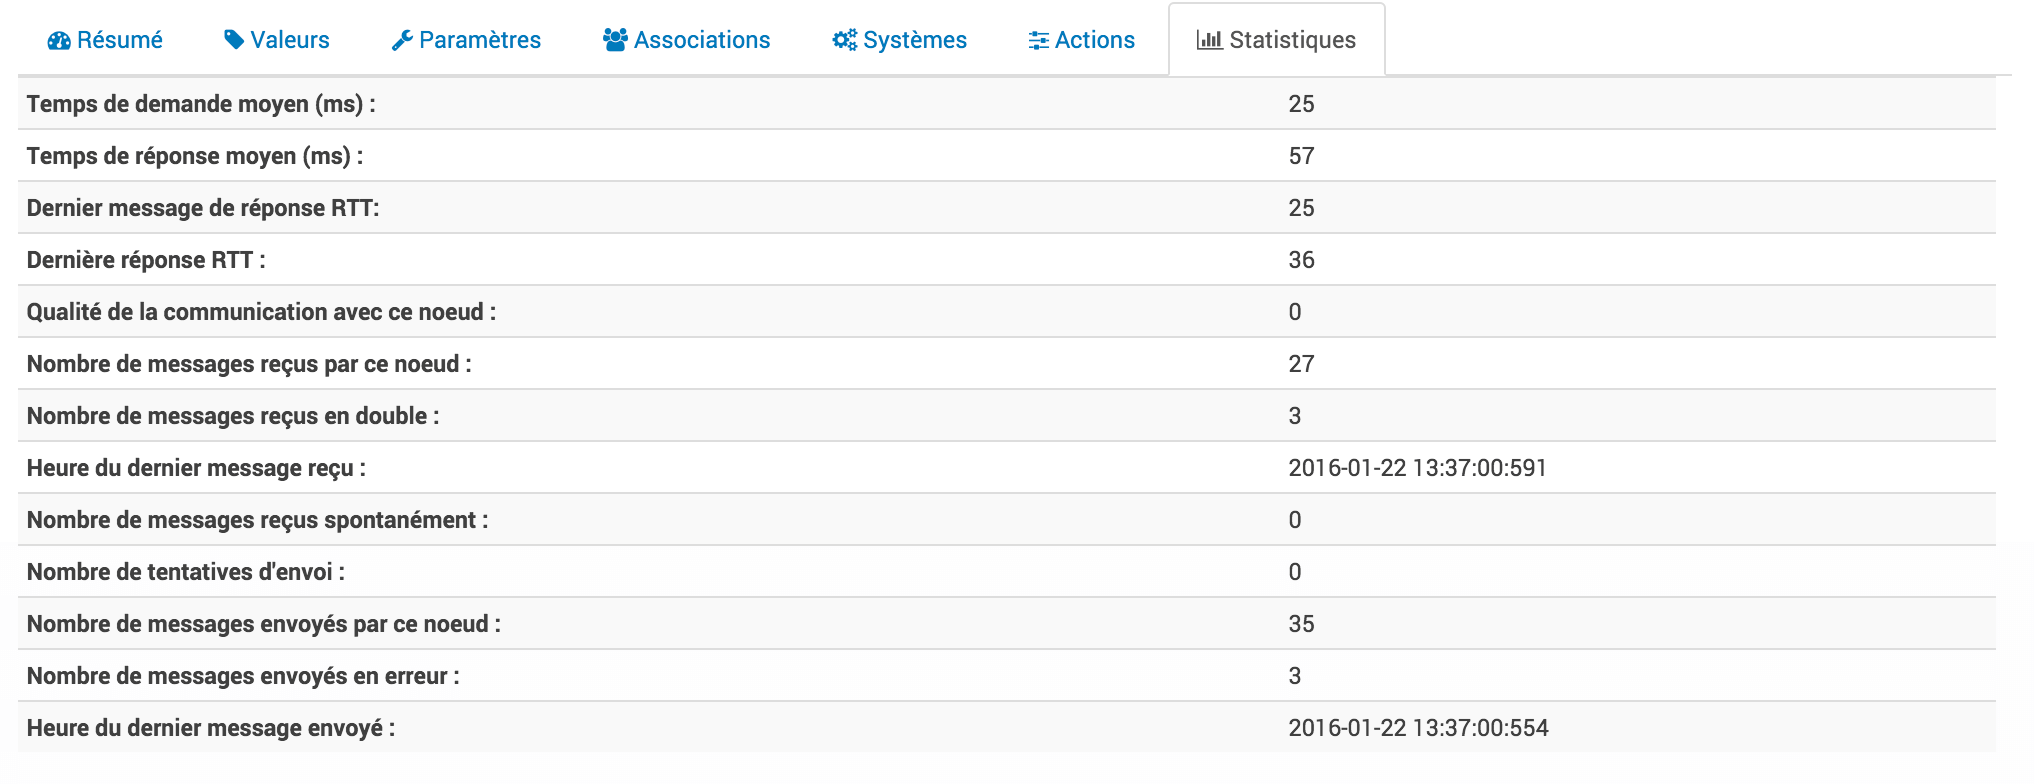
Can be interesting in case of modules which are presumed dead by the controller “Dead”.
Inclusion / exclusion
When it leaves the factory, a module does not belong to any Z-Wave network.
Inclusion mode
The module must join an existing Z-Wave network to communicate with the other modules of this network. This process is called Inclusion. Devices can also leave a network. This process is called Exclusion. Both processes are initiated by the main controller of the Z-Wave network.

This button allows you to switch to inclusion mode to add a module to your Z-Wave network.
You can choose the inclusion mode after clicking the button Inclusion.
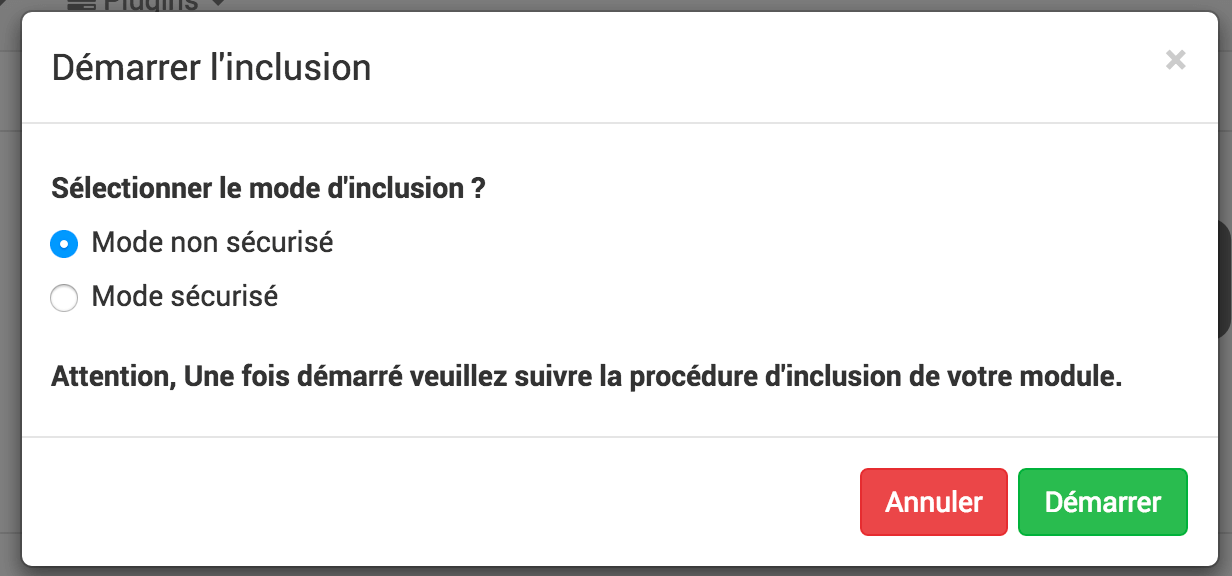
Since the appearance of the Z-Wave +, it is possible to secure exchanges between the controller and the nodes. It is therefore recommended to do the inclusions in mode Secured.
If however, a module cannot be included in secure mode, please include it in secure mode Insecure.
Once in inclusion mode : Jeedom tells you.
Tip
An ‘unsecured’ module can order ‘insecure’ modules’. A ‘non-secure’ module cannot order a ‘secure’ module’. A ‘secure’ module can order ‘non-secure’ modules provided that the transmitter supports it.
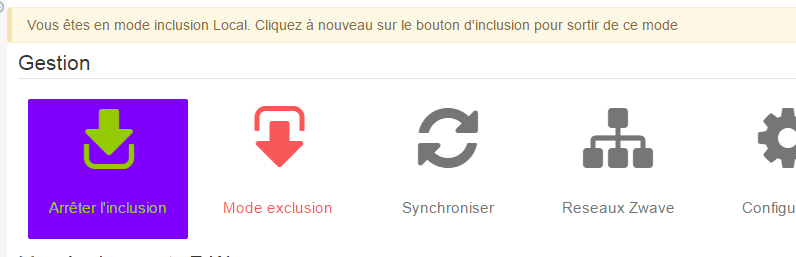
Once the wizard is launched, you must do the same on your module (refer to its documentation to switch it to inclusion mode).
Tip
As long as you do not have the banner, you are not in inclusion mode.
If you click on the button again, you exit the inclusion mode.
Tip
It is recommended, before the inclusion of a new module that would be “new” on the market, to launch the order Config modules via the plugin configuration screen. This action will recover all the latest versions of the openzwave configuration files as well as the Jeedom command mapping.
Important
During an inclusion, it is advised that the module is near the main controller, or less than one meter from your jeedom.
Tip
Some modules require an inclusion in mode Secured, for example for door locks.
Tip
Note that the mobile interface also gives you access to inclusion, the mobile panel must have been activated.
Tip
If the module already belongs to a network, follow the exclusion process before including it in your network. Otherwise the inclusion of this module will fail. It is also recommended to execute an exclusion before inclusion, even if the product is new, out of the box.
Tip
Once the module in its final location, it is necessary to launch the action to take care of the network, in order to ask all the modules to refresh all the neighbors.
Exclusion mode
This button allows you to switch to exclusion mode, to remove a module from your Z-Wave network, you must do the same with your module (refer to its documentation to switch it to exclusion mode).
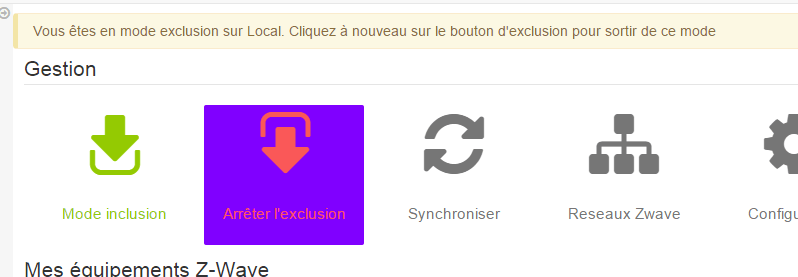
Tip
As long as you do not have the banner, you are not in exclusion mode.
If you click on the button again, you will exit exclusion mode.
Tip
Note that the mobile interface also gives you access to the exclusion.
Tip
A module does not need to be excluded by the same controller on which it was previously included. Hence the fact that it is recommended to execute an exclusion before each inclusion.
Synchroniser
Button allowing synchronization of the Z-Wave network modules with Jeedom equipment. The modules are associated with the main controller, the devices in Jeedom are created automatically when they are included. They are also automatically deleted when excluded, if the option Automatically delete excluded devices is activated.
If you have included modules without Jeedom (requires a battery dongle like the Aeon-labs Z-Stick GEN5), synchronization will be necessary after plugging in the key, once the daemon has started and is operational.
Tip
If you do not have the image or Jeedom has not recognized your module, this button can be used to correct (provided that the module interview is complete).
Tip
If on your routing table and / or on the Z-Wave health screen, you have one or more modules named with their generic name, synchronization will remedy this situation.
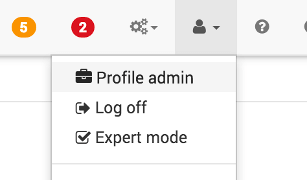
The Synchronize button is only visible in expert mode :
Z-Wave networks
Here you will find general information about your Z-Wave network.
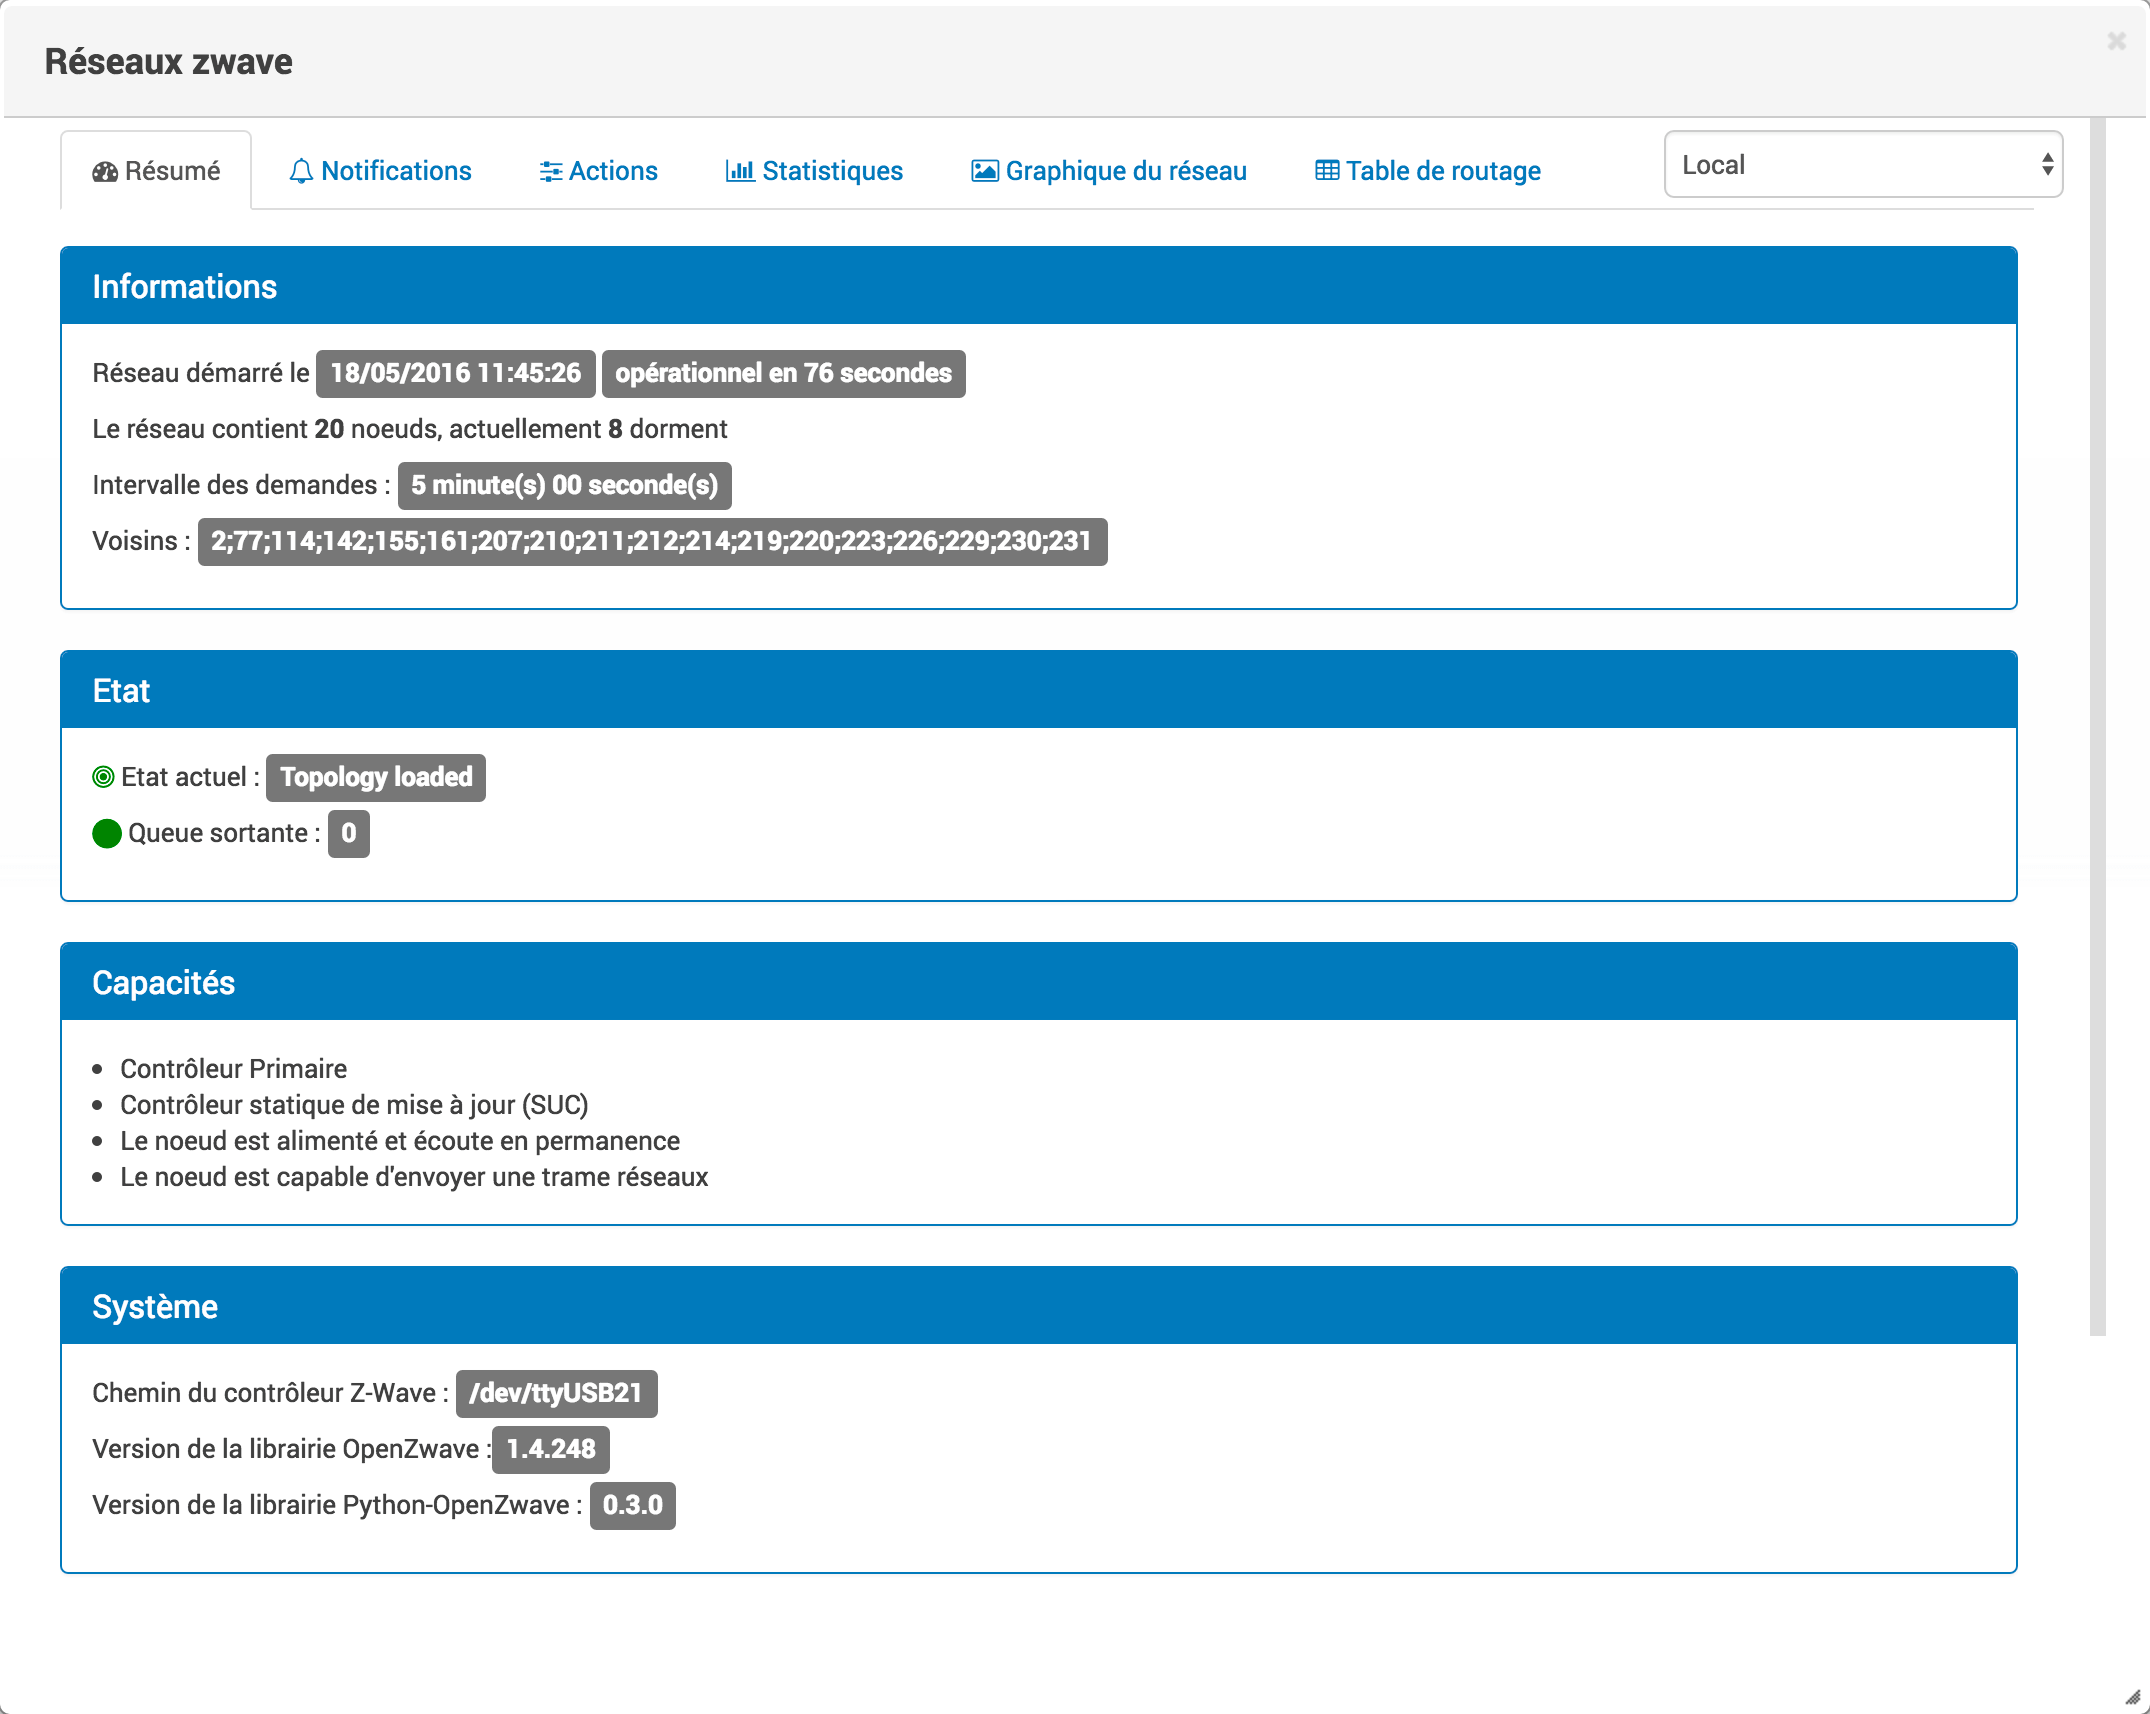
Summary
The first tab gives you the basic summary of your Z-Wave network, you will find in particular the status of the Z-Wave network as well as the number of elements in the queue.
Information
- Gives general information on the network, the start date, the time required to obtain the network in a so-called functional state.
- The total number of nodes in the network as well as the number that are sleeping in the moment.
- Request interval is associated with manual refresh. It is preset in the Z-Wave engine at 5 minutes.
- The neighbors of the controller.
State
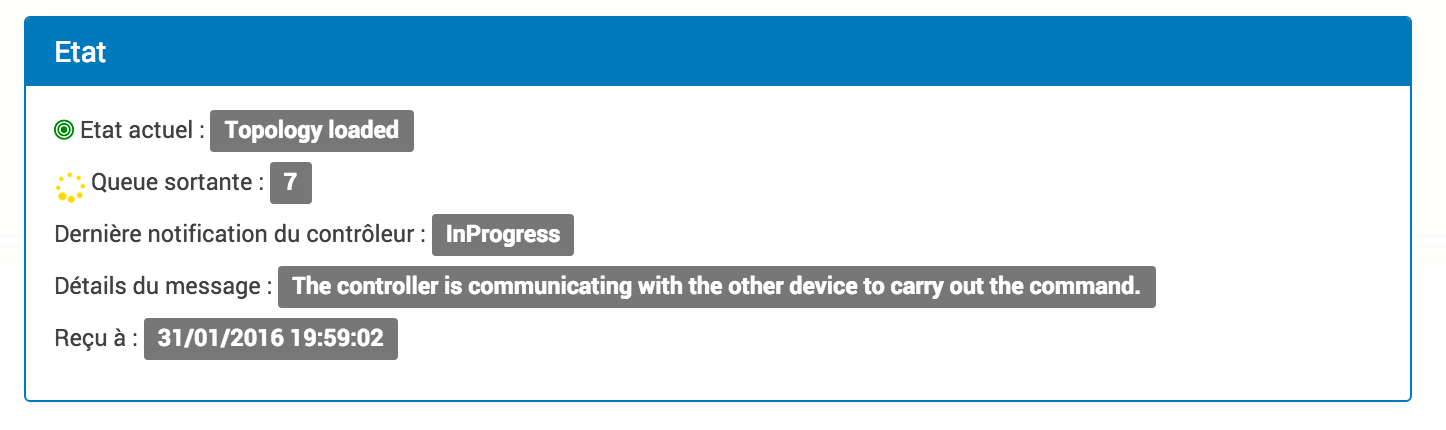
A set of information on the current state of the network, namely :
- Current state, maybe Driver Initialized, Topology loaded or Ready.
- Outgoing queue, indicates the number of messages queued in the controller waiting to be sent. This value is generally high during network startup when the status is still in Driver Initialized.
Once the network has at least reached Topology loaded, internal mechanisms of the Z-Wave server will force updates of values, it is therefore completely normal to see the number of messages rise. This will quickly return to 0.
Tip
The network is said to be functional when it reaches the status Topology loaded, that is to say that all the sector nodes have completed their interviews. Depending on the number of modules, the battery / sector distribution, the choice of the USB dongle and the PC on which the Z-Wave plugin is running, the network will reach this state between one and five minutes.
A network Ready, means that all sector and battery nodes have completed their interview.
Tip
Depending on the modules you have, the network may never reach status by itself Ready. Remote controls, for example, don’t wake up on their own and will never complete their interview. In this kind of case, the network is fully operational and even if the remote controls have not completed their interview, they ensure their functionality within the network.
Capacities
Used to find out whether the controller is a primary or secondary controller.
System
Displays various system information.
- Information on the USB port used.
- OpenZwave library version
- Version of the Python-OpenZwave library
Actions
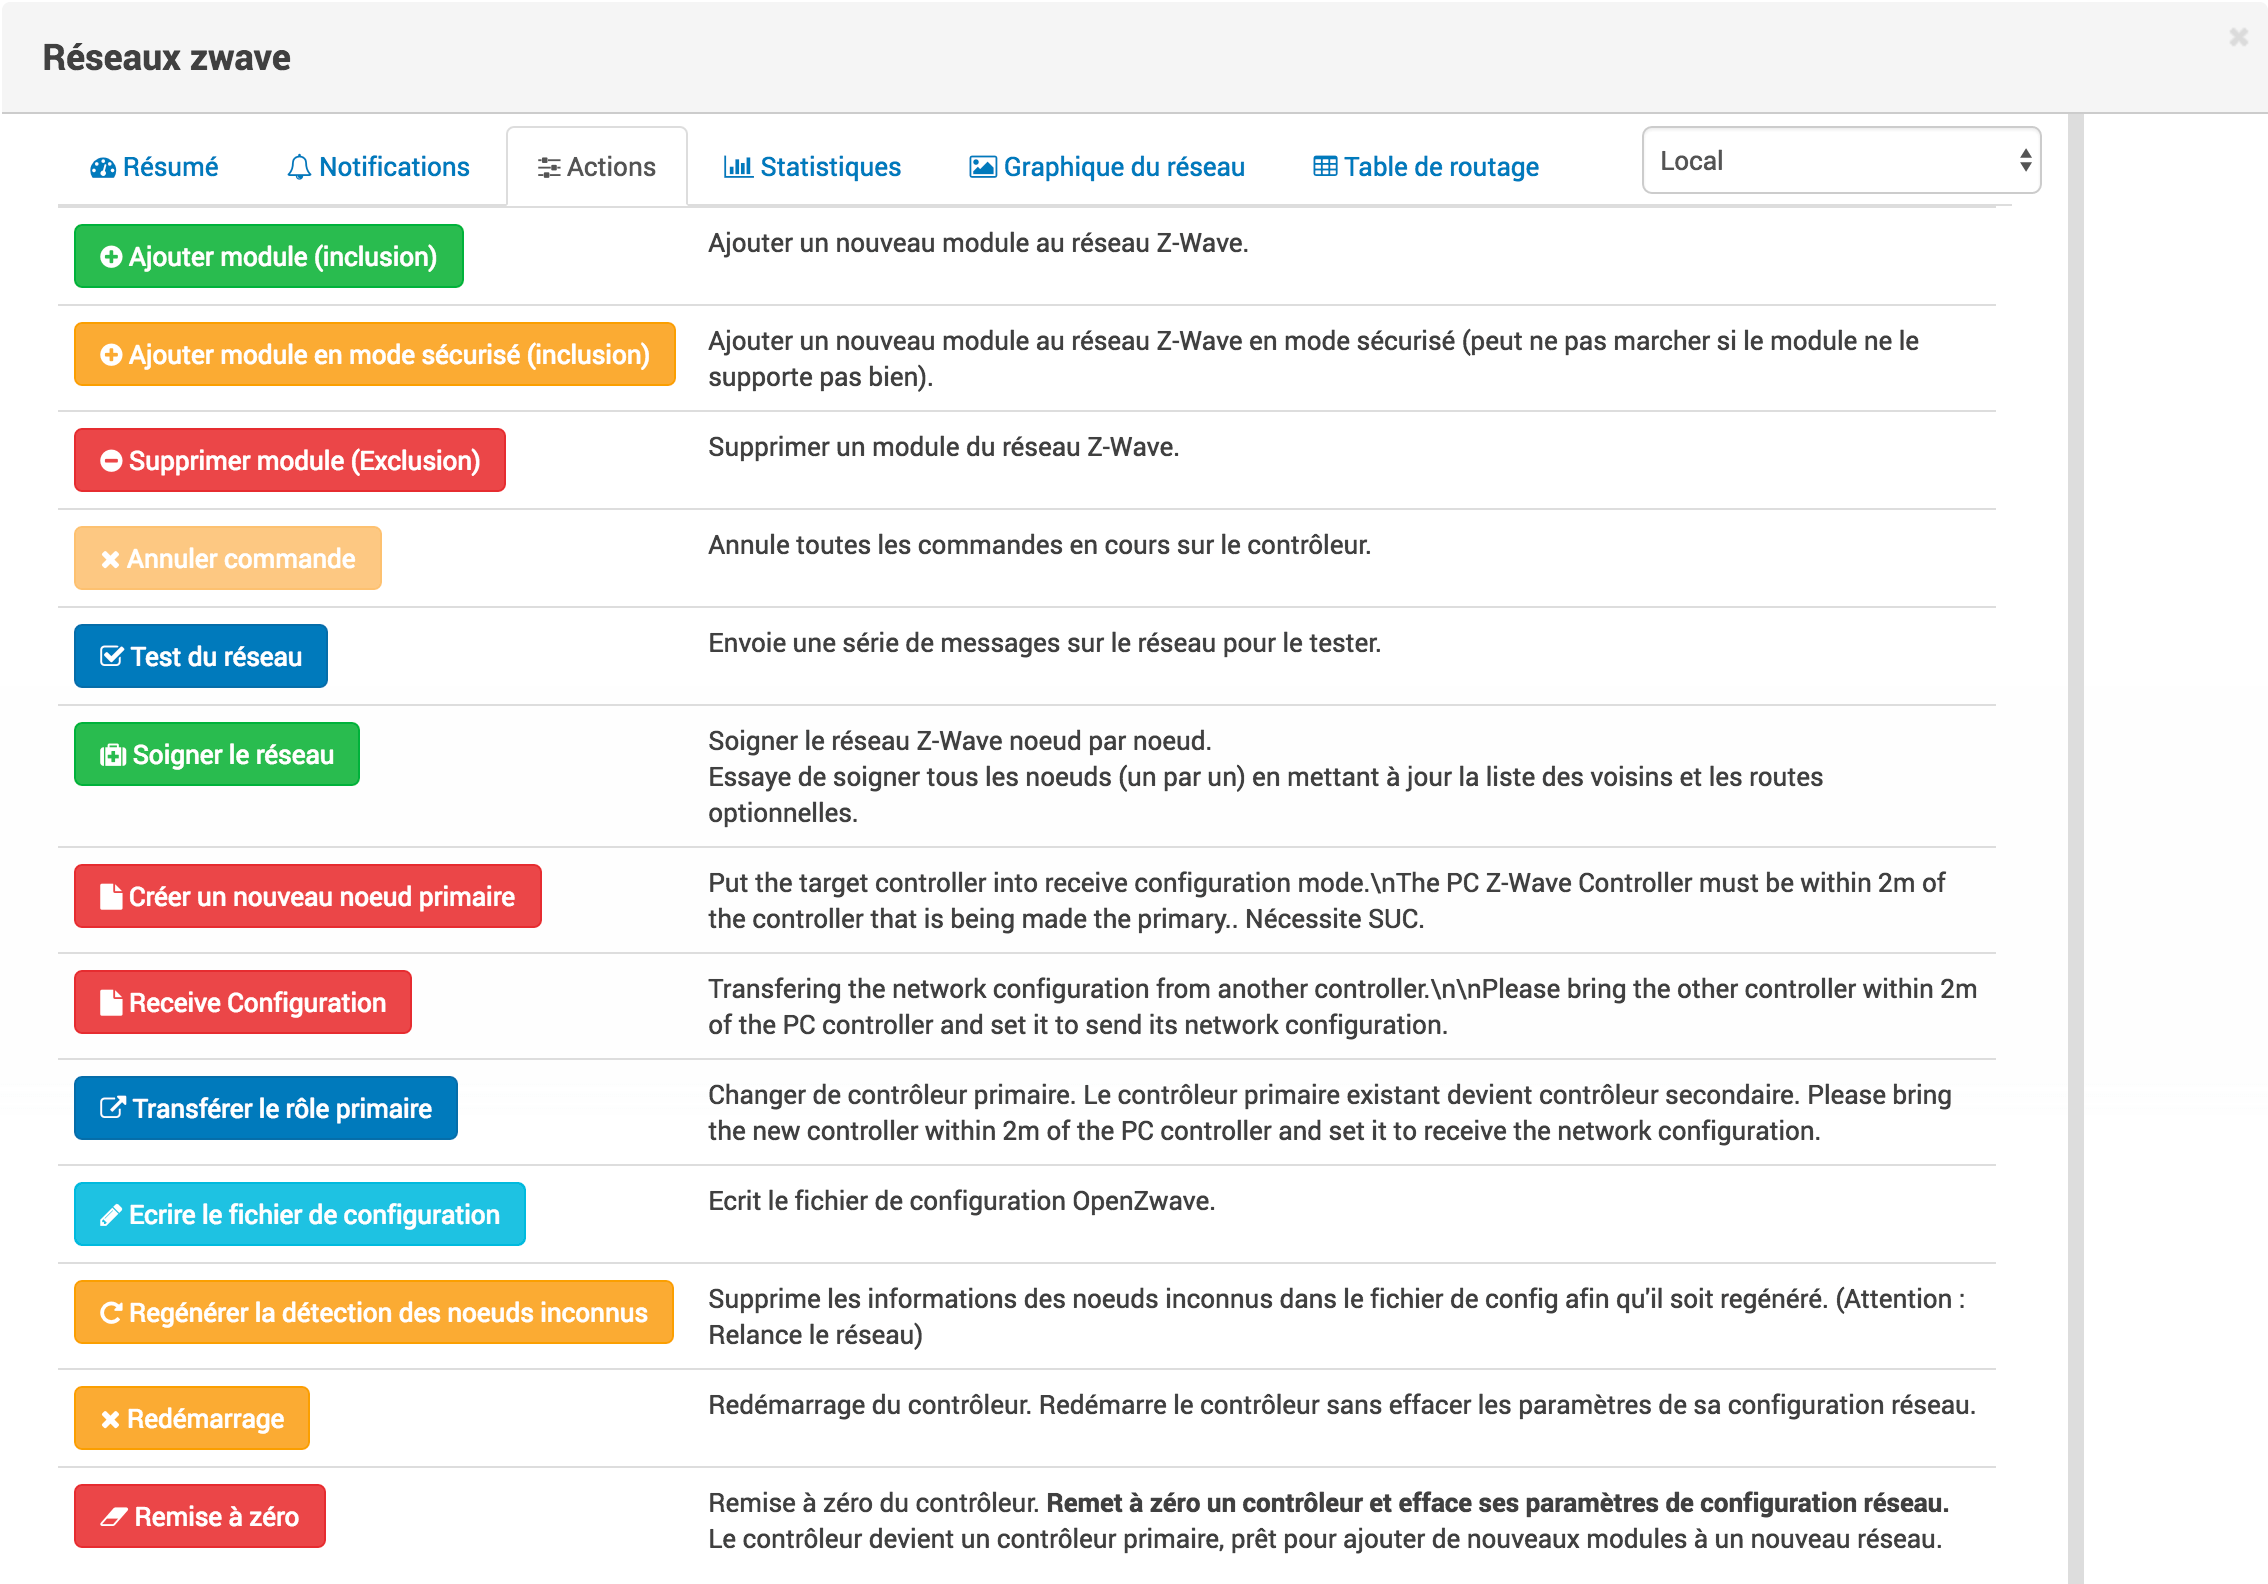
Here you will find all the possible actions for your entire Z-Wave network. Each action is accompanied by a brief description.
Important
Certain actions are really risky or even irreversible, the Jeedom team cannot be held responsible in the event of improper handling.
Important
Some modules require inclusion in secure mode, for example for door locks. Secure inclusion must be launched via the action on this screen.
Tip
If an action cannot be launched, it will be deactivated until it can be executed again.
Statistiques
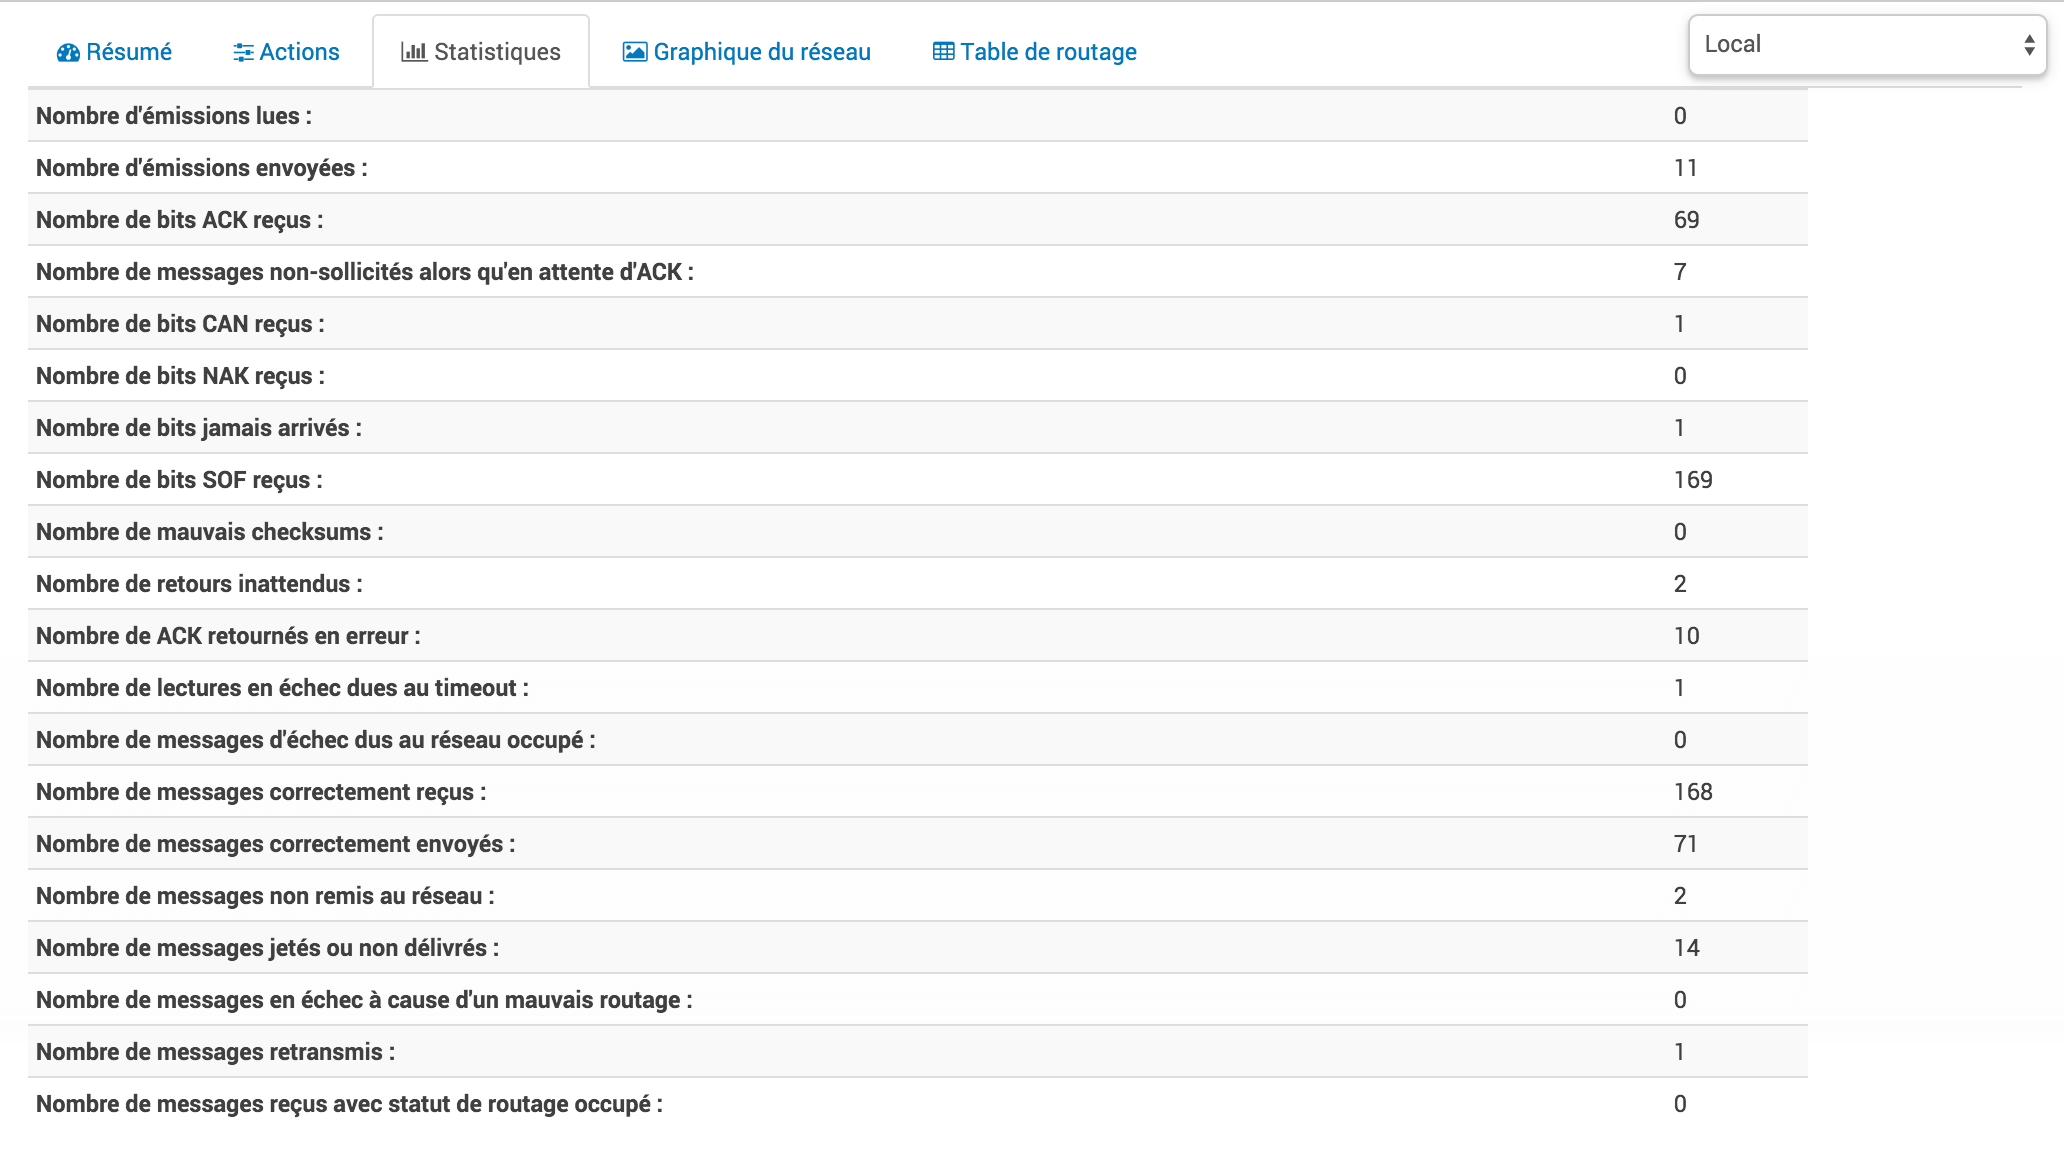
Here you will find general statistics for your entire Z-Wave network.
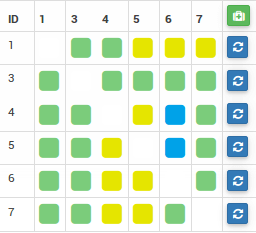
Network graph
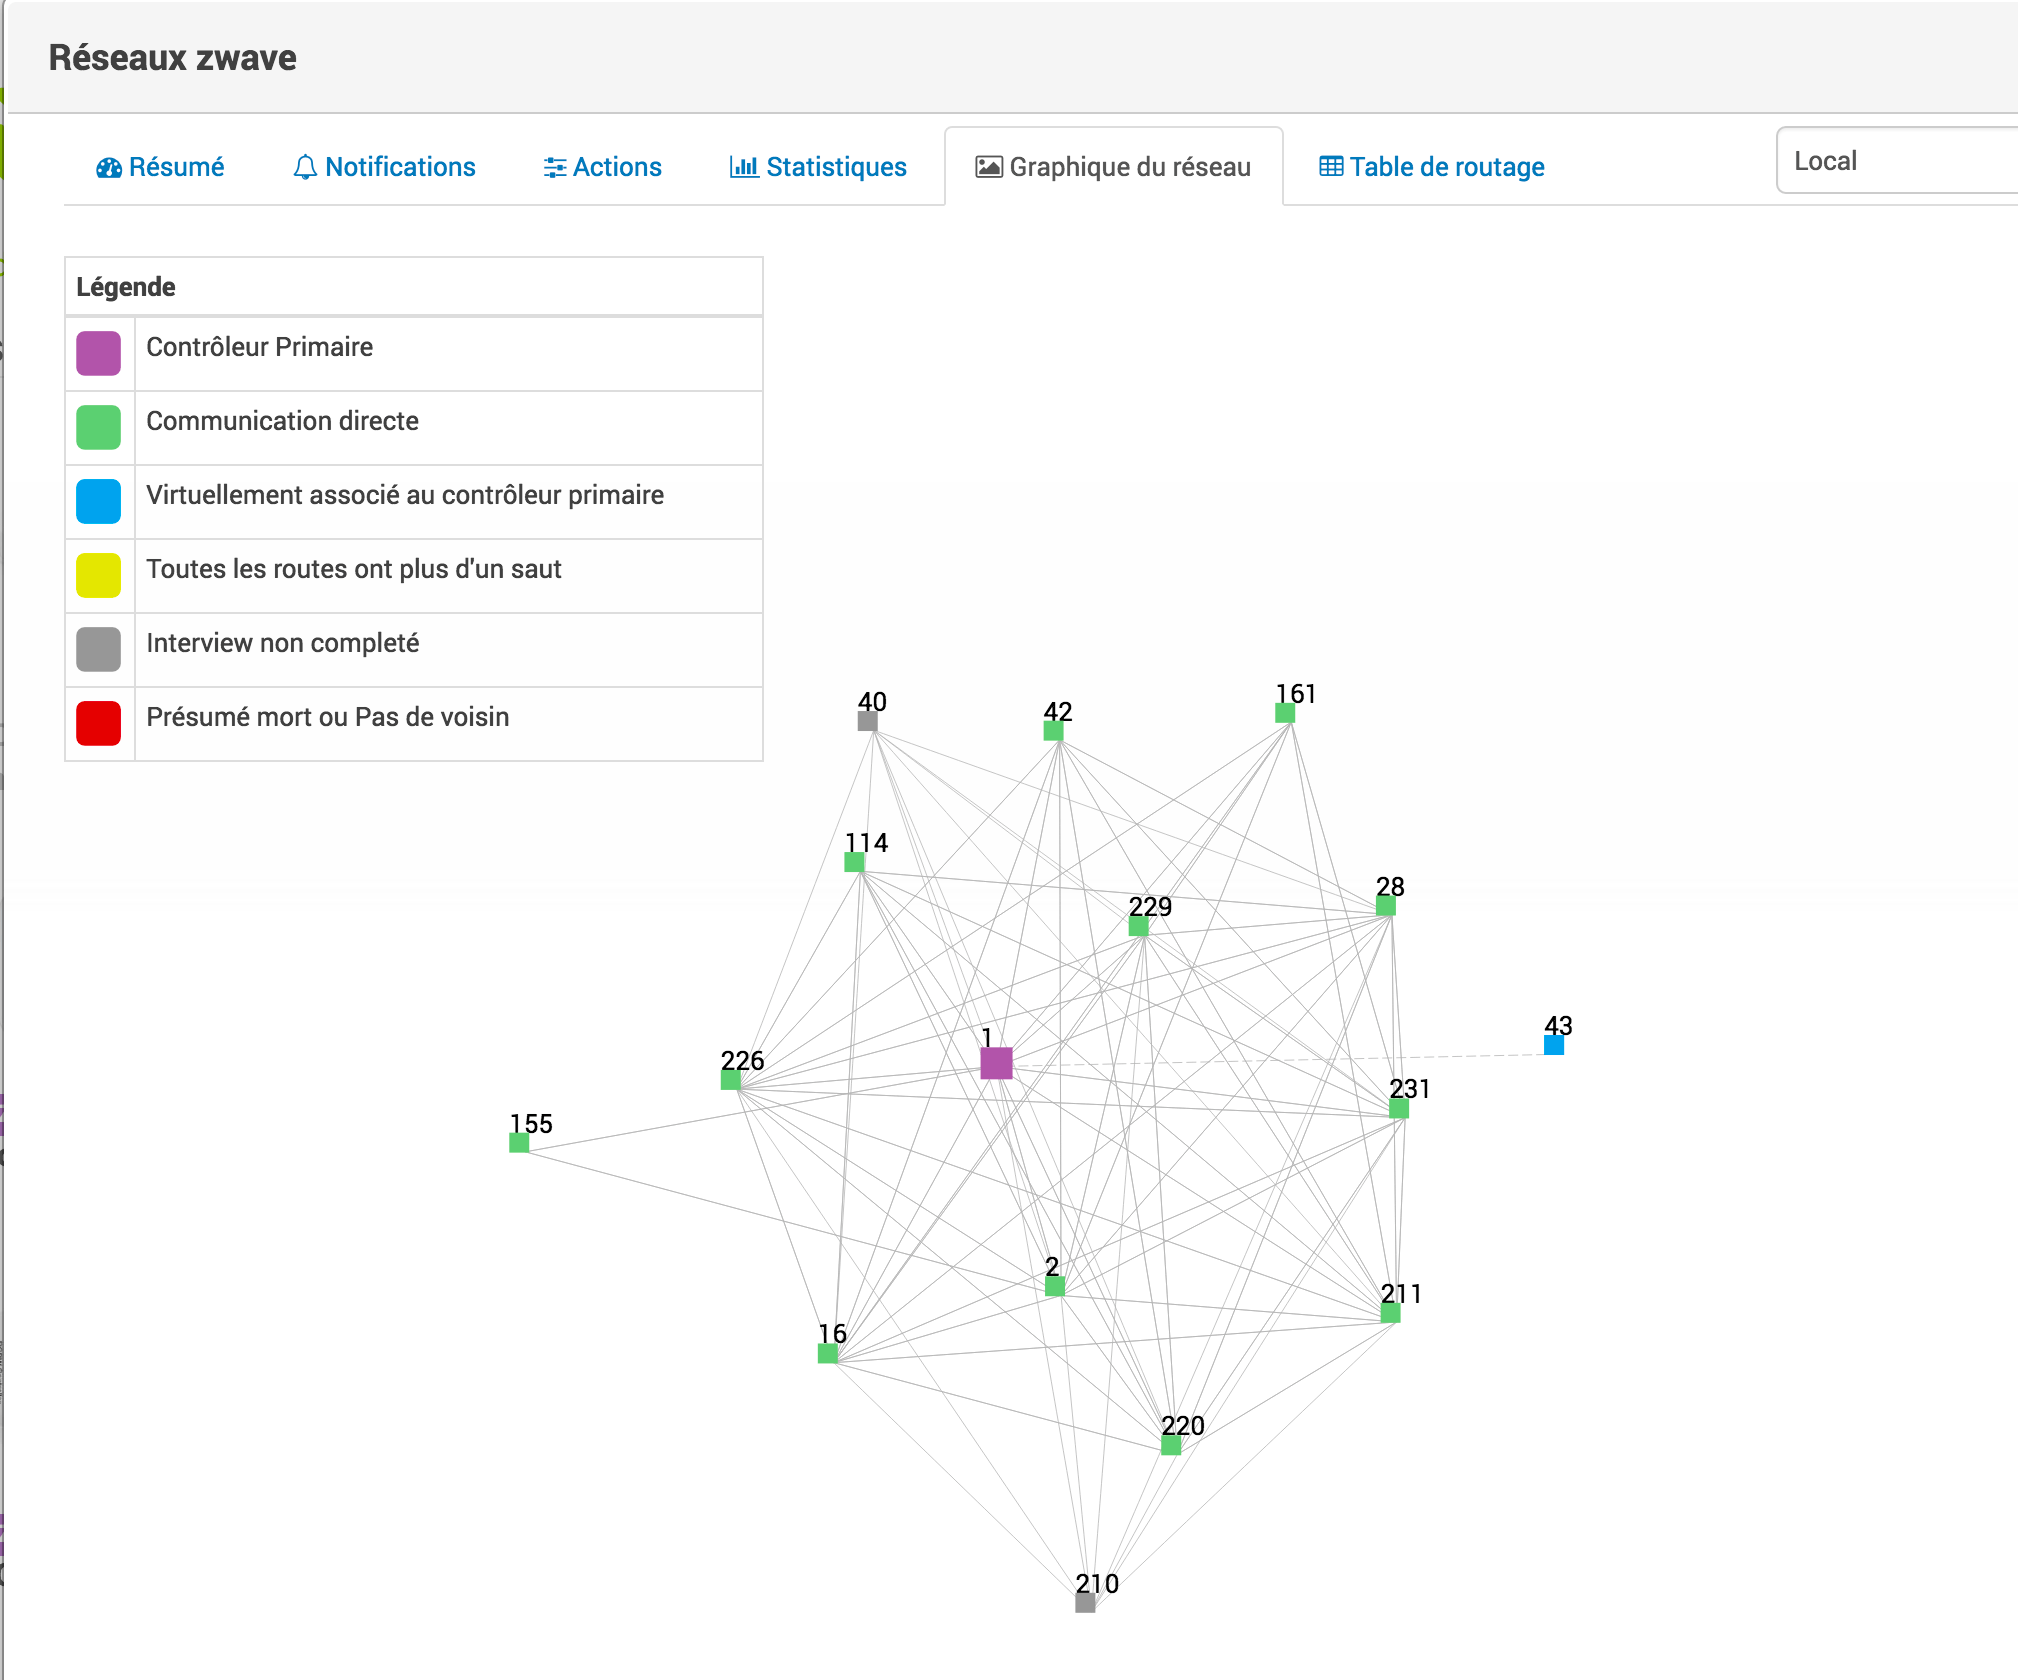
This tab will give you a graphic representation of the different links between the nodes.
Explanation of the color legend :
- Black : The main controller, generally represented as Jeedom.
- Green : Direct communication with the controller, ideal.
- Blue : For controllers, like remote controls, they are associated with the primary controller, but have no neighbor.
- Yellow : All roads have more than one jump before arriving at the controller.
- Grey : The interview is not yet completed, the links will be really known once the interview is completed.
- Red : presumed dead, or without a neighbor, does not participate / no longer in the networking of the network.
Tip
Only active equipment will be displayed in the network graph.
The Z-Wave network consists of three different types of nodes with three main functions.
The main difference between the three types of nodes is their knowledge of the network routing table and subsequently their ability to send messages to the network.
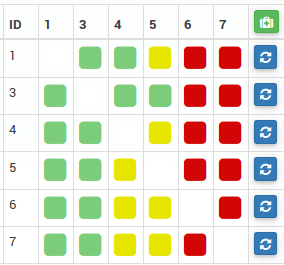
Routing table
Each node is able to determine which other nodes are in direct communication. These nodes are called neighbors. During the inclusion and / or later on request, the node is able to inform the controller of the list of neighbors. Thanks to this information, the controller is able to build a table that has all the information on the possible communication routes in a network.
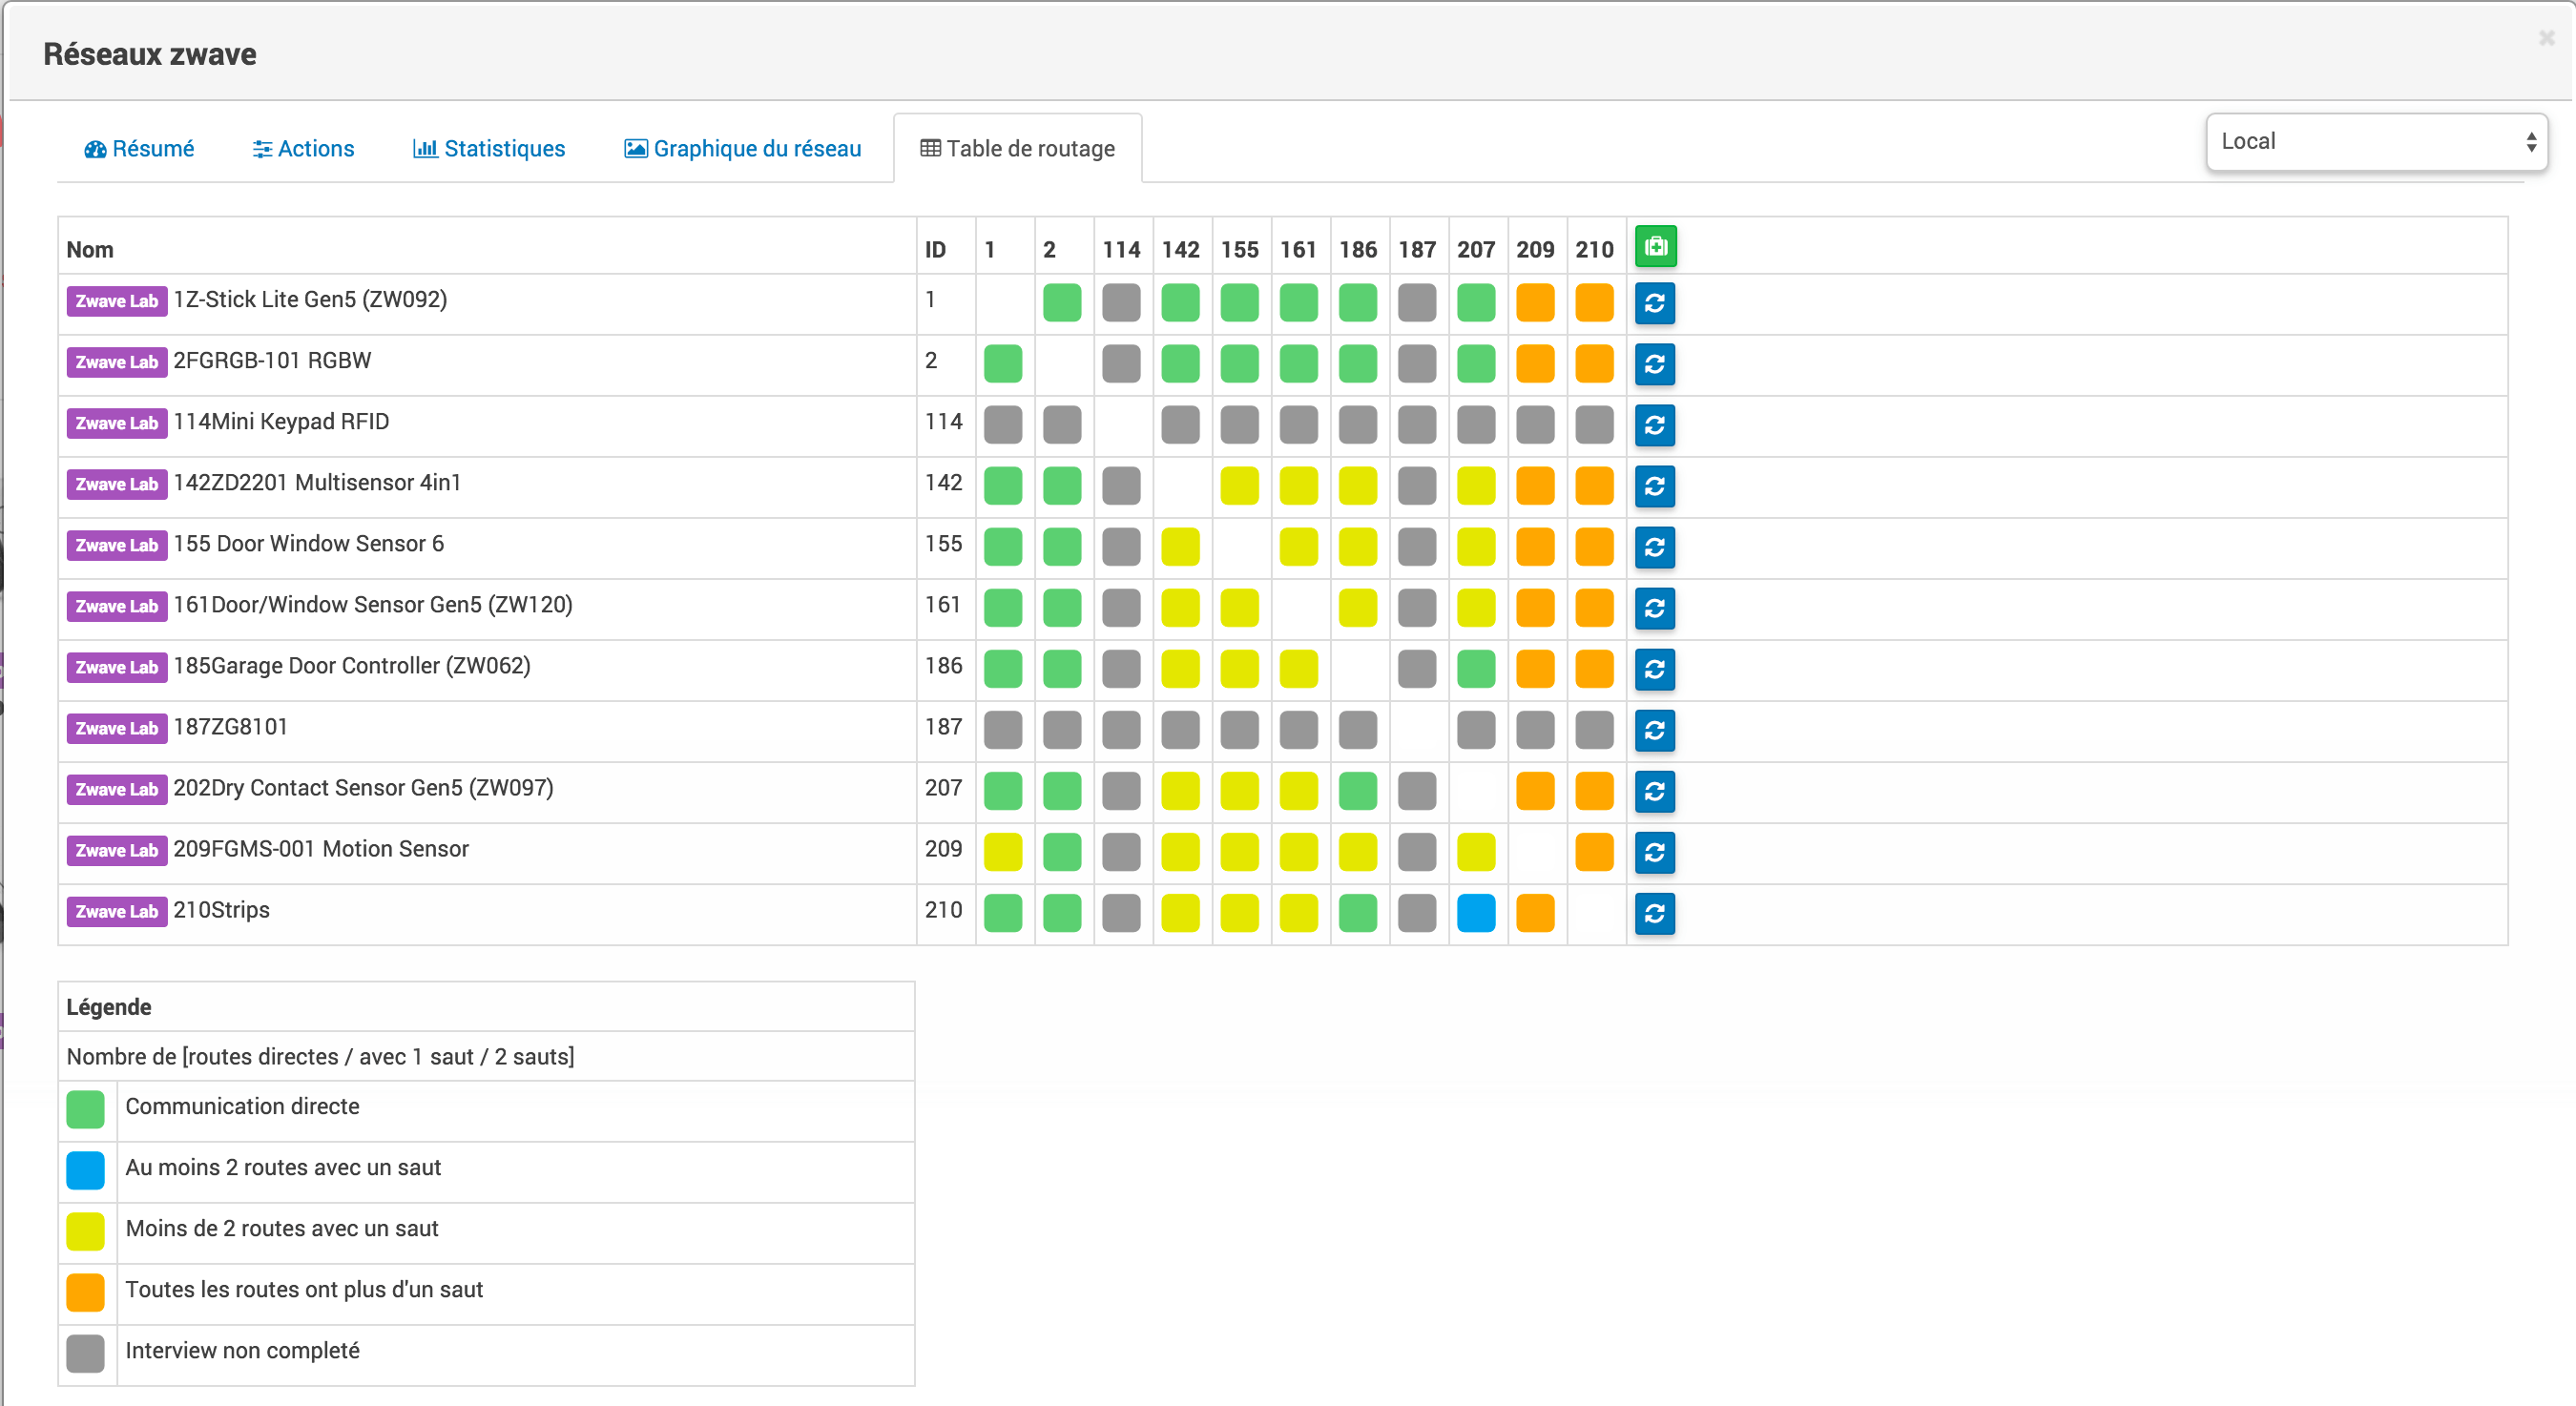
The rows of the table contain the source nodes and the columns contain the destination nodes. Refer to the legend to understand the cell colors that indicate the links between two nodes.
Explanation of the color legend :
- Green : Direct communication with the controller, ideal.
- Blue : At least 2 routes with a jump.
- Yellow : Less than 2 routes with a jump.
- Grey : The interview is not yet completed, will actually be updated once the interview is completed.
- Orange : All roads have more than one jump. May cause latencies.
Tip
Only active equipment will be displayed in the network graph.
Important
A module presumed dead, does not participate / no longer in the networking of the network. It will be marked here with a red exclamation point in a triangle.
Tip
You can manually start the neighbor update, by module or for the whole network using the buttons available in the routing table.
Santé

This window summarizes the status of your Z-Wave network :
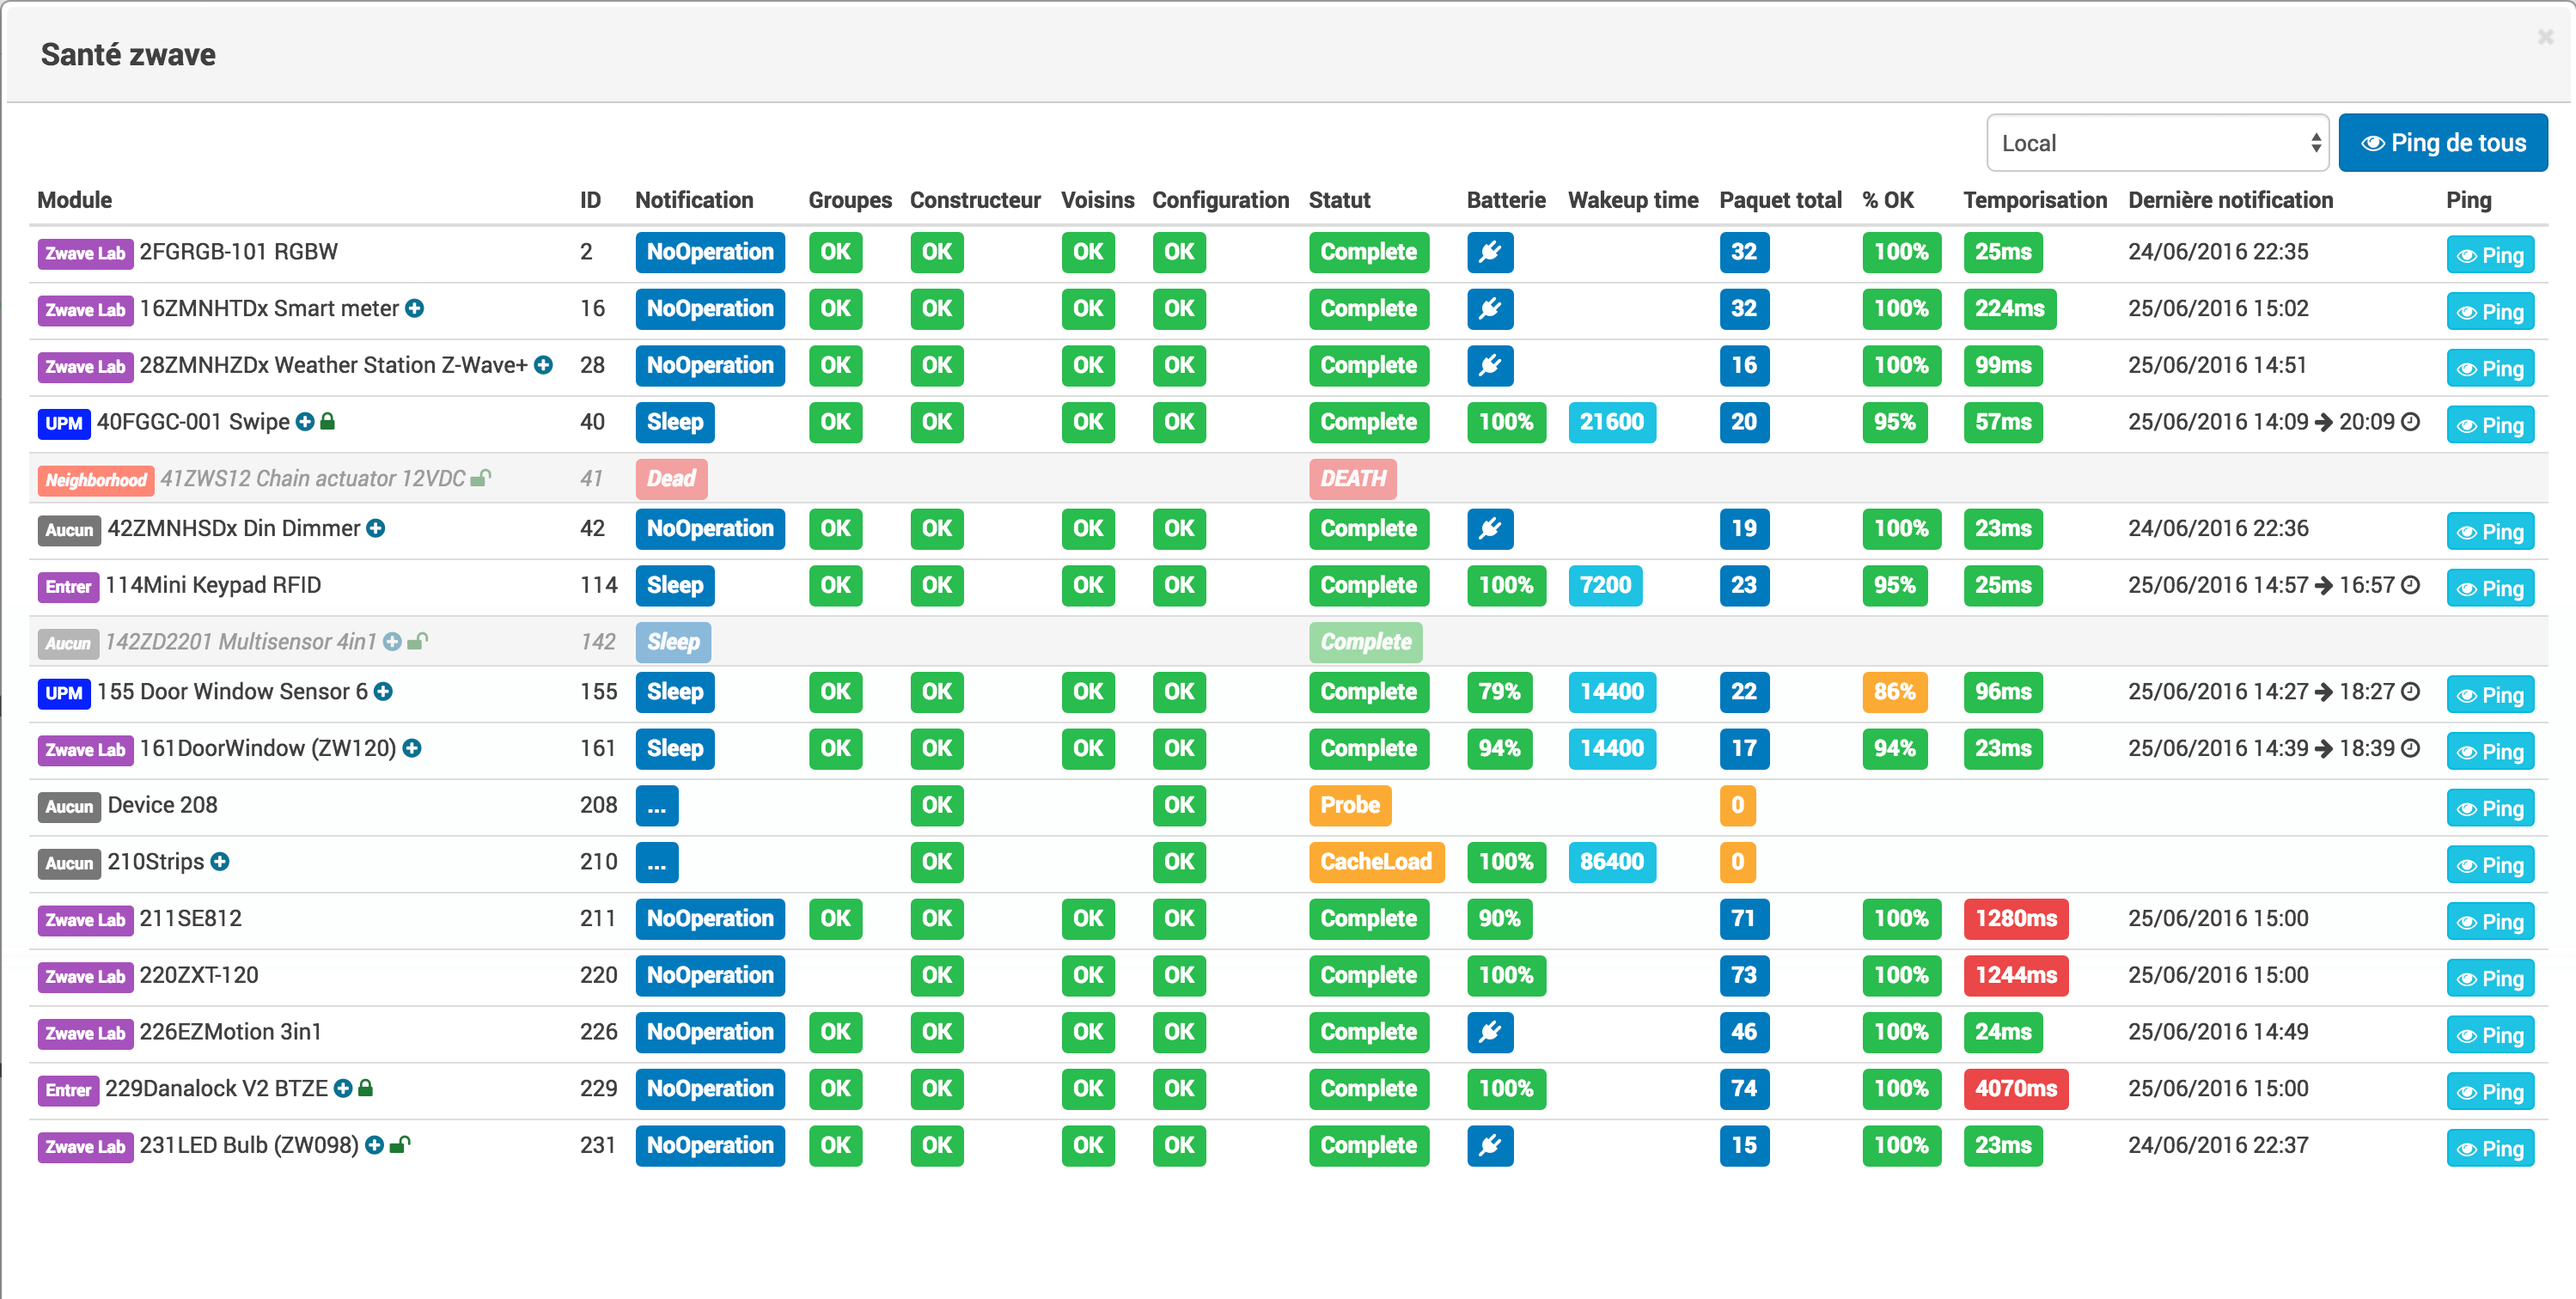
You have here :
- Module : the name of your module, click on it to access it directly.
- Id : ID of your module on the Z-Wave network.
- Notification : last type of exchange between the module and the controller
- Group : indicates if the group configuration is ok (controller at least in a group). If you have nothing it is that the module does not support the notion of group, it is normal
- Manufacturer : indicates whether the recovery of module identification information is ok
- Neighbour : indicates if the list of neighbors has been retrieved
- Status : Indicates the status of the module’s interview (query stage)
- Drums : battery level of the module (a mains plug indicates that the module is powered from the mains).
- Wakeup time : for modules on battery, it gives the frequency in seconds of the instants when the module wakes up automatically.
- Total package : displays the total number of packets successfully received or sent to the module.
- %OK : displays the percentage of packets sent / received successfully.
- Time delay : displays the average packet sending delay in ms.
- Last notification : Date of last notification received from the module and the time of the next wakeup scheduled, for modules that sleep.
- It also allows to inform if the node has not woken up once since the launch of the daemon.
- And indicates if a node has not woken up as expected.
- Ping : Allows you to send a series of messages to the module to test its proper functioning.
Important
Disabled equipment will be displayed but no diagnostic information will be present.
The name of the module can be followed by one or two images:
 Modules supportant la COMMAND_CLASS_ZWAVE_PLUS_INFO
 Modules supportant la COMMAND_CLASS_SECURITY and securisé.
 Modules supportant la COMMAND_CLASS_SECURITY and non Secured.
 Module FLiRS, routeurs esclaves (modules à piles) à écoute fréquente.
Tip
The Ping command can be used if the module is presumed dead “DEATH” in order to confirm if this is really the case.
Tip
Sleeping modules will only respond to Ping the next time they wake up.
Tip
Timeout notification does not necessarily mean a problem with the module. Launch a Ping and in most cases the module will respond with a Notification NoOperation which confirms a fruitful return from ping.
Tip
The Delay and% OK on nodes on batteries before the completion of their interview is not significant. Indeed the node will not respond to the controller’s interrogations of the fact that it is in deep sleep.
Tip
The Z-Wave server automatically takes care of launching tests on the modules in Timeout after 15 minutes
Tip
The Z-Wave server automatically tries to reassemble the modules that are presumed dead.
Tip
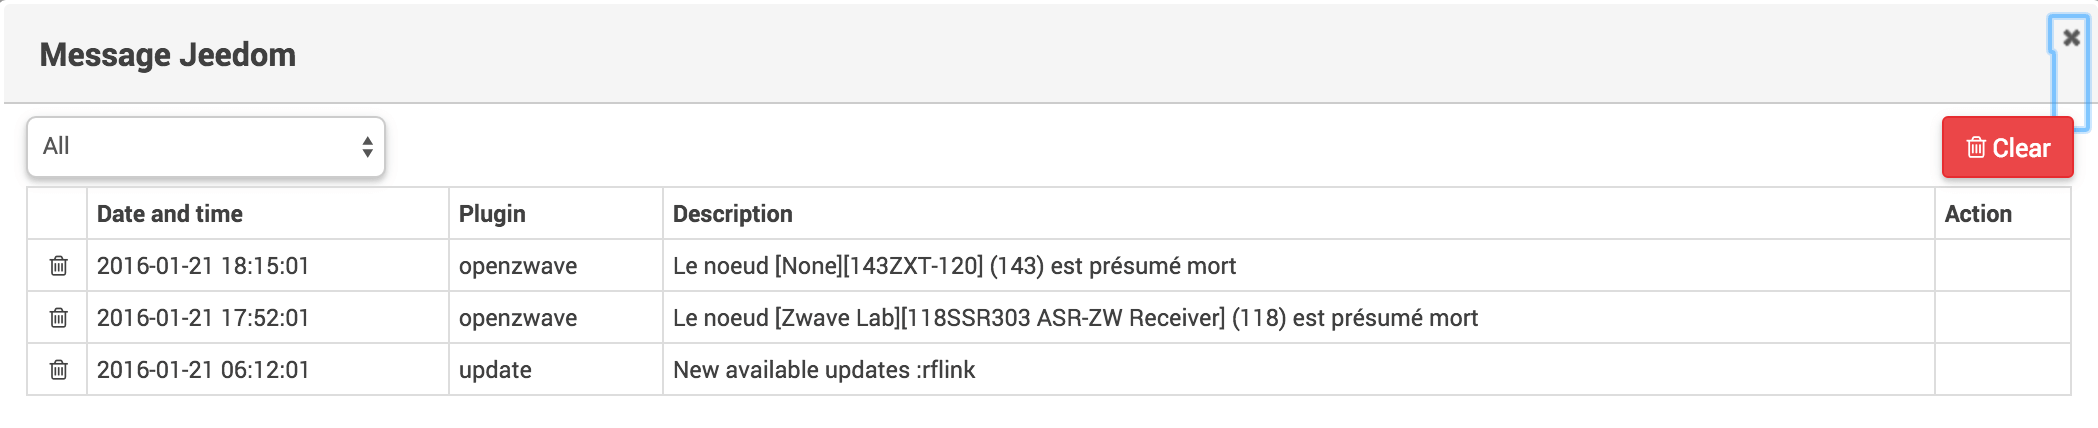
An alert will be sent to Jeedom if the module is presumed dead. You can activate a notification to be informed as soon as possible. See the Message configuration in the Jeedom Configuration screen.
Tip
If on your routing table and / or on the Z-Wave health screen you have one or more modules named with their generic name, synchronization will remedy this situation.
Tip
If on your routing table and / or on the Z-Wave health screen you have one or more modules named Unknown, this means that the module interview has not been successfully completed. You probably have a NOk in the constructor column. Open the details of the module (s), to try the suggested solutions (see section Troubleshooting and diagnostics, below).
Interview status
Step of interviewing a module after starting the daemon.
- None Initialization of the node search process.
- ProtocolInfo Retrieve protocol information, if this node is listening (listener), its maximum speed and its device classes.
- Probe Ping the module to see if it is awake.
- Wakeup Start the wake-up process, if it is a sleeping node.
- ManufacturerSpecific1 Retrieve the name of the manufacturer and product ids if ProtocolInfo allows it.
- NodeInfo Retrieve information on the support of supported command classes.
- NodePlusInfo Retrieve ZWave + info on support for supported command classes.
- SecurityReport Retrieve the list of order classes that require security.
- ManufacturerSpecific2 Retrieve the name of the manufacturer and the product identifiers.
- Versions Retrieve version information.
- Instances Retrieve multi-instance command class information.
- Static Retrieve static information (does not change).
- CacheLoad Ping the module during reboot with config cache of the device.
- Associations Retrieve information on associations.
- Neighbors Retrieve the list of neighboring nodes.
- Session Retrieve session information (rarely changes).
- Dynamic Retrieve dynamic information (changes frequently).
- Setup Retrieve configuration parameter information (only made on request).
- Complete The interview process is finished for this node.
Notification
Details of notifications sent by modules
- Completed Action successfully completed.
- Timeout Delay report reported when sending a message.
- NoOperation Report on a test of the node (Ping), that the message was sent successfully.
- Awake Report when a node has just woken up
- Sleep Report when a node has fallen asleep.
- Dead Report when a node is presumed dead.
- Alive Report when a node is relaunched.
Backups
The backup part will allow you to manage the backups of your network topology. This is your zwcfgxxx file.xml, it constitutes the last known state of your network, it is a form of cache of your network. From this screen you can :
- Start a backup (a backup is made at each restart of the network and during critical operations). The last 12 backups are kept
- Restore a backup (by selecting it from the list just above)
- Delete a backup

Update OpenZWave
Following an update of the Z-Wave plugin it is possible that Jeedom asks you to update the Z-Wave dependencies. A dependency NOK will be displayed:
Tip
An update of the dependencies is not to be done with each update of the plugin.
Jeedom should launch the dependency update by itself if the plugin considers that they are NOk. This validation is carried out after 5 minutes.
The duration of this operation can vary depending on your system (up to more than 1 hour on raspberry pi)
Once the update of dependencies is completed, the daemon will restart automatically upon validation of Jeedom. This validation is carried out after 5 minutes.
Tip
In the event that the updating of the dependencies does not complete, please consult the log Openzwave_update who should inform you about the problem.
List of compatible modules
You will find the list of compatible modules here
Troubleshooting and diagnosis
My module is not detected or does not provide its product and type identifiers
Start the Regeneration of the node detection from the Actions tab of the module.
If you have several modules in this scenario, launch Regenerate the detection of unknown nodes from the screen Zwave network tab Actions.
My module is presumed dead by the Dead controller
If the module is still connected and reachable, follow the solutions proposed in the module screen.
If the module has been canceled or is really defective, you can exclude it from the network using delete the node in error via tab Actions.
If the module has been repaired and a new replacement module has been delivered, you can launch Replace failed node via tab Actions, the controller triggers the inclusion then you must proceed with the inclusion on the module. The id of the old module will be kept as well as its commands.
How to use the SwitchAll command
It is available via your controller node. Your controller should have Switch All On and Switch All Off commands.
If your controller does not appear in your module list, start synchronization.
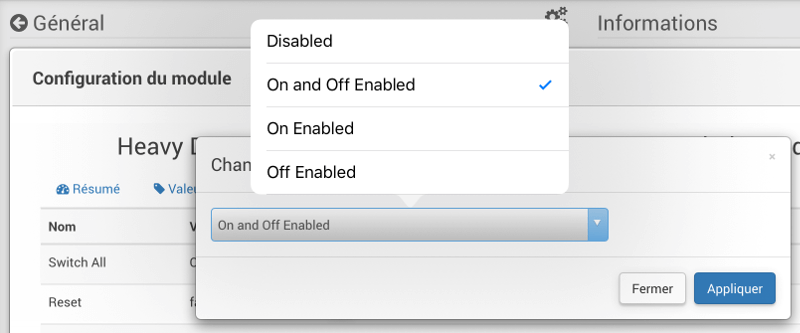
Class Switch All Command is generally supported on switches and drives. Its behavior is configurable on each module that supports it.
So we can either:
- Deactivate the Switch All Class Command.
- Activate for On and Off.
- Activate On only.
- Activate Off only.
The choice of options depends on the manufacturer.
You must therefore take the time to review all of its switches / dimmers before setting up a scenario if you do not control only lights.
My module does not have a Scene or Button command

You can add the command in the command mapping screen.
This is an order Info in CC 0x2b Instance 0 commande data \ [0 ]. val
Scene mode must be activated in module settings. See the documentation for your module for more details.
Force refresh values
It is possible to force the request to refresh the values of an instance for a specific class command.
It is possible to do via an http request or create an order in the equipment mapping screen.

This is an order Action choose the CC desired for a Instance given with the command data \ [0 ]. ForceRefresh()
All the instance indexes for this Class command will be updated. The nodes on batteries will await their next awakening before carrying out the update of their value.
You can also use by script by sending an http request to the Z-Wave REST server. Replace ip_jeedom, node_id, instance_id, cc_id and index
http://token:\#APIKEY\#@ip\_jeedom:8083/ZWaveAPI/Run/devicesnode\_id.instances\[instance\_id\].commandClasses\[cc\_id\].data\[index\].ForceRefresh()
Transfer the modules to a new controller
For different reasons, you may have to transfer all of your modules to a new main controller.
You decide to go from raZberry has a Z-Stick Gen5 or because, you have to perform a Reset complete of main controller.
Here are different steps to get there without losing your valuable scenarios, widgets and history:
- 1 ) Make a Jeedom backup.
- 2 ) Remember to write down (screenshot) your parameter values for each module, they will be lost following exclusion.
- 3 ) In the Z-Wave configuration, uncheck the option “Automatically delete excluded devices” and save. Network reboots.
- 4a) In the case of a Reset, Reset the main controller and restart the plugin.
- 4b) For a new controller, stop Jeedom, disconnect the old controller and connect the new one. Start Jeedom.
- 5 ) For each Z-Wave device, change the ZWave ID to 0.
- 6 ) Open 2 pages of the Z-Wave plugin in different tabs.
- 7 ) (Via the first tab) Go to the configuration page of a module that you wish to include in the new controller.
- 8 ) (Via second tab) Exclude and then include the module. New equipment will be created.
- 9 ) Copy the Z-Wave ID of the new device, then delete this device.
- 10 ) Return to the tab of the old module (1st tab) then paste the new ID in place of the old ID.
- 11 ) The ZWave parameters were lost during the exclusion / inclusion, remember to reset your specific parameters if you do not use the default values.
- 11 ) Repeat steps 7 to 11 for each module to be transferred.
- 12 ) At the end, you should no longer have equipment in ID 0.
- 13 ) Check that all modules are correctly named in the Z-Wave health screen. Start Synchronization if this is not the case.
Replace a faulty module
How to redo the inclusion of a failing module without losing your value scenarios, widgets and histories
If the module is assumed to be “Dead” :
- Note (screenshot) your parameter values, they will be lost following inclusion.
- Go to the actions tab of the module and launch the command “Replace failed node”.
- The controller is in inclusion mode, proceed to inclusion according to the module documentation.
- Reset your specific parameters.
If the module is not presumed to be “Dead” but is still accessible:
- In the ZWave configuration, uncheck “Automatically remove excluded devices”.
- Note (screenshot) your parameter values, they will be lost following inclusion.
- Exclude the faulty module.
- Go to the configuration page of the faulty module.
- Open the ZWave plugin page in a new tab.
- Include the module.
- Copy the ID of the new module, then delete this equipment.
- Return to the tab of the old module then paste the new ID in place of the old ID.
- Reset your specific parameters.
Ghost node removal
If you have lost all communication with a battery-powered module and want to exclude it from the network, it is possible that the exclusion does not succeed or that the node remains present in your network.
Automatic ghost node assistant is available.
- Go to the actions tab of the module to delete.
- He will probably have a status CacheLoad.
- Start command Remove ghost node.
- Z-Wave network stops. Automatic assistant modifies the file zwcfg to remove CC WakeUp from the module. Network reboots.
- Close the module screen.
- Open the Z-Wave Health screen.
- Wait for the start-up cycle to be completed (topology loaded).
- The module will normally be marked as presumed dead (Dead).
- The next minute, you should see the node disappear from the health screen.
- If in the Z-Wave configuration, you have unchecked the option “Automatically delete excluded devices”, you will have to manually delete the corresponding equipment.
This wizard is only available for battery modules.
Post-inclusion actions
It is recommended to perform the inclusion at least 1M from the main controller, or this will not be the final position of your new module. Here are some good practices to follow following the inclusion of a new module in your network.
Once the inclusion is complete, we must apply a certain number of parameters to our new module in order to get the most out of it. Reminder, the modules, following inclusion, have the manufacturer’s default settings. Take advantage of being next to the Jeedom controller and interface to properly configure your new module. It will also be easier to wake up the module to see the immediate effect of the change. Some modules have specific Jeedom documentation to help you with the different parameters as well as recommended values.
Test your module, confirm the feedback, status feedback and possible actions in the case of an actuator.
During the interview, your new module looked for its neighbors. However, the modules in your network do not yet know your new module.
Move your module to its final location. Launch the update of its neighbors and wake it up again.
We see that he sees a certain number of neighbors but that the neighbors do not see him.
To remedy this situation, it is necessary to launch the action to take care of the network, in order to ask all the modules to find their neighbors.
This action can take 24 hours before being completed, your battery modules will perform the action only the next time they wake up.
The option to treat the network twice a week allows you to do this process without any action on your part, it is useful when installing new modules and or when moving them.
No battery condition feedback
Z-Wave modules very rarely send their battery status to the controller. Some will do it at inclusion then only when it reaches 20% or another critical threshold value.
To help you better monitor the status of your batteries, the Batteries screen under the Analysis menu gives you an overview of the status of your batteries. A low battery notification mechanism is also available.
The value returned from the Batteries screen is the last known in the cache.
Every night, the Z-Wave plugin asks each module to refresh the Battery value. The next time you wake up, the module sends the value to Jeedom to be added to the cache. So you generally have to wait at least 24 hours before obtaining a value in the Batteries screen.
Tip
It is of course possible to manually refresh the Battery value via the Values tab of the module, then either wait for the next wake-up or even manually wake the module to obtain an immediate rise. The Wake-up Interval of the module is defined in the System tab of the module. To optimize the life of your batteries, it is recommended to space this delay as long as possible. For 4h, apply 14400, 12h 43200. Certain modules must listen regularly to messages from the controller such as Thermostats. In this case, you have to think of 15 min, i.e. 900. Each module is different, so there is no exact rule, it is case by case and according to experience.
Tip
The discharge of a battery is not linear, some modules will show a large percentage loss in the first days of commissioning, then do not move for weeks to empty quickly once past the 20%.
Controller is being initialized
When you start the Z-Wave daemon, if you try to immediately start an inclusion / exclusion, you may get this message: * “The controller is initializing, please try again in a few minutes”
Tip
Following the start of the daemon, the controller goes on all the modules in order to repeat their interview. This behavior is completely normal in OpenZWave.
If however after several minutes (more than 10 minutes), you still have this message, it is no longer normal.
You have to try the different steps:
- Make sure that the Jeedom health screen lights are green.
- Make sure the plugin configuration is in order.
- Make sure you have selected the correct port for the ZWave key.
- Make sure your Jeedom Network configuration is correct. (Attention if you have made a Restore of a DIY installation towards official image, the suffix / jeedom should not appear there)
- Look at the plugin log to see if an error has not been reported.
- Look the Console ZWave plugin, to see if an error has not been reported.
- Launch the Demon by Debug look again at the Console and plugin logs.
- Completely restart Jeedom.
- Make sure you have a Z-Wave controller, the Razberry are often confused with the EnOcean (error when ordering).
We must now start the hardware tests:
- The Razberry is well connected to the GPIO port.
- USB power is sufficient.
If the problem still persists, reset the controller:
- Completely stop your Jeedom via the stop menu in the user profile.
- Disconnect the power.
- Remove the USB dongle or Razberry as appropriate, about 5 minutes.
- Re connect everything and try again.
The controller no longer responds
No more orders are transmitted to the modules, but status returns are sent back to Jeedom.
Controller message queue may be full. See the Z-Wave Network screen if the number of pending messages only increases.
In this case you have to restart the Demon Z-Wave.
If the problem persists, you must reset the controller:
- Completely stop your Jeedom via the stop menu in the user profile.
- Disconnect the power.
- Remove the USB dongle or Razberry as appropriate, about 5 minutes.
- Re connect everything and try again.
Error during dependencies
Several errors can occur when updating dependencies. Check the dependency update log to determine what exactly is the error. Generally, the error is at the end of the log in the last few lines.
Here are the possible problems and their possible solutions:
- could not install mercurial - abort
The mercurial package does not want to install, to correct launch in ssh:
    sudo rm /var/lib/dpkg/info/$mercurial* -f
    sudo apt-gand install mercurial
- Addictions seem blocked on 75%
At 75% this is the start of the compilation of the openzwave library as well as the openzwave python wrapper. This step is very long, you can however view the progress via the update log view. So you just have to be patient.
- Error when compiling the openzwave library
        arm-linux-gnueabihf-gcc: internal compiler error: Killed (program cc1plus)
        Please submit a full bug report,
        with preprocessed source if appropriate.
        See <file:///usr/share/doc/gcc-4.9/README.Bugs> for instructions.
        error: command 'arm-linux-gnueabihf-gcc' failed with exit status 4
        Makefile:266: recipe for targand 'build' failed
        make: *** [build] Error 1
This error can occur due to a lack of RAM memory during compilation.
From the jeedom UI, launch the compilation of dependencies.
Once launched, in ssh, stop these processes (consumers in memory) :
    sudo systemctl stop cron
    sudo systemctl stop apache2
    sudo systemctl stop mysql.
To follow the progress of the compilation, we tail the log file openzwave_update.
tail -f /var/www/html/log/openzwave_update
When the compilation is complete and without error, restart the services that you stopped
sudo systemctl start cron sudo systemctl start apache2 sudo systemctl
start mysql
Using the Razberry card on a Raspberry Pi 3
To use a Razberry controller on a Raspberry Pi 3, the Raspberry’s internal Bluetooth controller must be disabled.
Add this line:
dtoverlay=pi3-miniuart-bt
At the end of the file:
/boot/config.txt
Then restart your Raspberry.
HTTP API
The Z-Wave plugin provides developers and users with a complete API in order to be able to operate the Z-Wave network via HTTP request.
You can use all of the methods exposed by the REST server of the Z-Wave daemon.
The syntax for calling routes is in this form:
URLs = http://token:\#APIKEY\#@\#IP\_JEEDOM\#:\#PORTDEMON\#/\#ROUTE\#
- #API_KEY# corresponds to your API key, specific to your installation. Pour la trouver, il faut aller dans le menu « Main », puis « Administration » and « Setup », en activant le mode Expert, vous verrez alors une ligne Clef API.
- #IP_JEEDOM# corresponds to your Jeedom access url.
- #PORTDEMON# corresponds to the port number specified in the configuration page of the Z-Wave plugin, by default: 8083.
- #ROUTE# corresponds to the route on the REST server to execute.
To know all the routes, please refer Github of the Z-Wave plugin.
Example: To ping the node id 2
URLs = http://token:a1b2c3d4e5f6g7h8@192.168.0.1:8083/ZWaveAPI/Run/devices\[2\].TestNode()
FAQ
I get the error “Not enough space in stream buffer”
Unfortunately this error is hardware, there is nothing we can do about it and we are looking for the moment how to force a restart of the daemon in the event of this error (but often it is also necessary to unplug the key for 5 min so that it starts again)