Google smarthome plugin
This plugin allows you to :
- use the native implementation of Google for the management of connected objects
It can work in 2 ways :
- Standalone : you create the applications in dev mode on Google side then connect your Jeedom to the Google service
- Cloud : via a cloud service provided by Jeedom
Important
Cloud mode requires a subscription to voice services (3 months free when purchasing the plugin). You can manage your subscription here
Important
GOOGLE requires that your Jeedom be accessible in HTTPS (the plugin does not work in HTTP) with a valid certificate (therefore no self-signed certificate)
Thanks to the Power or Ultimate Service Packs, your Jeedom is accessible via HTTPS. If you have a Community Service Pack, you must install yourself an SSL certificate issued by a certification authority (ex: Let’s encrypt).
Important
The plugin does not support equipment with dual functions (2 outputs like certain zwave Fibaro modules). You absolutely have to go through 2 virtual ones to break it down.
Cloud mode
Important
It is important to do the following steps in the order listed !!!
Important
If you get an error message telling you that your user password or password is incorrect, you must :
- check that Google Home is active on the market
- if this is the case, are you sure of your identifiers (be careful, you must respect upper/lower case) ?
- if this is the case, change your password on the market and on the configuration of the voice assistant service (market profile page my services tab) save
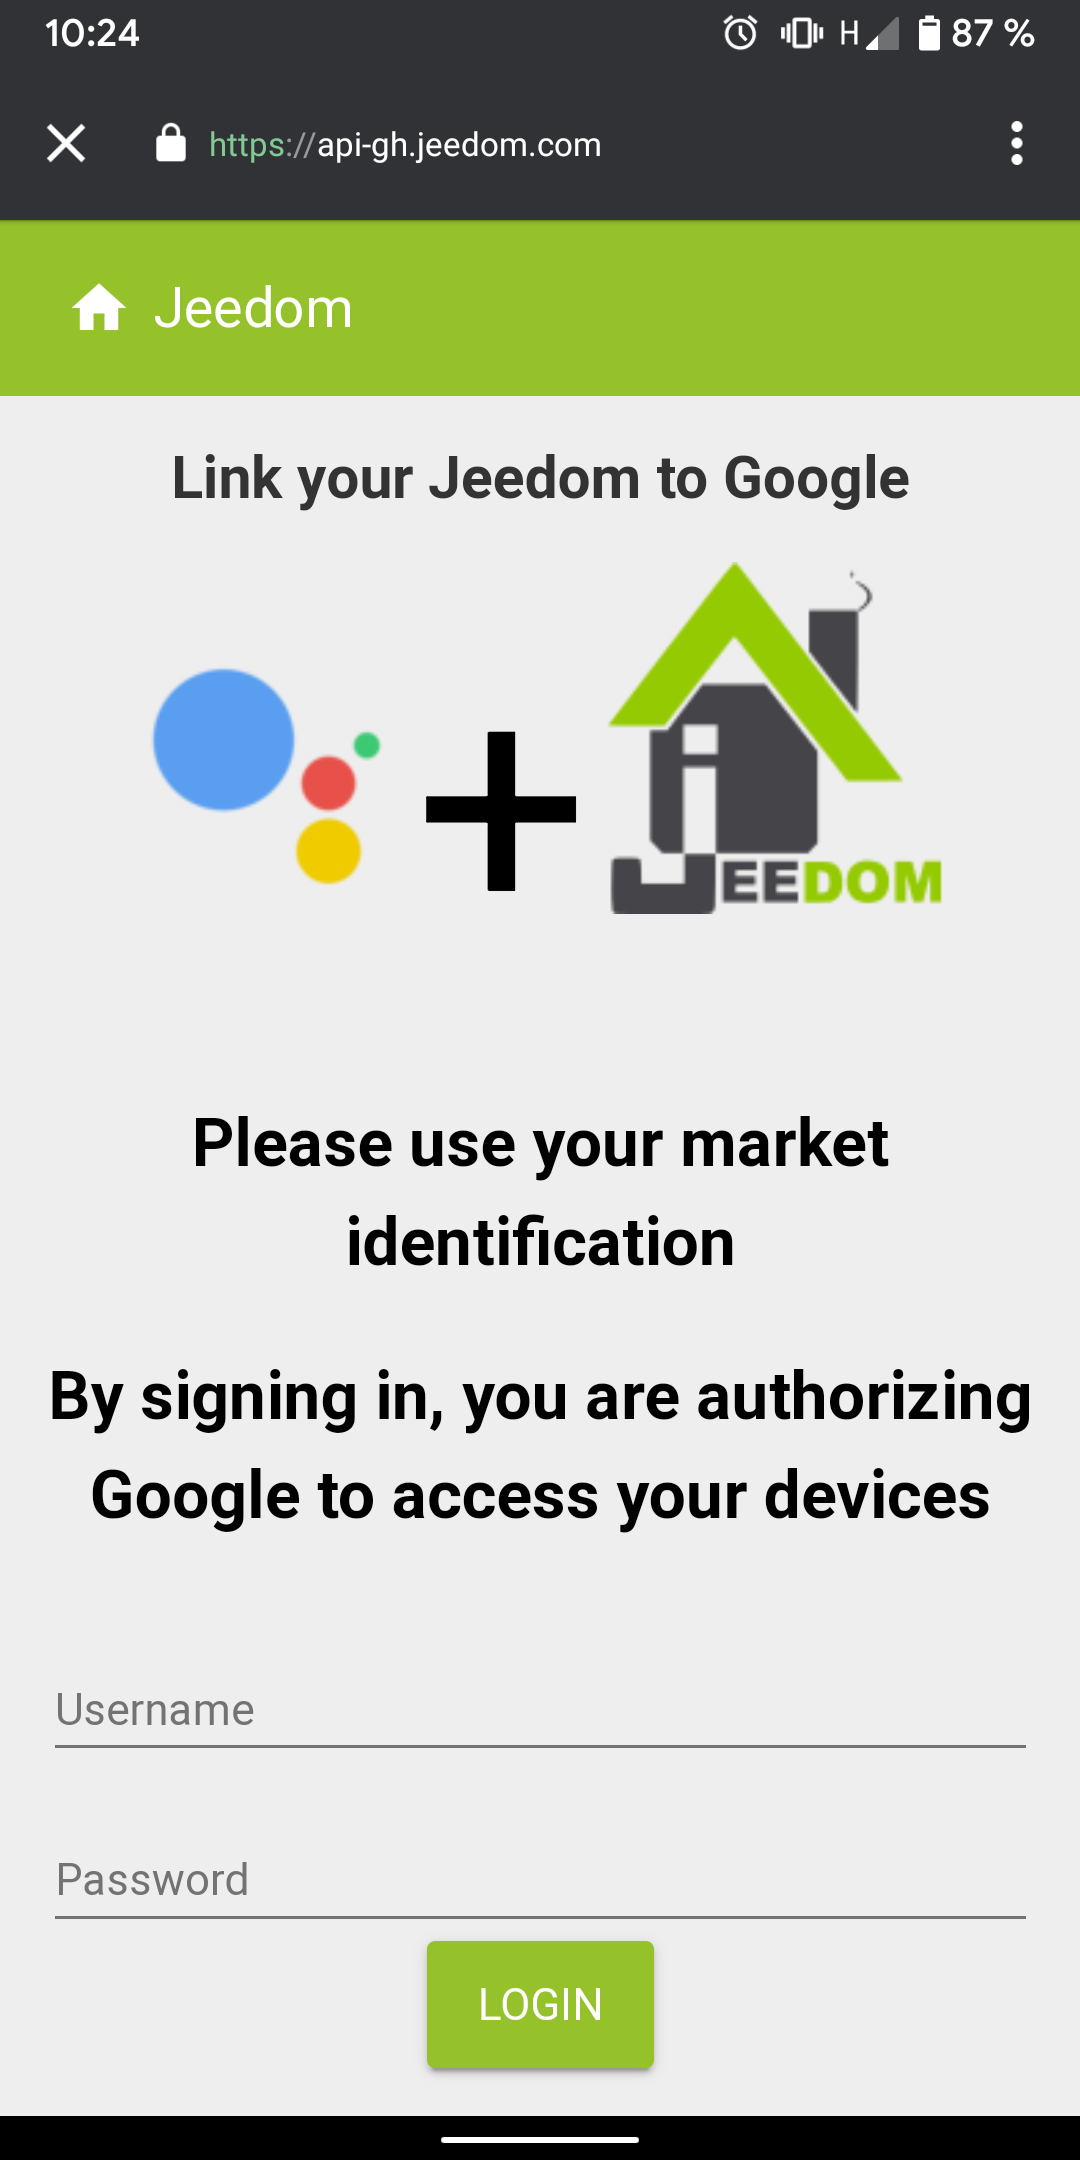
After installing the plugin, simply go to the configuration of the plugin, select the Cloud mode then click on “Send” (this will send the connection information to the plugin API on the market)
Then in Jeedom in Communication/Google Smarthome you must click on save to send your initial configuration, you need at least one device in OK (otherwise when connecting Google Home <-> Jeedom you will have an error)
Then on the Google Home application you have to go to the first tab click on Add (the +) :
Then configure a device :
On “Works with Google” :
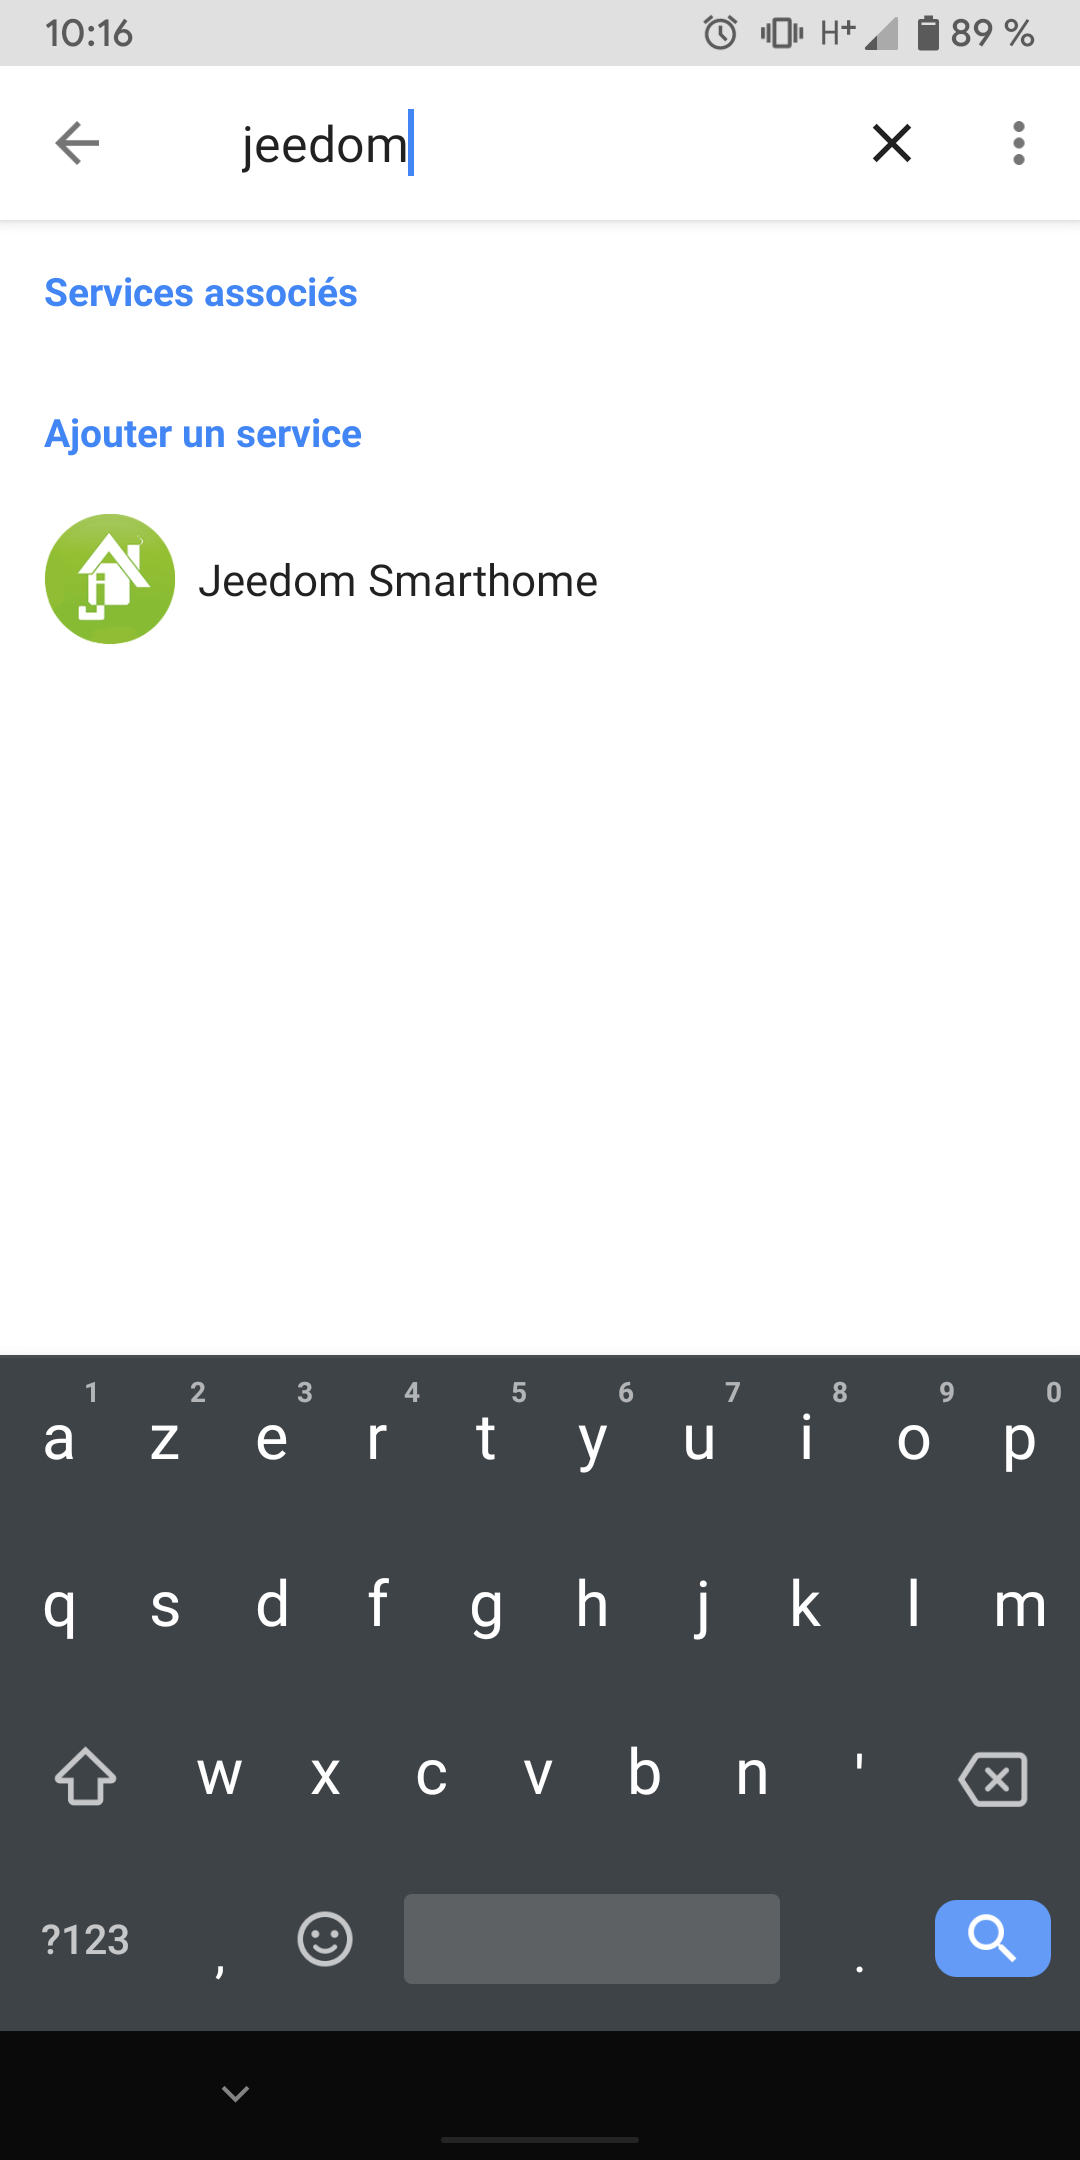
Then in the list with the search button (magnifying glass at the top right), search for “Jeedom Smarthome” and click on it :
Enter your market identifiers (well those market not those of your Jeedom).
In plugins -> communication -> Google Smarthome you can configure your different equipment (see chapter Plugin configuration)
NOTE
To switch from standalone mode to cloud mode you must :
- in the plugin go to cloud then save
- wait 24h
- in the Google home application you must dissociate testsmarthome (your standalone application)
- in Communication/Google Smarthome you must click on save to send your initial configuration
- Link Jeedom Smarthome in Google Home
Important
Any modification to the configuration of the equipment sent to Google Home (addition of equipment, deletion of equipment, change of a generic order type) necessarily requires going to Plugin -> Communication -> Googme Smarthome then save
Standalone mode
Important
Google modifies the interface (very) often, we do not have the human resources to redo all the screen captures each time. There can therefore be big differences between the captures and reality
Important
If you have used cloud mode you should not do this part !!! Go directly to the “Plugin configuration” chapter”
Important
Standalone mode is a “scam” because it makes you create an application at Google in development mode which allows synchronization only for 3 days after activation of test mode. So when adding or modifying equipment, reactivate the test mode every 3 days to be able to synchronize. Attention we are talking about a modification of the configuration if you do not add or modify equipment there is nothing to do the application will work without time limit
Important
Since the application is a dev application on the Google side, they can cut it, delete it or change the rules at any time. In this case Jeedom cannot be held responsible in the event of a malfunction.
Important
For the application (s) to work, it is essential that your jeedom is in https with a valid certificate (if you have a service pack, DNS access is there for that)
As a reminder, the plugin allows you to :
- use the native implementation of Google for the management of connected objects
- use jeedom interactions using “Talk to …”
There are therefore 2 applications listed on Google : one for the Google Smarthome part and one for the interaction part (you can of course only do one of the 2)
Google Smarthome app
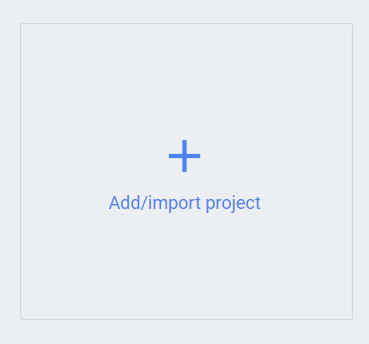
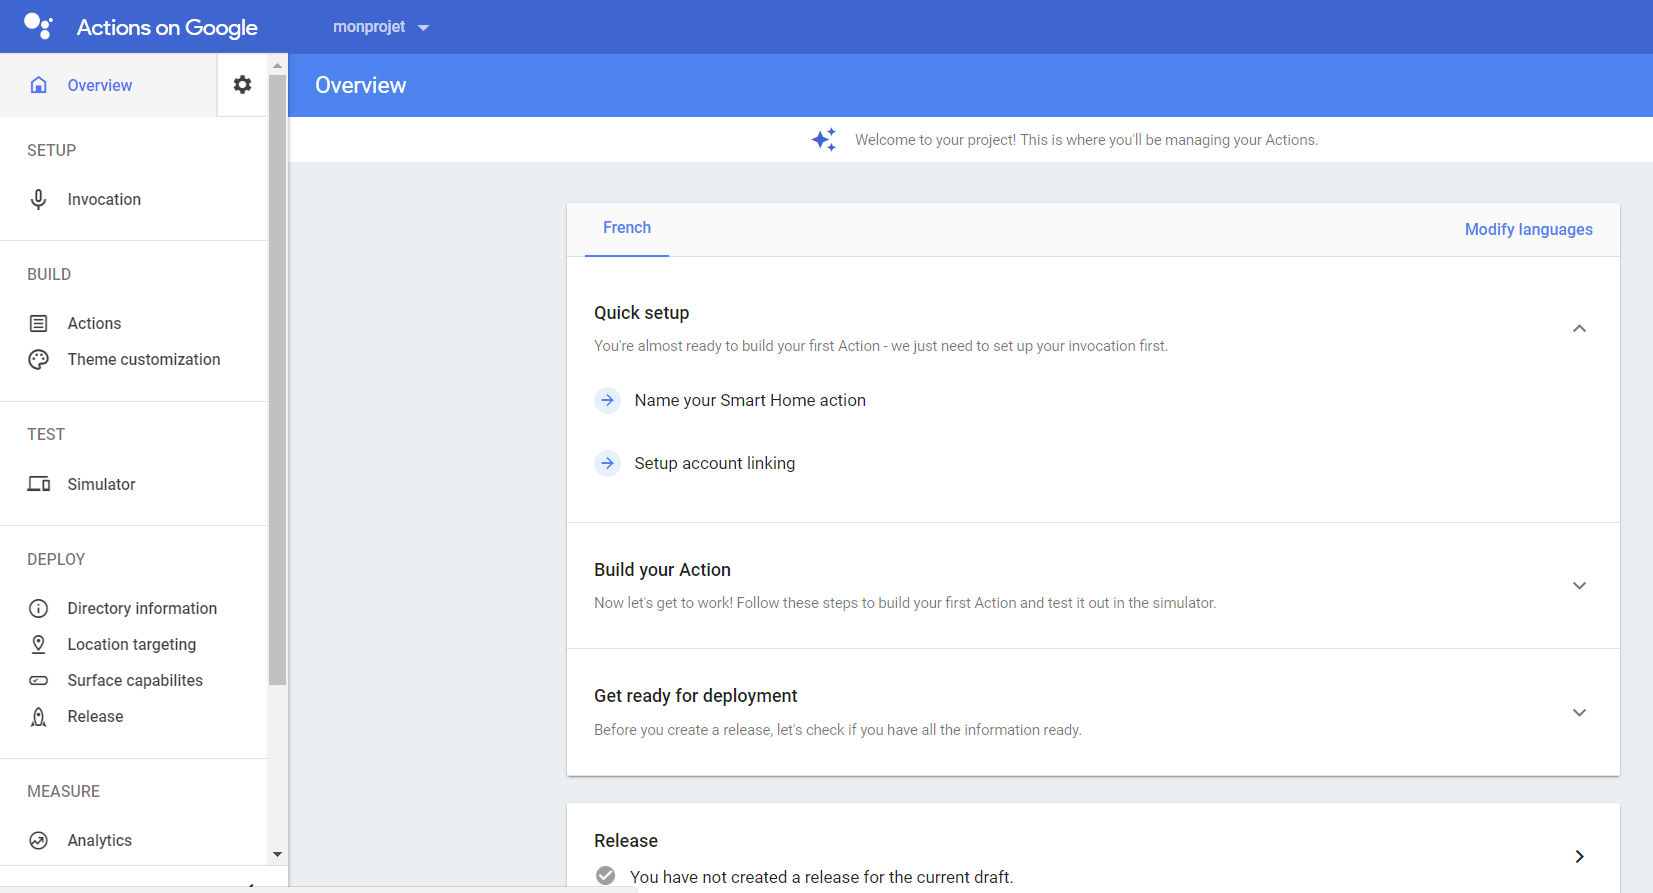
Come on here then click on “Add / import project”
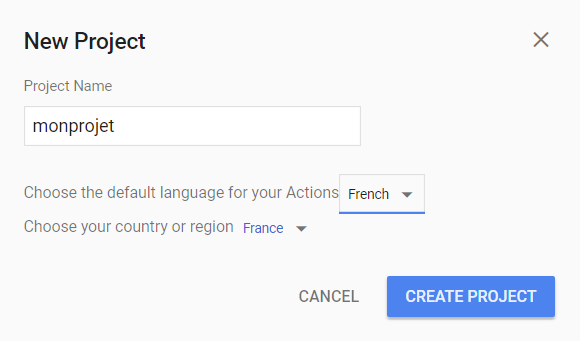
Give a name to the project change default language and region and validate :
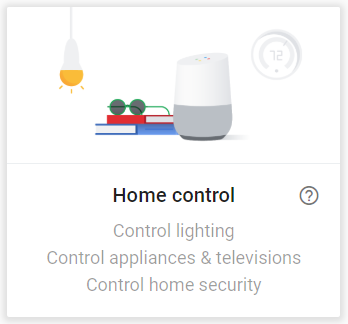
Select “Home control” :
Click on “Smarthome” :
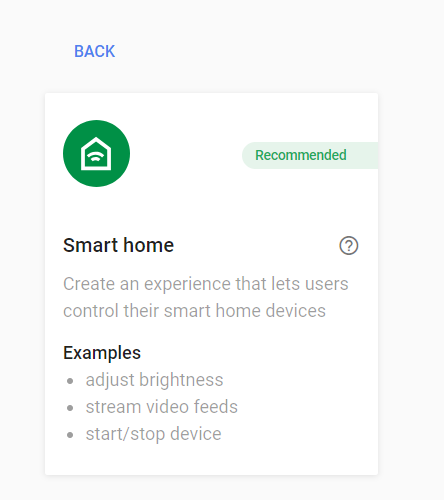
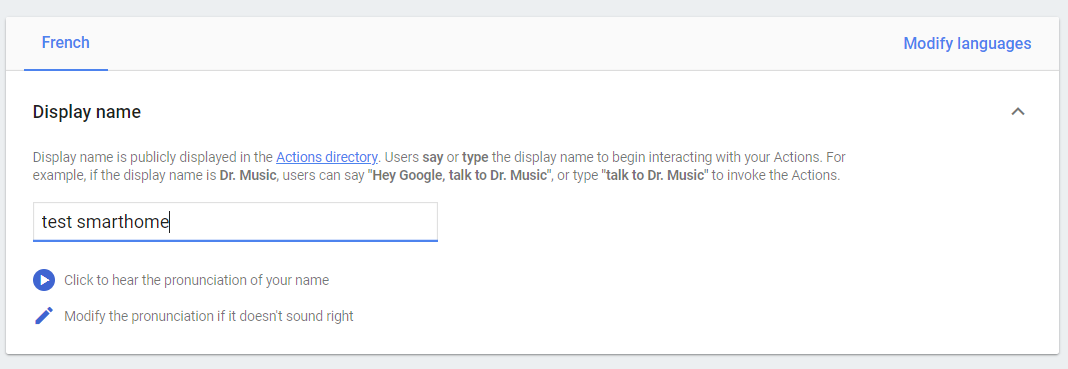
Click on “Name your Smart Home action” :
Put “smarthome test” and validate (Save button at the top right) :
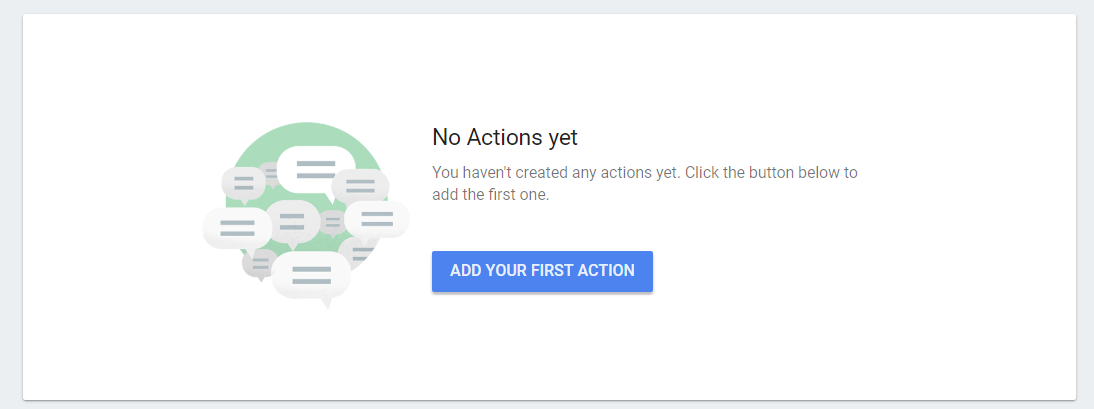
Then on the left click on “Actions” :
Then “Add your first action” :
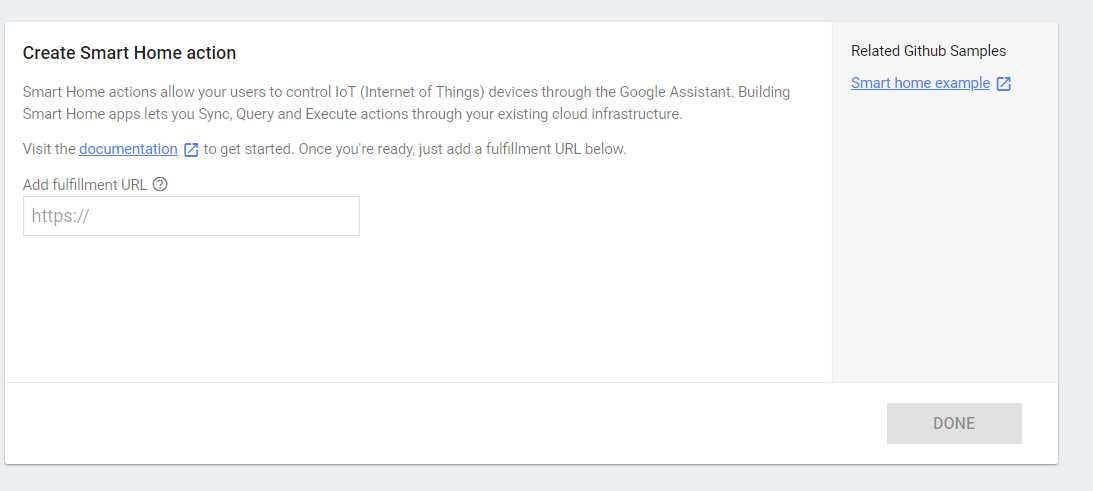
You will have to give here the arrival URL of Jeedom. To get it it’s very simple, in Jeedom you have to go to the plugin management page, choose the “Standalone” mode (and save in passing), the url is the one called “Fulfillment URL”
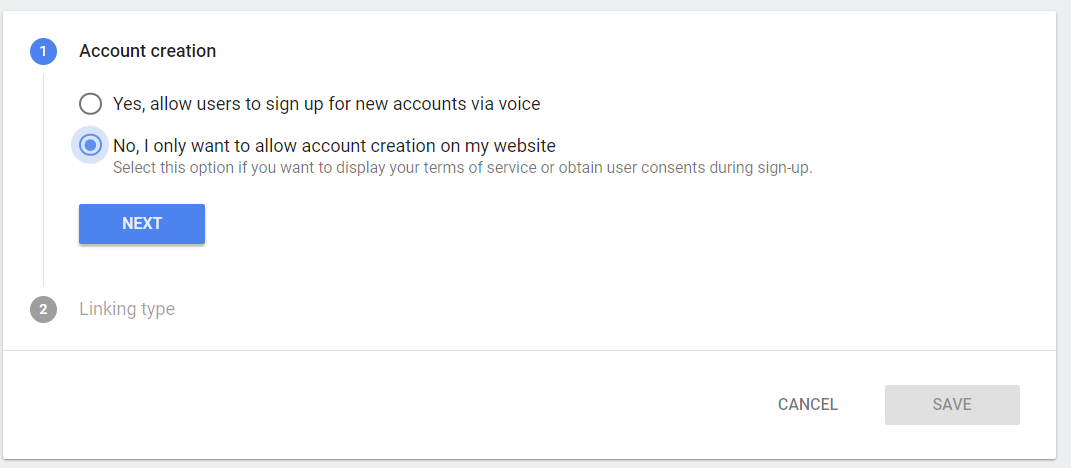
Then go to “Account linking” (left menu) :
Select “No, I only want to allow account creation on my website” and do “Next” :
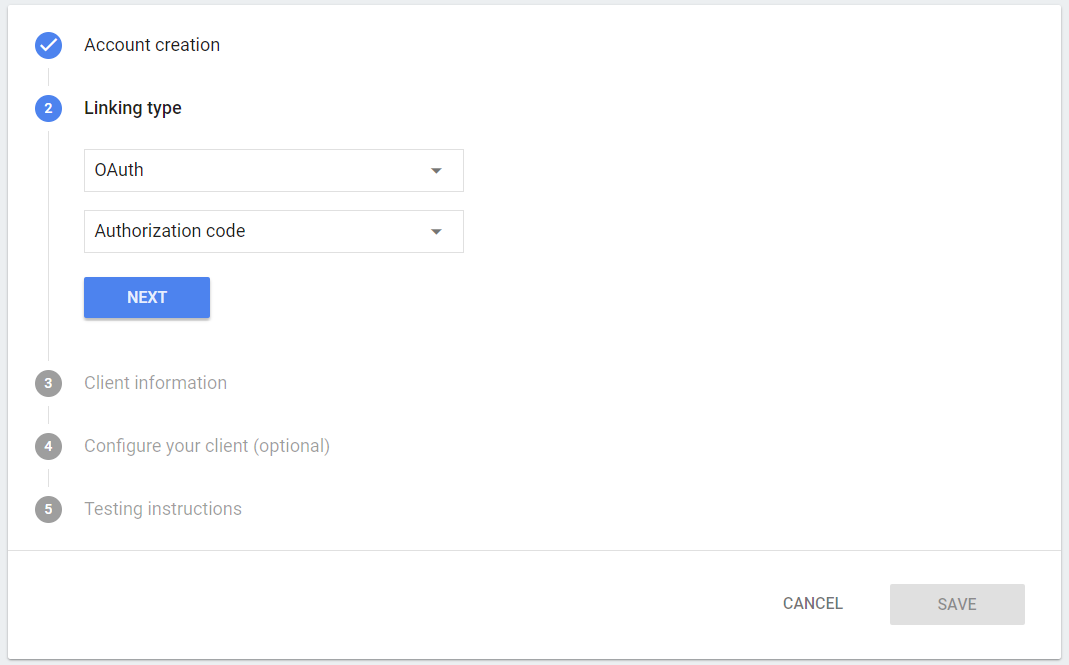
Select “OAuth” then “Authorization code” and do “Next” :
Then fill in the 4 fields according to the plugin configuration page, then click “Next” :
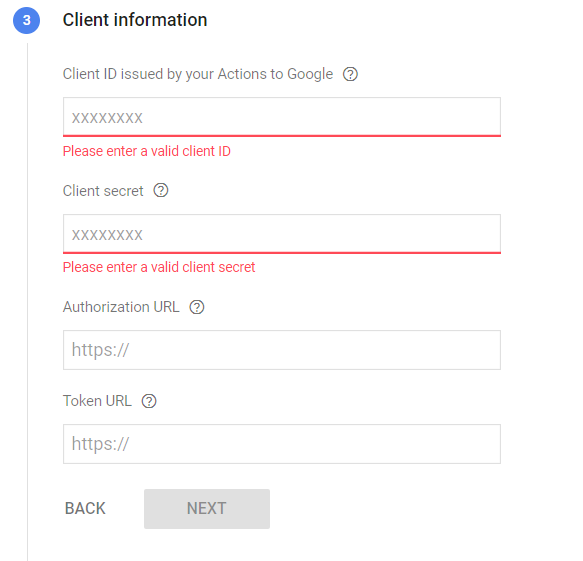
NOTE
The fields are :
- client ID first
- then the secret client
- then “Authorization URL” (be careful to take the one from the “Smarthome” section”)
- then “Token URL” (be careful to take the one from the “Smarthome” section”)
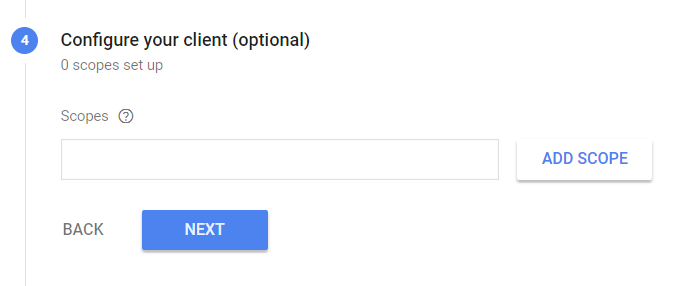
There is nothing to do simply “Next” :
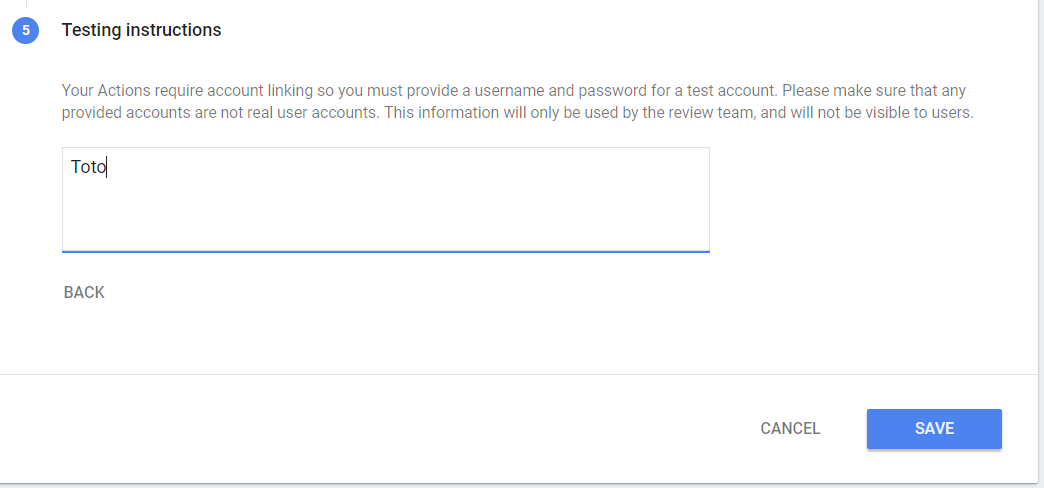
Write “Toto” then do “Save” :
You must now configure the homegraph API key, to do this go here, then right click on “Library” :
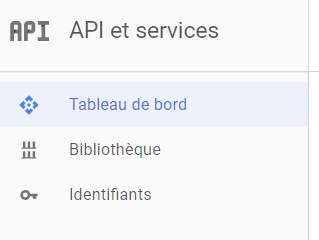
NOTE
If you don’t have a project you need to create one
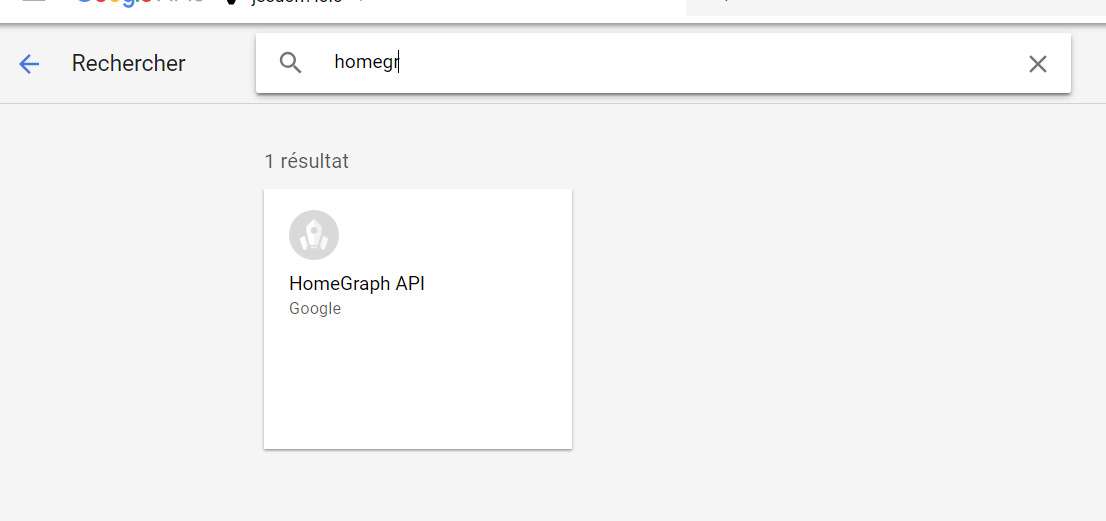
And look for “Homegraph” :
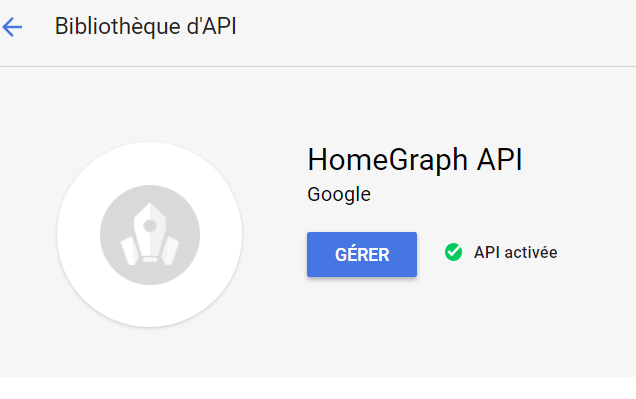
Click on homegraphapi then activate the API and click on manage :
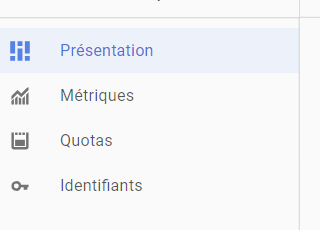
Click on identifier on the left :
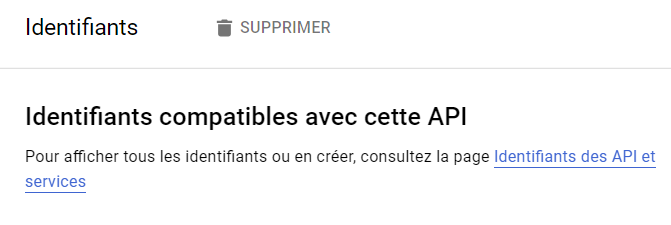
Then on “Identifiers of APIs and services” :
Click on “Create identifiers” then on “API key” :
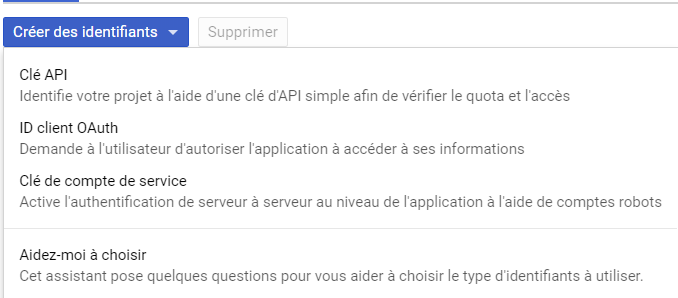
Copy the generated API key and paste it on the Google Smarthome plugin management page in “Homegraph API Google”
Last step to give Jeedom the project id to manage the connection, go here then click on your project. Récuperez l’url de la forme “https://console.actions.google.com / u / 0 / project / myproject-31023 / overview “, the project id is between project / and / overview, in the example here it is” myproject-31023 “, copy this id on the management page the Google Smarthome plugin in “Smarthome Project ID”.
That’s it, you can now click on the left on “Action” :
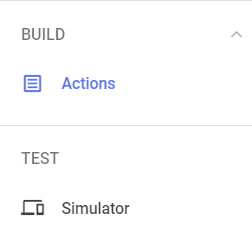
Then on test :
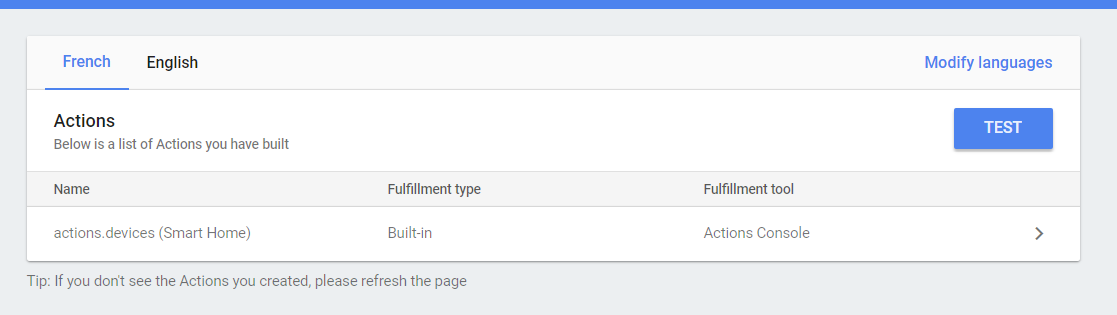
Then you need on a smartphone android (must not work on an iphone) connect to your Jeedom by the external url of it. Then go to the home application then “configure or add” then “Configure a device” and finally click on “Works with Google” and add your service created above (it starts with [test])
Jwt configuration
JWT allows you to automatically report any change in the status of an item of equipment sent to Google, which therefore allows you to have the status more quickly when you request it from Google Home or the Google Home app. It is not obligatory to configure it, however if you check the “Report status” box, you absolutely must have done it for it to work.
To make the configuration you need
- go here, if Google asks you, you must choose the project (the one created just above).
- Click on create a service account
- Give it a name (you can put whatever you want, avoid )
- Retrieve the email generated just below to copy it into the plugin configuration on Jeedom (fields : Mail client (JWT))
- Click on create
- Click on continue without modifying anything
- Click on “Create a key”
- Leave JSON and click OK
- Click on OK
- Open the downloaded file and copy the ‘private_key’ part (starts with “—–BEGIN PRIVATE KEY—–”, included and ends with “—–END PRIVATE KEY—–\n “, included without the “) in the plugin configuration on Jeedom (fields : Private key (JWT))
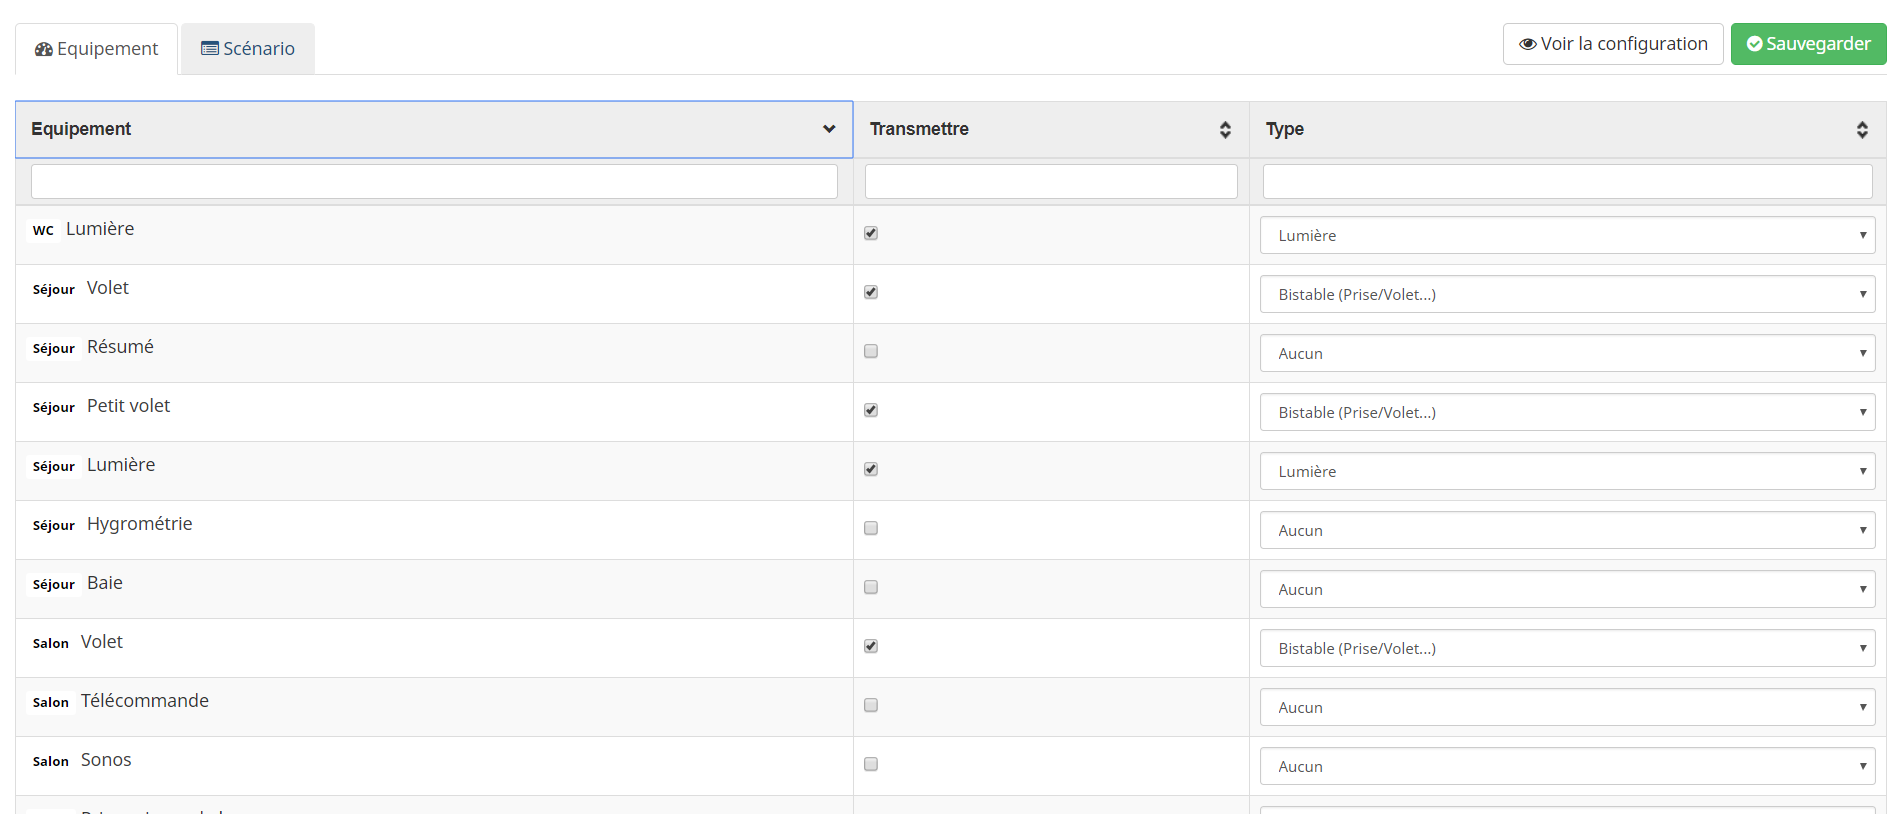
Plugin configuration
On your Jeedom, go to Plugins -> Communication -> Google Smarthome and in the equipment section select the equipment to transmit to Google as well as the type of equipment.
Important
The plugin is based on the generic Jeedom types of commands to control your home automation. It is therefore very important to configure these correctly.You can see here documentation on typical generics
NOTE
For the “camera” type you must absolutely configure the URL of the stream (we tested only the RTSP) so that it works. Note that camera support is currently in beta and consumes a lot of resources
Equipement
On equipment you can configure :
- Options :
- Transmit : sends the equipment to Google Home so that it can be controlled (be careful, the configuration of the generic types must be OK)
- Raise the state : sending any state change information to Google directly (this prevents Google Home from querying Jeedom when requesting information). See section “JWT Configuration”
- Challenge [None, Code] : if in code mode then Google will ask you for a Code (the one indicated just below) for each action on the equipment
- Status : indicates if the transmission is OK, if it is NOK then it comes from Generic type. If you click on NOK you can have the information on the necessary generic types
- Type : indicates the type of equipment
- Pseudo : device nickname, if empty then the device name is used
- Action :
- Allows advanced configuration of equipment for Google Home (depends on the type used)
- Advanced equipment configuration, allows access to advanced command configuration and therefore modification of generic types
- Allows you to go directly to the equipment configuration page
Type
The types of equipment are important this allows Google to react based on the sentences you say.
Important
Jeedom supports “beta” types not yet documented at Google so which may or may not work depending on updates at Google
Important
The thermostat type is only fully supported through equipment coming from the thermostat plugin, otherwise the management of the modes may not work
For mode management on a thermostat type, it is necessary :
- An info of type “other” which takes as value “heat”, “cool”, “off”, “eco” and assigns it the generic type : Thermostat Mode
- Actions that perform mode changes and assign them the generic type : Thermostat Mode
- It is also necessary to attach in the equipment settings in the gsh plugin of the action to the corresponding mode (part “Configuration TemperatureSetting”)
Scenario
You can also create scenes in the scenario tab, with entry and exit actions.
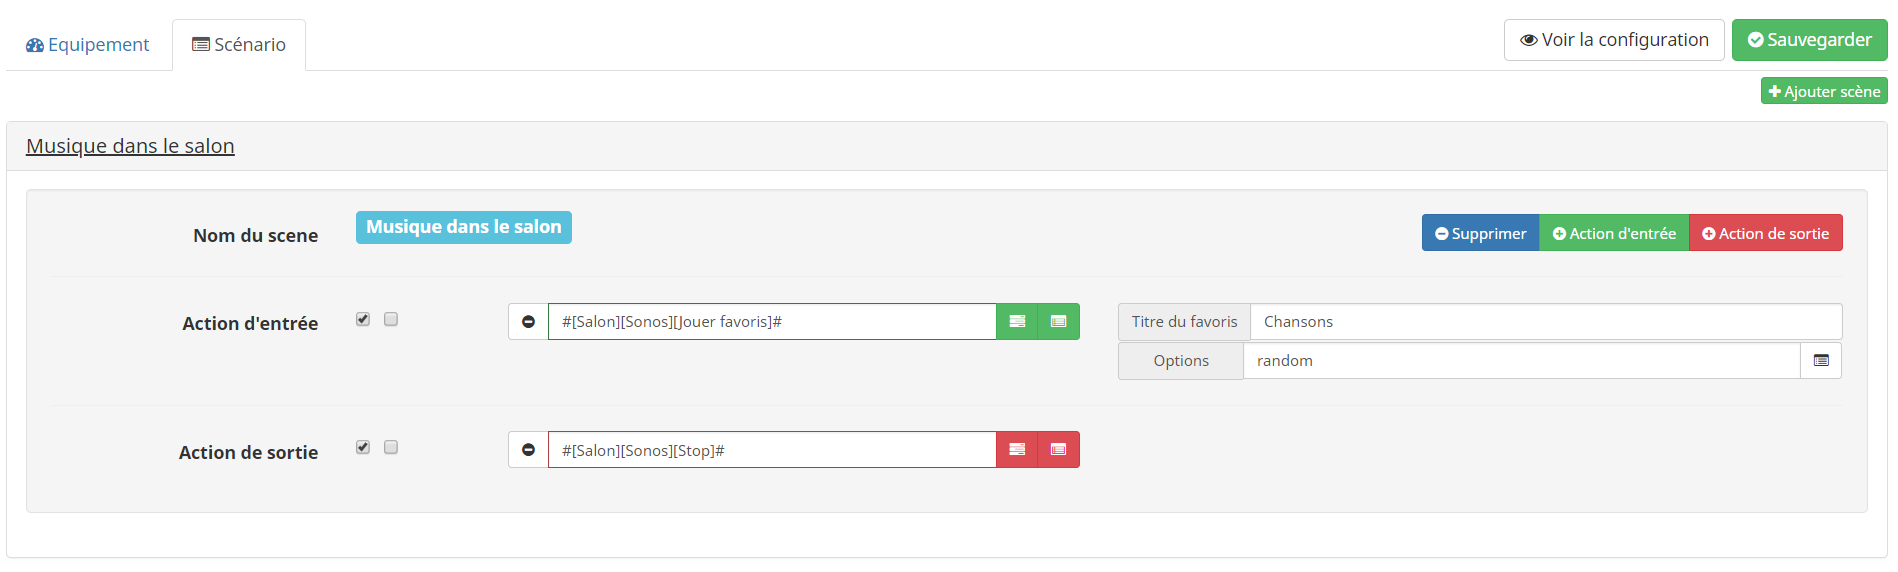
NOTE
To start a scenario just say “Active #nom du scénario#” or “Disable #nom du scénario#
NOTE
When saving Jeedom will automatically request synchronization with Google. Attention in standalone mode if you have an error (type “Requested entity was not found”) try to reactivate the test of the application (here) then click again on the connection button on the plugin configuration page. Also check the configuration (especially the oauth part) of your Google application (sometimes the fields are deleted by Google)
All you have to do is assign the equipment to the rooms in the Google Home app
FAQ
I can’t make the association in cloud mode ?
We must verify that :
- you are in https (if you have a service pack, use jeedom DNS these are secure by default)
- you have activated Google Assistant on the market (profiles page, my services tab then configuration in the Voice assistants section)
- you have subscribed to the voice services subscription and it is still valid (necessary from 01/06/2019). This can be seen on your market profiles page, my services tab
- you must in plugins -> communication -> Google Smarthome select “transmit” equipment and set the type and finally save
- use your market credentials well
- if you have a let’s encrypt certificate, don’t forget to put the root and the intermediary in the certification chain
- no OK module (you must have one otherwise google refuses to link)
- if you are on your own domain, problems resolving the domain name in IP, no idea why. On the jeedom side, the DNS are those provided by default by OVH (we have no control over it anyway). I even had the case of a user having the DNS at OVH and yet unable to resolve it on our machines
- Problem with the phone, on some brand the browser is either outdated or not chrome by default and it causes problems to make the link
- If you still have the problem, try sending only a light type module
What are the possible orders ?
Voice commands (as well as returns) are managed only by Google, here is the Documentation
The assistant asks me to assign the parts but I don’t know what the equipment corresponds to.
Yes the assistant does not display the real name of the equipment, just the nickname. You must therefore quit the assistant and return to the home control home page. By clicking on the equipment you will have its name you can then assign it to a room
Why do you need to assign parts to each piece of equipment ?
Because Google doesn’t allow you to do it through the API so you absolutely must do it manually.
I get the error message “OpenSSL unable to sign data”
You have to check the “Push the state” box (in the advanced configuration, green button with the notched wheel) without doing the JWT configuration
I get the error message “Cant find resource 404” when saving
So no worries, everything is saved, it’s just the automatic synchronization that is not done. To make it say “Synchronize my devices” to your assistant. To try to correct this problem : go to the next page here. On this page you will see the list of all projects even those invisible on the google actions page. Delete all unused projects. Then redo the tutorial from the step configure the Homegraph API key (activation, key generation, then dissociate jeedom from your Google account and redo the link)
You have a link error or Unable to update the parameter, check your connection in cloud mode
It is necessary in jeedom, on the plugin to add equipment, save and redo the association of Jeedom Smarthome in the Google Home application. Attention il y a aussi des soucis avec l’application Google Home ou il faut vider le cache de celle-ci pour la connexion marche
I get the error “Apparently Jeedom Smart Home is unavailable at the moment.” or “Sorry I can’t connect to Jeedom Smart Home.”
Try to un-associate / re-associate the Google smarthome app. Be careful to use the official application and not a [TEST] application if you have used standalone mode before. If the problem persists, check (especially in a scene) that the execution time remains less than 2s (maximum allowed by Google)
When adding equipment I have NOK
Simply click on the NOK a window will tell you the type generics to have on the equipment controls for this to work. You can see here the documentation on generic type
Changing the speed on a fan does not work
After analysis Google does not send an order during an action on speed. We must therefore wait for Google to correct
.