Installation on Raspberry Pi
You will find here the documentation to install Jeedom on a raspberry PI with a MiroSD card..
Command line installation
Download the latest “lite” image”
Raspberry Pi Imager allows you to directly download the Raspberry Pi OS installation image, in its most recent version, and burn the image directly to the SD card. Please note you must take a Debian 11 version (Bullseye), Jeedom is not yet compatible with Debian 12 (but we are working on it).
Enable SSH access
Warning
For security reasons, SSH access is no longer enabled by default on this distribution. So you have to activate it.
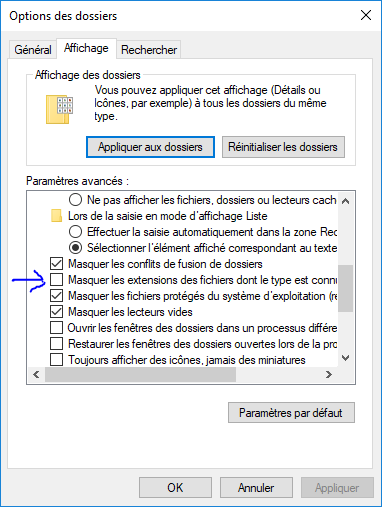
An empty ssh file must be created on the boot partition (the only one accessible under windows).
Just right click : new / text document and rename it to “ssh” without extension
Important
Under Windows, in Explorer, you must therefore check your settings in display / options / modify the folder and search options /
Start the Raspberry Pi
Insert your MicroSD card, connect the network cable and connect the power.
Connect in SSH
Identify your Raspberry Pi on the network
You need to know the IP address of your Raspberry PI. Many solutions :
- Consult the DHCP configuration in your router
- Use a port scanner such as “Angry IP Scanner” here
Establish connection
Then use for example PuTTY to establish your connection Here
Enter the IP address of your Raspberry Pi (here 192.168.0.10) and click on open. Accept the default security message on first login.
Log in with credentials pi / raspberry
Important
For security reasons, it is imperative to change the default password. Cases of hacking based on the use of the default login / password pair of the Raspberry Pi are particularly widespread. (Command : passwd and sudo passwd)
Launch the jeedom installation script
wget https://raw.githubusercontent.com/jeedom/core/master/install/install.sh
chmod +x install.sh
./install.sh
The sudo password is also raspberry
NOTE
Depending on your internet speed, the installation can take 45 to 90 minutes. You must not interrupt the process before the end. Otherwise, you will have to repeat the entire procedure.
Then just go to IP_MACHINE_JEEDOM
NOTE
The default credentials are admin / admin
For more information on installing Jeedom please see this documentation
Then you can follow the documentation First step with Jeedom
