Here is the most important part in home automation : scenarios. True brain of the domotics, it is what makes it possible to interact with the real world in an “intelligent way”.
The Scenarios management page
Gestion
To access it, nothing simpler, just go to Tools -> Scenarios. You will find there the list of scenarios for your Jeedom as well only functions to manage them better :
-
Add : Create a scenario. The procedure is described in the next chapter.
-
Disable scenarios : Disables all scenarios.
-
See variables : Lets see the variables, their value as well that the place where they are used. You can also create a. Variables are described in a chapter of this page.
-
Overview : Allows you to have an overview of all scenarios. You can change the values active, Jeedom, multi launch, synchronous mode, Log et Timeline (these parameters are described in the following chapter). You can also access the logs for each scenario and start individually.
-
Expression tester : Allows you to run a test on a expression of your choice and display the result.
My scenarios
In this section you will find the list of scenarios that you have created. They are classified according to groups that you have defined for each of them. Each scenario is displayed with its last name and his parent object. The grayed out scenarios are those who are disabled.
As in many Jeedom pages, put the mouse to the left of the screen displays a quick access menu (from your profile, you can always leave it visible). You will be able so search your scenario, but also in Add one by this menu.
Editing a scenario
After clicking on Add, you must choose the name of your scenario and you are redirected to its general settings page. At the top, there are some useful functions to manage our scenario :
-
Id : Next to the word General, this is the scenario identifier.
-
status : Current state of your scenario.
-
variables : View variables.
-
Expression : Displays the expression tester.
-
Perform : Allows you to launch the scenario manually (Remember no save beforehand !). The triggers are therefore not not taken into account.
-
Remove : Delete scenario.
-
Save : Save the changes made.
-
Template : Allows you to access and apply templates to the script from the market. (explained at the bottom of the page).
-
Export : Get a text version of the script.
-
Log : Displays the scenario logs.
-
Duplicate : Copy the scenario to create one new with another name.
-
Connections : Allows you to view the graph of the linked elements with the script.
General tab
In the tab General, we find the main parameters of our scenario :
-
Scenario name : The name of your scenario.
-
Name to display : The name used for its display.
-
Group : Allows you to organize the scenarios, by classifying them in groups.
-
Active : Activate the scenario.
-
Jeedom : Used to make the scenario visible.
-
Parent object : Assignment to a parent object.
-
Timeout seconds (0 = unlimited) : The maximum execution time authorized
- Multi launch : Check this box if you want the
scenario can be launched several times at the same time.
IMPORTANT
The multi-launch works by the second, that is to say that if you have 2 launches in the same second without the box checked there will still be 2 launches of the scenario (when it should not). Similarly during several launches in the same second it is possible that some launches lose the tags. Conclusion you MUST ABSOLUTELY avoid multiple launches in the same seconds.
-
Synchronous mode : Start the scenario in the current thread instead of a dedicated thread. It increases the speed of launch of the scenario but it can make the system unstable.
-
Log : The type of log desired for the scenario.
-
Follow in the timeline : Keeps track of the scenario in the timeline.
-
Description : Allows you to write a small text to describe your scenario.
- Scenario mode : The scenario can be programmed, triggered or both of them. You will then have the choice to indicate the (s) trigger (s) (be careful, there is a limit to the number of possible triggers per scenario of 15) and the programming (s)).
Tip
Warning : you can have a maximum of 28 triggers / programming for a scenario.
Scenario tab
This is where you will build your scenario. We must start through add a block, with the button on the right. Once a block created, you can add another block or a Action.
Tip
In conditions and actions, it is better to favor single quotes (‘) instead of double (“)
Blocks
Here are the different types of blocks available :
-
If / Then / Or : Allows you to perform actions under conditions).
-
Action : Allows you to launch simple actions without no conditions.
-
Loop : Allows you to perform actions repeatedly 1 up to a defined number (or even the value of a sensor, or a random number…).
-
In : Starts an action in X minute (s) (0 is a possible value). The peculiarity is that the actions are launched in the background, so they do not block the rest of the scenario. So it's a non-blocking block.
-
AT : Allows to tell Jeedom to launch the actions of the block at a given time (in the form hhmm). This block is non-blocking. Ex : 0030 for 00:30, or 0146 for 1h46 and 1050 for 10h50.
-
Coded : Allows you to write directly in PHP code (request some knowledge and can be risky but allows not to have no constraints).
-
Comment : Allows you to add comments to your scenario.
Each of these blocks has its options for better handling them :
-
The check box on the left allows you to completely disable the block without deleting it.
-
The vertical double arrow on the left allows you to move the whole block by drag and drop.
-
The button, on the far right, allows you to delete the entire block.
If / Then / Otherwise blocks, Loop, In and A
NOTE
On Si / Then / Otherwise blocks, circular arrows located to the left of the condition field allow to activate or not the repetition of actions if the evaluation of the condition gives the same result that the previous assessment.
For the conditions, Jeedom tries to make sure that we can write as much as possible in natural language while remaining flexible. Three buttons are available on the right of this type of block for select an item to test :
-
Find an order : Allows you to search for an order in all those available in Jeedom. Once the order is found, Jeedom opens a window to ask you which test you want perform on it. If you choose to Put nothing, Jeedom will add the order without comparison. You can also to choose and or or in front of Then to chain tests on different equipment.
-
Search a scenario : Lets search for a scenario to test.
-
Search for equipment : Same for equipment.
Tip
There is a list of tags allowing access to variables from the script or another, or by time, date, a random number,…. See further the chapters on commands and tags.
Once the condition is completed, you must use the button “add “, left, to add a new block or a Action in the current block.
Tip
You MUST NOT use [] in condition tests, only parentheses () are possible
Block Code
IMPORTANT
Please note, tags are not available in a code block.
Controls (sensors and actuators):
- cmd::byString ($ string); : Returns the corresponding command object.
- $string : Link to the desired order : #[objet][Equipment][commande]# (Ex : #[Appartement][Alarme][Active]#)
- cmd::BYID ($ id); : Returns the corresponding command object.
- $id : Order ID
- $cmd->execCmd($options = null); : Execute the command and return the result.
- $options : Options for command execution (may be plugin specific), basic option (command subtype) : - Message : $option = array(‘title’ => ‘titre du Message , ‘message’ => ‘Mon message’); - color : $option = array(‘color’ => ‘couleur en hexadécimal’); - slider : $option = array(‘slider’ => ‘valeur voulue de 0 à 100’);
Log :
- log::add ( 'filename' 'level', 'message');
- filename : Log file name.
- level : [debug], [info], [error], [event].
- Message : Message to write in the logs.
Scenario :
- $scenario->getName(); : Returns the name of the current scenario.
- $scenario->getGroup(); : Returns the scenario group.
- $scenario->getIsActive(); : Returns the state of the scenario.
- $scenario->setIsActive($active); : Allows you to activate or not the scenario.
- $active : 1 active, 0 not active.
- $scenario->setOnGoing($onGoing); : Lets say if the scenario is running or not.
- $onGoing => 1 en cours , 0 arrêté.
- $scenario->save(); : Save changes.
- $scenario->setData($key, $value); : Save a data (variable).
- $key : value key (int or string).
- $value : value to store (int, string, array or object).
- $scenario->getData($key); : Get data (variable).
- $key => value key (int or string).
- $scenario->removeData($key); : Delete data.
- $scenario->setLog($message); : Write a message in the scenario log.
- $scenario->persistLog(); : Force the writing of the log (otherwise it is written only at the end of the scenario). Be careful, this can slow the scenario down a bit.
The actions
Actions added to blocks have several options. In order :
-
A box parallel so that this command is launched in parallel other commands also selected.
-
A box activated so that this command is taken into account account in the scenario.
-
A vertical double arrow to move the action. Simply drag and drop from there.
-
A button to delete the action.
-
A button for specific actions, each time with the description of this action.
-
A button to search for an action command.
Tip
Depending on the selected command, we can see different additional fields displayed.
Possible substitutions
Triggers
There are specific triggers (other than those provided by commandes) :
-
#start# : triggered at (re) start of Jeedom,
-
#begin_backup# : event sent at the start of a backup.
-
#end_backup# : event sent at the end of a backup.
-
#begin_update# : event sent at the start of an update.
-
#end_update# : event sent at the end of an update.
-
#begin_restore# : event sent at the start of a restoration.
-
#end_restore# : event sent at the end of a restoration.
-
#user_connect# : user login
You can also trigger a scenario when a variable is set to day putting : #variable(nom_variable)# or using the HTTP API described here.
Comparison operators and links between conditions
You can use any of the following symbols for comparisons in conditions :
-
== : equal to,
-
> : strictly greater than,
-
>= : greater than or equal to,
-
< : strictly less than,
-
<= : less than or equal to,
-
!= : different from, is not equal to,
-
matches : contains (ex : [Bathroom] [Hydrometry] [condition] matches “/ wet /” ),
-
not (… matches…) : does not contain (ex : not ([Bathroom] [Hydrometry] [condition] matches “/ wet /”)),
You can combine any comparison with operators following :
-
&& / ET / and / AND / and : et,
-
| / OR / or / OR / or : ou, - |^ / XOR / xor : or exclusive.
Tags
A tag is replaced during the execution of the scenario by its value. You can use the following tags :
Tip
To have the leading zeros on display, use the Date () function. See here.
-
#seconde# : Current second (without leading zeros, ex : 6 for 08:07:06),
-
#heure# : Current time in 24h format (without leading zeros, Ex : 8 for 08:07:06 or 17 for 17:15),
-
#heure12# : Current time in 12-hour format (without leading zeros, Ex : 8 for 08:07:06),
-
#minute# : Current minute (without leading zeros, ex : 7 for 08:07:06),
-
#jour# : Current day (without leading zeros, ex : 6 for 07/06/2017),
-
#mois# : Current month (without leading zeros, ex : 7 for 07/06/2017),
-
#annee# : Current year,
-
#time# : Current hour and minute (ex : 1715 for 5.15 p.m),
-
#timestamp# : Number of seconds since January 1, 1970,
-
#date# : Day and month. Attention, the first number is the month. (Ex : 1215 for December 15),
-
#semaine# : Week number (ex : 51),
-
#sjour# : Name of the day of the week (ex : Samedi),
-
#njour# : Day number from 0 (Sunday) to 6 (Saturday),
-
#smois# : Name of the month (ex : Janvier),
-
#IP# : Jeedom's internal IP,
-
#hostname# : Jeedom machine name,
-
#trigger# : Maybe the name of the command that started the scenario, 'api' if the launch was started by the API, 'schedule' if it was started by programming, 'user' if it was started manually
You also have the following additional tags if your script has been triggered by an interaction :
-
#query# : interaction that triggered the scenario,
-
#profil# : profile of the user who started the scenario (can be empty).
IMPORTANT
When a scenario is triggered by an interaction, it is necessarily run in fast mode.
Calculation functions
Several functions are available for the equipment :
-
- average (order, period) and averageBetween (order, start, end)
- Give the average of the order over the period (period = [month, day, hour, min] or expression PHP) ou between the 2 required terminals (in the form Ymd H:i:s or expression PHP) :
-
min (order, period) and minBetween (order, start, end) : Give the minimum order over the period (period = [month, day, hour, min] or expression PHP) ou between the 2 required terminals (in the form Ymd H:i:s or expression PHP) :
-
max (order, period) and maxBetween (order, start, end) : Give the maximum of the order over the period (period = [month, day, hour, min] or expression PHP) ou between the 2 required terminals (in the form Ymd H:i:s or expression PHP) :
-
duration (order, value, period) and durationbetween (command, value, start, end) : Give the duration in minutes during which the equipment had the value selected on the period (period = [month, day, hour, min] or expression PHP) ou between the 2 required terminals (in the form Ymd H:i:s or expression PHP) :
-
statistics (order, calculation, period) and statisticsBetween (command, calculation, start, end) : Give the result different statistical calculations (sum, count, std, variance, avg, min, max) over the period (period = [month, day, hour, min] or expression PHP) ou between the 2 required terminals (in the form Ymd H:i:s or expression PHP) :
-
trend (order, period, threshold) : Gives the trend of order over the period (period = [month, day, hour, min] or expression PHP) :
-
stateDuration (command) : Gives duration in seconds since the last change in value. Returns -1 if none history does not exist or if the value does not exist in history. Returns -2 if the order is not logged.
-
lastChangeStateDuration (command, value) : Give the duration in seconds since the last change of state to the value passed as a parameter. Returns -1 if none history does not exist or if the value does not exist in history. Returns -2 if the order is not logged
-
lastStateDuration (command, value) : Gives duration in seconds during which the equipment has recently had the chosen value. Returns -1 if no history exists or if the value does not exist in the history. Returns -2 if the order is not logged
-
stateChanges (order, [value], period) and stateChangesBetween (command, [value], start, end) : Give the number of state changes (to a certain value if indicated, or in total otherwise) over the period (period = [month, day, hour, min] or expression PHP) ou between the 2 required terminals (in the form Ymd H:i:s or expression PHP) :
-
lastBetween (command, start, end) : Returns the last value registered for the equipment between the 2 required terminals (under the form Ymd H:i:s or expression PHP) :
-
variable (variable, default value) : Get the value of a variable or the desired default value :
-
scenario (scenario) : Returns the status of the scenario. 1 in progress, 0 if stopped and -1 if disabled, -2 if the scenario does not exist and -3 if the state is not consistent. To have the "human" name of the scenario, you can use the dedicated button to the right of the scenario search.
-
lastScenarioExecution (scenario) : Gives duration in seconds since the last scenario launch :
-
collectDate (cmd, [format]) : Returns the date of the last data for the command given as a parameter, the 2nd optional parameter allows to specify the return format (details here). A return of -1 means that the order cannot be found and -2 that the order is not no info type
-
valueDate (cmd, [format]) : Returns the date of the last data for the command given as a parameter, the 2nd optional parameter allows to specify the return format (details here). A return of -1 means that the order cannot be found and -2 that the order is not no info type
-
eqEnable (equipment) : Returns the status of the equipment. -2 if the equipment cannot be found, 1 if the equipment is active and 0 if it is not is inactive
-
value (cmd) : Returns the value of an order if it is not automatically given by Jeedom (case when storing the name of the order in a variable)
-
tag (montag, [default]) : Used to retrieve the value of a tag or the default if it does not exist :
-
name (type, command) : Used to retrieve the name of the command, equipment or object. Type is worth either cmd, eqLogic or object.
-
lastCommunication (equipment, [format]) : Returns the date of the last communication for the equipment given as a parameter, the 2nd optional parameter allows to specify the return format (details here). A return of -1 means that the equipment cannot be found
- color_gradient (color_start, color_end, value_min, value_max, value) : Returns a color calculated with respect to value in the range color_start / color_end. The value must be between min_value and max_value
The periods and intervals of these functions can also use with expressions PHP comme par example :
-
Now : maintenant
-
Today : 00:00 today (allows for example to obtain results of the day if between ‘Today’ and ‘Now’)
-
Last monday : last Monday at 00:00
-
5 days ago : 5 days ago
-
Yesterday noon : yesterday afternoon
-
Etc..
Here are practical examples to understand the values returned by these different functions :
| Socket with values : | 000 (for 10 minutes) 11 (for 1 hour) 000 (for 10 minutes) |
|---|---|
| average (catch, period) | Returns the average of 0 and 1 (can |
| be influenced by polling) | |
| averageBetween(#[Salle de bain][Hydrometrie][Humidité]#,2015-01-01 00:00:00,2015-01-15 00:00:00) | Returns the average order between January 1, 2015 and January 15, 2015 |
| min (catch, period) | Returns 0 : the plug was extinguished during the period |
| minBetween(#[Salle de bain][Hydrometrie][Humidité]#,2015-01-01 00:00:00,2015-01-15 00:00:00) | Returns the minimum order between January 1, 2015 and January 15, 2015 |
| max (catch, period) | Returns 1 : the plug was well lit in the period |
| maxBetween(#[Salle de bain][Hydrometrie][Humidité]#,2015-01-01 00:00:00,2015-01-15 00:00:00) | Returns the maximum of the order between January 1, 2015 and January 15, 2015 |
| duration (taken, 1, period) | Returns 60 : the plug was on (at 1) for 60 minutes in the period |
| durationBetween(#[Salon][Prise][Etat]#,0, Last Monday, Now) | Returns the duration in minutes during which the socket was off since last Monday. |
| statistics (catch, count, period) | Returns 8 : there were 8 escalations in the period |
| trend (plug, period 0.1) | Returns -1 : downward trend |
| stateDuration (taken) | Returns 600 : the plug has been in its current state for 600 seconds (10 minutes) |
| lastChangeStateDuration (taken, 0) | Returns 600 : the socket went out (change to 0) for the last time 600 seconds ago (10 minutes) |
| lastChangeStateDuration (take, 1) | Returns 4200 : the socket turned on (switch to 1) for the last time 4200 seconds ago (1h10) |
| lastStateDuration (taken, 0) | Returns 600 : the socket has been off for 600 seconds (10 minutes) |
| lastStateDuration (taken, 1) | Returns 3600 : the socket was last switched on for 3600 seconds (1h) |
| stateChanges (taken, period) | Returns 3 : the plug changed state 3 times during the period |
| stateChanges (take, 0, period) | Returns 2 : the socket has extinguished (going to 0) twice during the period |
| stateChanges (take, 1, period) | Returns 1 : the plug is lit (change to 1) once during the period |
| lastBetween(#[Salle de bain][Hydrometrie][Humidité]#,Yesterday, Today) | Returns the last temperature recorded yesterday. |
| variable (plop, 10) | Returns the value of the variable plop or 10 if it is empty or does not exist |
| scenario(#[Salle de bain][Lumière][Auto]#) | Returns 1 in progress, 0 if stopped and -1 if deactivated, -2 if the scenario does not exist and -3 if the state is not consistent |
| lastScenarioExecution(#[Salle de bain][Lumière][Auto]#) | Returns 300 if the scenario was started for the last time 5 min ago |
| collectDate(#[Salle de bain][Hydrometrie][Humidité]#) | Returns 2015-01-01 17:45:12 |
| valueDate(#[Salle de bain][Hydrometrie][Humidité]#) | Returns 2015-01-01 17:50:12 |
| eqEnable(#[Aucun][Basilique]#) | Returns -2 if the equipment is not found, 1 if the equipment is active and 0 if it is inactive |
| tag (montag, toto) | Returns the value of “montag” if it exists otherwise returns the value “toto” |
| name (eqLogic, #[Salle de bain][Hydrometrie][Humidité]#) | Returns Hydrometry |
Mathematical functions
A generic function toolbox can also be used to perform conversions or calculations :
-
rand(1,10) : Give a random number from 1 to 10.
-
randText (text1; text2; text…..) : Returns one of texts randomly (separate the texts by one; ). There's no limit in the number of text.
-
randomColor (min, max) : Gives a random color between 2 terminals (0 => red, 50 => green, 100 => blue).
-
trigger (command) : Used to find out the trigger for the scenario or to know if it is the order placed as a parameter that has triggered the scenario.
-
triggerValue (command) : Used to find out the value of scenario trigger.
-
round (value, [decimal]) : Round above, [decimal] number of decimal places after the decimal point.
-
odd (value) : Lets you know if a number is odd or not. Returns 1 if odd 0 otherwise.
-
median (command1, command2.commandeN) : Returns the median values.
-
time_op (time, value) : Allows you to perform operations on time, with time = time (ex : 1530) and value = value to add or to subtract in minutes.
-
time_between (time, start, end): Allows to test if a time is between two values withtime = time(ex : 1530),start = time,end = time. Start and end values can be straddling midnight. -
time_diff (date1, date1 [, format]): Used to find out the difference between 2 dates (the dates must be in the format YYYY / MM / DD HH:MM:SS). By default (if you don't put anything for format), the method returns the total number of days. You can ask it in seconds (s), minutes (m), hours (h). Example in secondstime_diff (2018-02-02 14:55:00,2018-02-25 14:55:00,s)` -
formatTime (time): Formats the return of a chain#time#. -
floor (time / 60) : Converts from seconds to minutes, or minutes to hours (floor (time / 3600) for seconds in hours)
And practical examples :
| Example of function | Returned result |
|---|---|
| randText (it does #[salon][oeil][température]#; The temperature is #[salon][oeil][température]#; Currently we have #[salon][oeil][température]#) | the function will return one of these texts randomly at each execution. |
| randomColor(40,60) | Returns a random color close to green. |
| trigger(#[Salle de bain][Hydrometrie][Humidité]#) | 1 if that’s good #[Salle de bain][Hydrometrie][Humidité]# who started the scenario otherwise 0 |
| triggerValue(#[Salle de bain][Hydrometrie][Humidité]#) | 80 if the hydrometry of #[Salle de bain][Hydrometrie][Humidité]# is 80%. |
| round(#[Salle de bain][Hydrometrie][Humidité]# / 10) | Returns 9 if the humidity percentage and 85 |
| odd(3) | Returns 1 |
| median(15,25,20) | Returns 20 |
| time_op(#time#, -90) | if it is 4:50 p.m., return : 1 650 - 1 130 = 1520 |
| formatTime(1650) | Returns 4:50 p.m |
| floor(130/60) | Returns 2 (minutes if 130s, or hours if 130m) |
Specific orders
In addition to home automation commands, you have access to the following actions :
-
Pause (sleep) : Pause of x second (s).
-
Variable (variable) : Creation / modification of a variable or value of a variable.
-
Remove variable (delete_variable) : Allows you to delete a variable
-
Scenario (scenario) : Allows you to control scenarios. The tags part allows to send tags to the scenario, ex : montag = 2 (be careful there only use letters from a to z. No capital letters, no accents and no special characters). We get the tag in the target scenario with the tag function (montag). The command “Reset to SI” allows to reset the status of “SI” (this status is used for the non-repetition of the actions of an “SI” if you pass for the 2nd consecutive time in it)
-
STOP (stop) : Stop the scenario.
-
Wait (wait) : Wait until the condition is valid (maximum 2h), the timeout is in seconds (s).
-
Go to design (gotodesign) : Change the design displayed on all browsers by requested design.
-
Add a log (log) : Allows you to add a message to the logs.
-
Create message (message) : Add a message in the center of messages.
-
Activate / Deactivate Hide / display equipment (equipement) : Allows modify the properties of a device visible / invisible, active / inactive.
-
To make a request (ask) : Allows you to tell Jeedom to ask a question to the user. The answer is stored in a variable, then just test its value. For the time being, only sms and slack plugins are compatible. Be careful, this function is blocking. As long as there is no response or the timeout is not reached, the scenario waits.
-
Stop Jeedom (jeedom_poweroff) : Ask Jeedom to shut down.
-
Restart Jeedom (jeedom_reboot) : Ask Jeedom to restart.
-
Return a text / data (scenario_return) : Returns a text or a value for an interaction for example.
-
Icon (icon) : Allows to change the icon of representation of the scenario.
-
Alert (alert) : Allows you to display a small alert message on all browsers that have a Jeedom page open. You can more, choose 4 alert levels.
-
Pop-up (popup) : Allows to display a pop-up which must absolutely be validated on all browsers that have a jeedom page open.
-
Report (report) : Export a view in format (PDF, PNG, JPEG or SVG) and send it through a message type command. Please note, if your Internet access is in unsigned HTTPS, this functionality will not work. Signed HTTP or HTTPS is required.
-
Delete programmed IN / A block (remove_inat) : Allows you to delete the programming of all blocks IN and A of the scenario.
-
Event (event) : Allows you to push a value in an information type command arbitrarily
-
Tag (tag) : Allows you to add / modify a tag (the tag only exists during the current execution of the scenario unlike the variables that survive the end of the scenario)
Scenario template
This functionality allows you to transform a scenario into a template for for example apply it on another Jeedom or share it on the Market. It is also from there that you can recover a scenario from the Market.

You will then see this window :
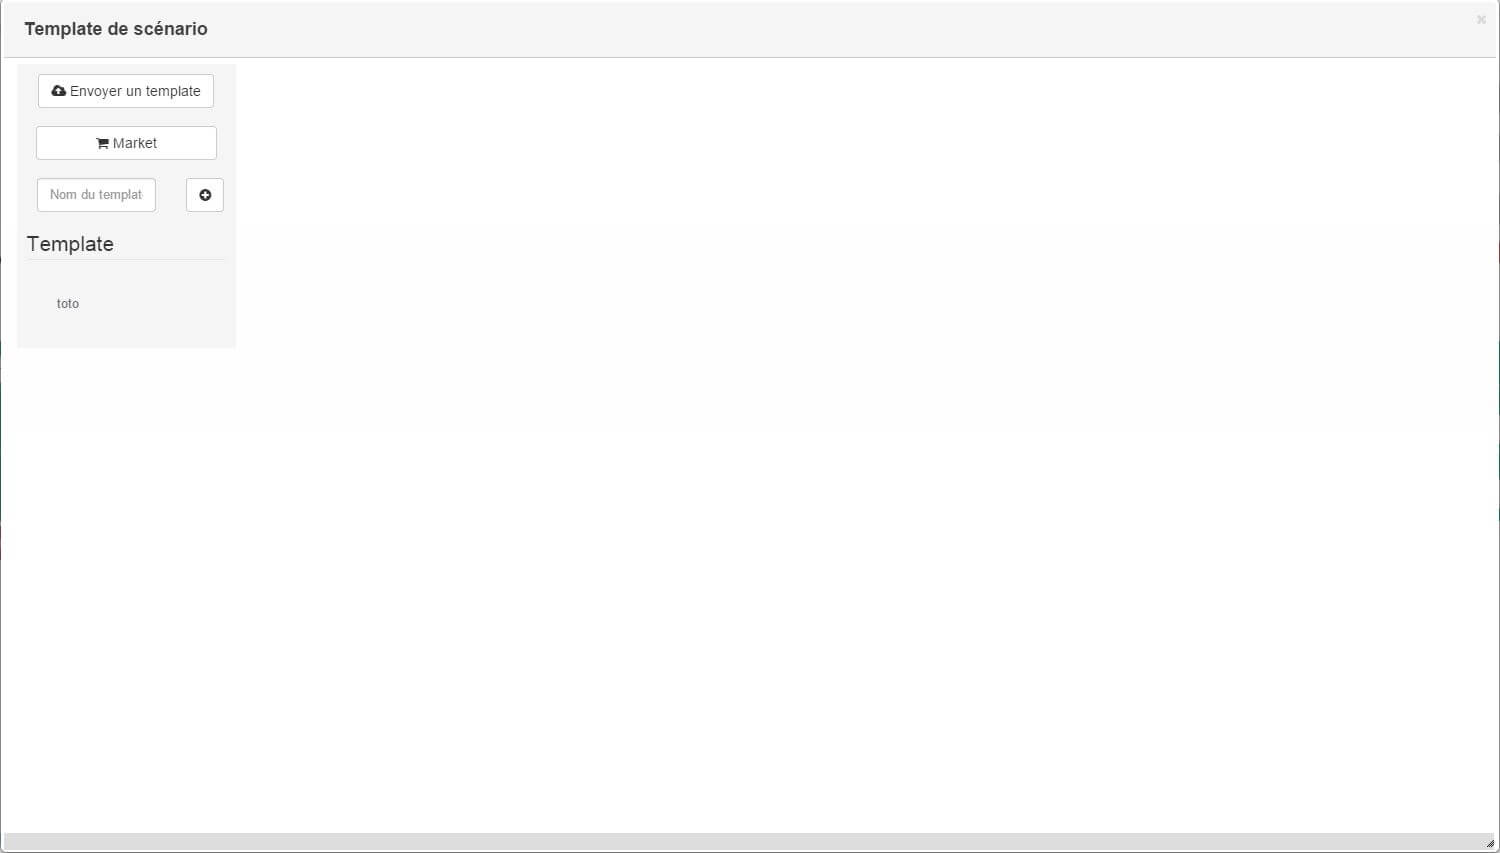
From there, you have the possibility :
-
Send a template to Jeedom (JSON file beforehand recovered),
-
Consult the list of scenarios available on the Market,
-
Create a template from the current scenario (don't forget to give a name),
-
To consult the templates currently present on your Jeedom.
By clicking on a template, you get :
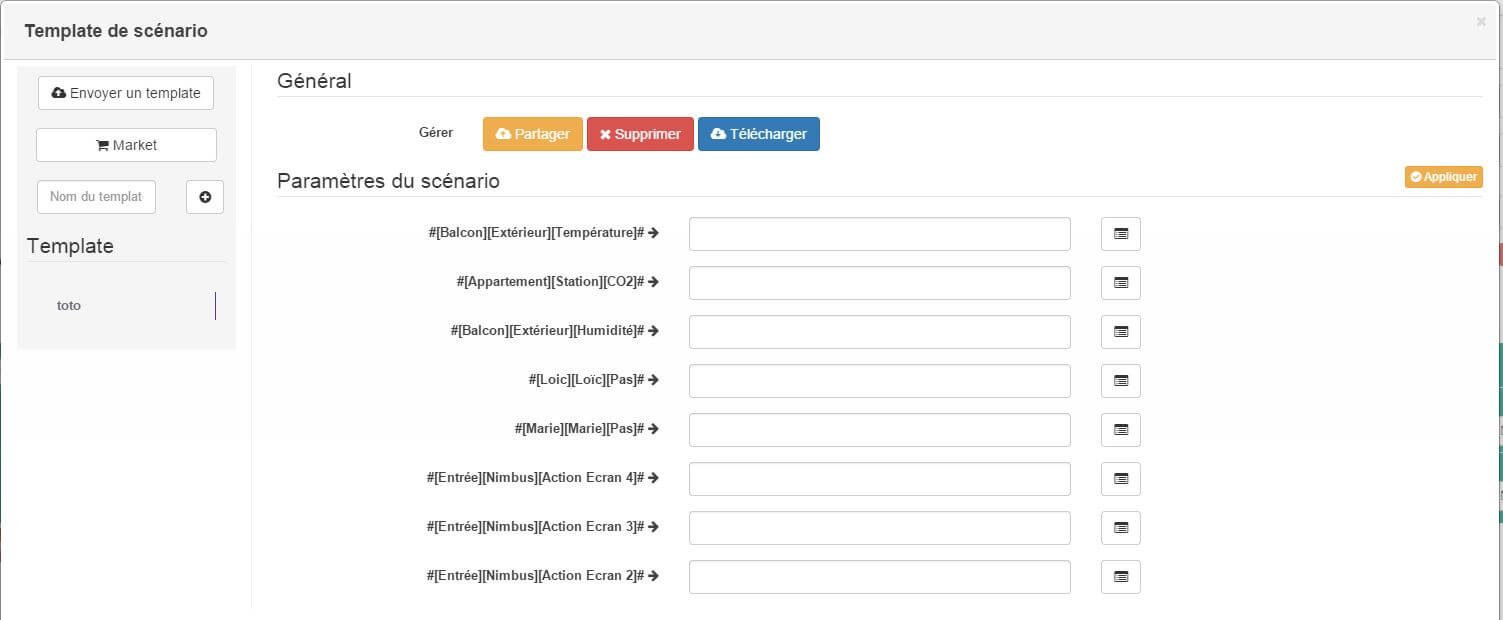
At the top you can :
-
Share : share the template on the Market,
-
Remove : delete template,
-
Download : recover the template as a JSON file to send it back to another Jeedom for example.
Below, you have the part to apply your template to current scenario.
Since from one Jeedom to another or from one installation to another, the orders may be different, Jeedom ask you the correspondence of orders between those present during creation of the template and those present at home. You just need to fill in the match orders then apply.
Addition of php function
IMPORTANT
Adding PHP function is reserved for advanced users. The slightest error can crash your Jeedom
Set up
Go to the Jeedom configuration, then OS / DB and launch the file editor.
Go to the data folder then php and click on the user.function.class.php file.
It is in this class that you must add your functions, you will find there an example of basic function.
IMPORTANT
If you have a problem you can always go back to the original file and copy the contents of user.function.class.sample.php in user.function.class.php